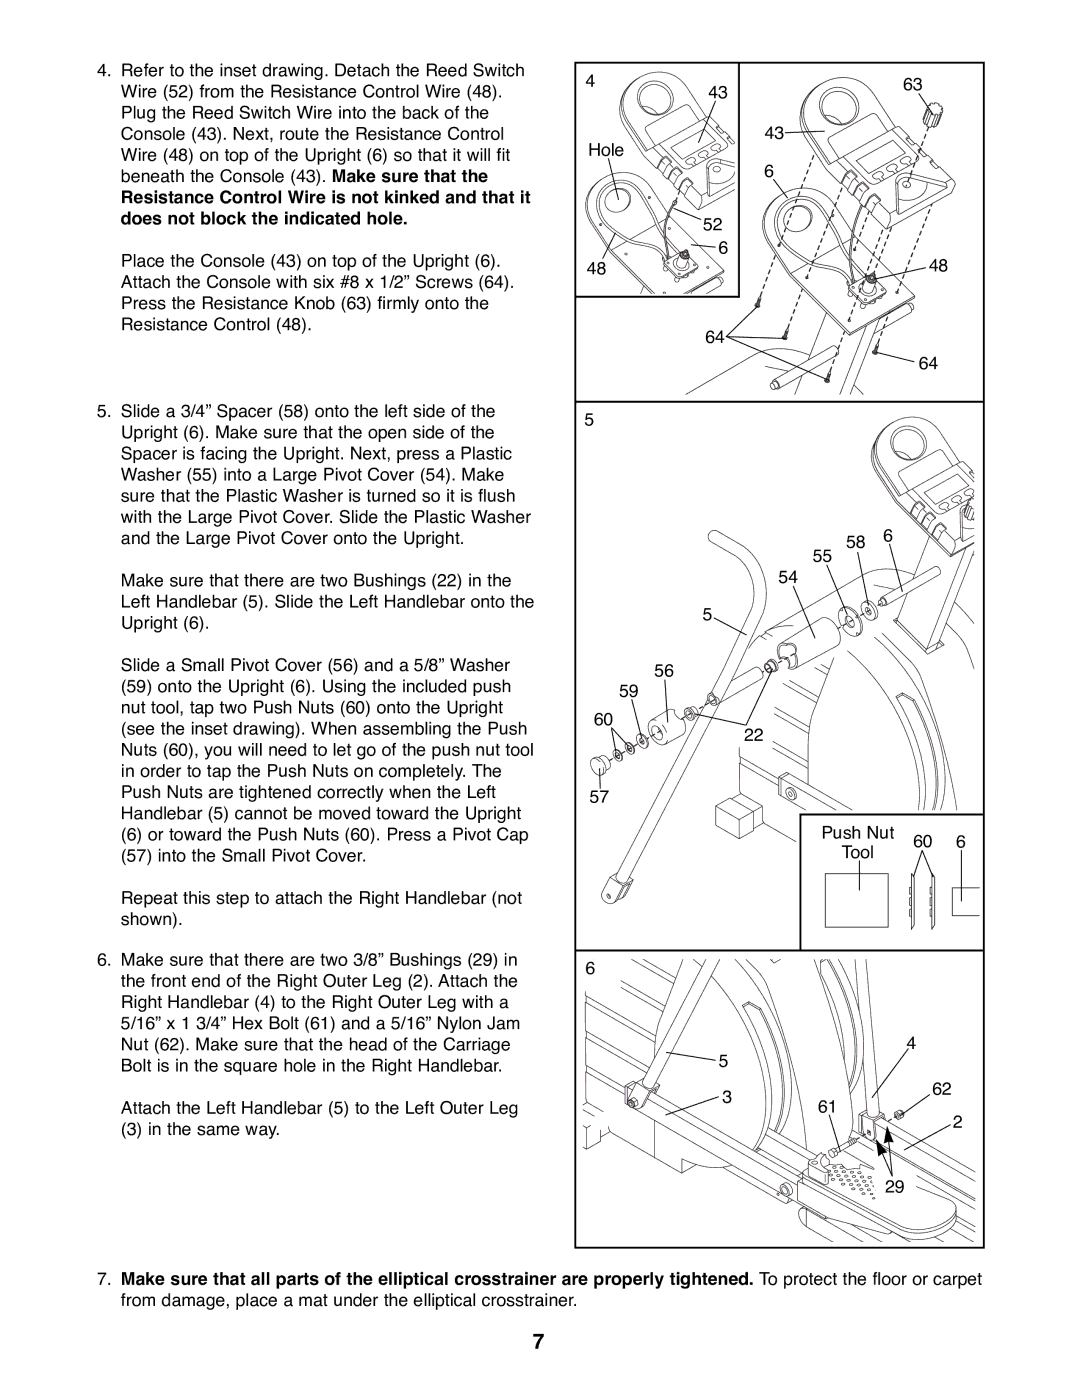
4.Refer to the inset drawing. Detach the Reed Switch Wire (52) from the Resistance Control Wire (48). Plug the Reed Switch Wire into the back of the Console (43). Next, route the Resistance Control Wire (48) on top of the Upright (6) so that it will fit beneath the Console (43). Make sure that the
Resistance Control Wire is not kinked and that it does not block the indicated hole.
Place the Console (43) on top of the Upright (6). Attach the Console with six #8 x 1/2Ó Screws (64). Press the Resistance Knob (63) firmly onto the Resistance Control (48).
5.Slide a 3/4Ó Spacer (58) onto the left side of the Upright (6). Make sure that the open side of the Spacer is facing the Upright. Next, press a Plastic Washer (55) into a Large Pivot Cover (54). Make sure that the Plastic Washer is turned so it is flush with the Large Pivot Cover. Slide the Plastic Washer and the Large Pivot Cover onto the Upright.
Make sure that there are two Bushings (22) in the Left Handlebar (5). Slide the Left Handlebar onto the Upright (6).
Slide a Small Pivot Cover (56) and a 5/8Ó Washer
(59)onto the Upright (6). Using the included push nut tool, tap two Push Nuts (60) onto the Upright (see the inset drawing). When assembling the Push Nuts (60), you will need to let go of the push nut tool in order to tap the Push Nuts on completely. The Push Nuts are tightened correctly when the Left Handlebar (5) cannot be moved toward the Upright
(6)or toward the Push Nuts (60). Press a Pivot Cap
(57)into the Small Pivot Cover.
Repeat this step to attach the Right Handlebar (not shown).
6.Make sure that there are two 3/8Ó Bushings (29) in the front end of the Right Outer Leg (2). Attach the Right Handlebar (4) to the Right Outer Leg with a 5/16Ó x 1 3/4Ó Hex Bolt (61) and a 5/16Ó Nylon Jam Nut (62). Make sure that the head of the Carriage Bolt is in the square hole in the Right Handlebar.
Attach the Left Handlebar (5) to the Left Outer Leg
(3)in the same way.
4 | 43 |
|
| 63 |
|
|
|
|
|
| |
Hole |
| 43 |
|
|
|
|
|
|
|
| |
|
| 6 |
|
|
|
| 52 |
|
|
|
|
| 6 |
|
| 48 |
|
48 |
|
|
|
| |
| 64 |
|
|
|
|
|
|
|
| 64 |
|
5 |
|
|
|
|
|
|
| 58 | 6 |
|
|
|
| 55 |
|
|
|
|
| 54 |
|
|
|
| 5 |
|
|
|
|
59 | 56 |
|
|
|
|
|
|
|
|
| |
60 |
| 22 |
|
|
|
|
|
|
|
| |
57 |
|
|
|
|
|
|
| Push Nut | 60 | 6 | |
|
| Tool |
|
|
|
6 |
|
|
|
|
|
| 5 |
|
| 4 |
|
|
|
|
|
| |
| 3 | 61 |
| 62 |
|
|
|
|
| ||
|
|
|
| 2 | |
|
|
|
|
| |
|
|
| 29 |
| |
7.Make sure that all parts of the elliptical crosstrainer are properly tightened. To protect the floor or carpet from damage, place a mat under the elliptical crosstrainer.
7