INSTALLATION

INSTALLING THE

OUTSIDE AIR KIT

Combustion air is fed to the firebox through a connection on the rear lower left side of the unit. A free flowing supply of air must be available to this opening at all times. Combustion air may be taken from inside the building if the local building code allows, but performance may suffer. Also, it must go through the 4 in. duct to the connection on the left hand side.

Air drawn from the interior of the building will affect the performance of gas or oil furnaces, and exhaust fans and fan driven appliances. This may cause a negative pressure in the house allowing smoke to back into the home. The preferred source of combustion air is from outside the building. If possible, install the kit on the wind loading side of the building not the leeward or (negative pressure) side.

Note: Do not obtain combustion air from attic, garage or other enclosed space.

1)Put the supplied insulated air duct to a nearby exterior wall. Maximum length of duct is 20 ft. (6.1m). Duct length should be kept to a minimum and as straight as possi- ble. Note: 5 ft. only is supplied with unit. If more than 5 ft. is used, increase the diam- eter of the duct. Termination should be in an area with good air flow.

WIRING THE WARMHEARTH

Field wire main power supply to fireplace for fan kit. (All electrical connections should only be performed by a licensed/certified electrician).

CAUTION: Label all wires prior to dis- connection when servicing controls. Wiring errors can cause improper and dangerous operation.

INSTALLING THE BLOWER SYSTEMS

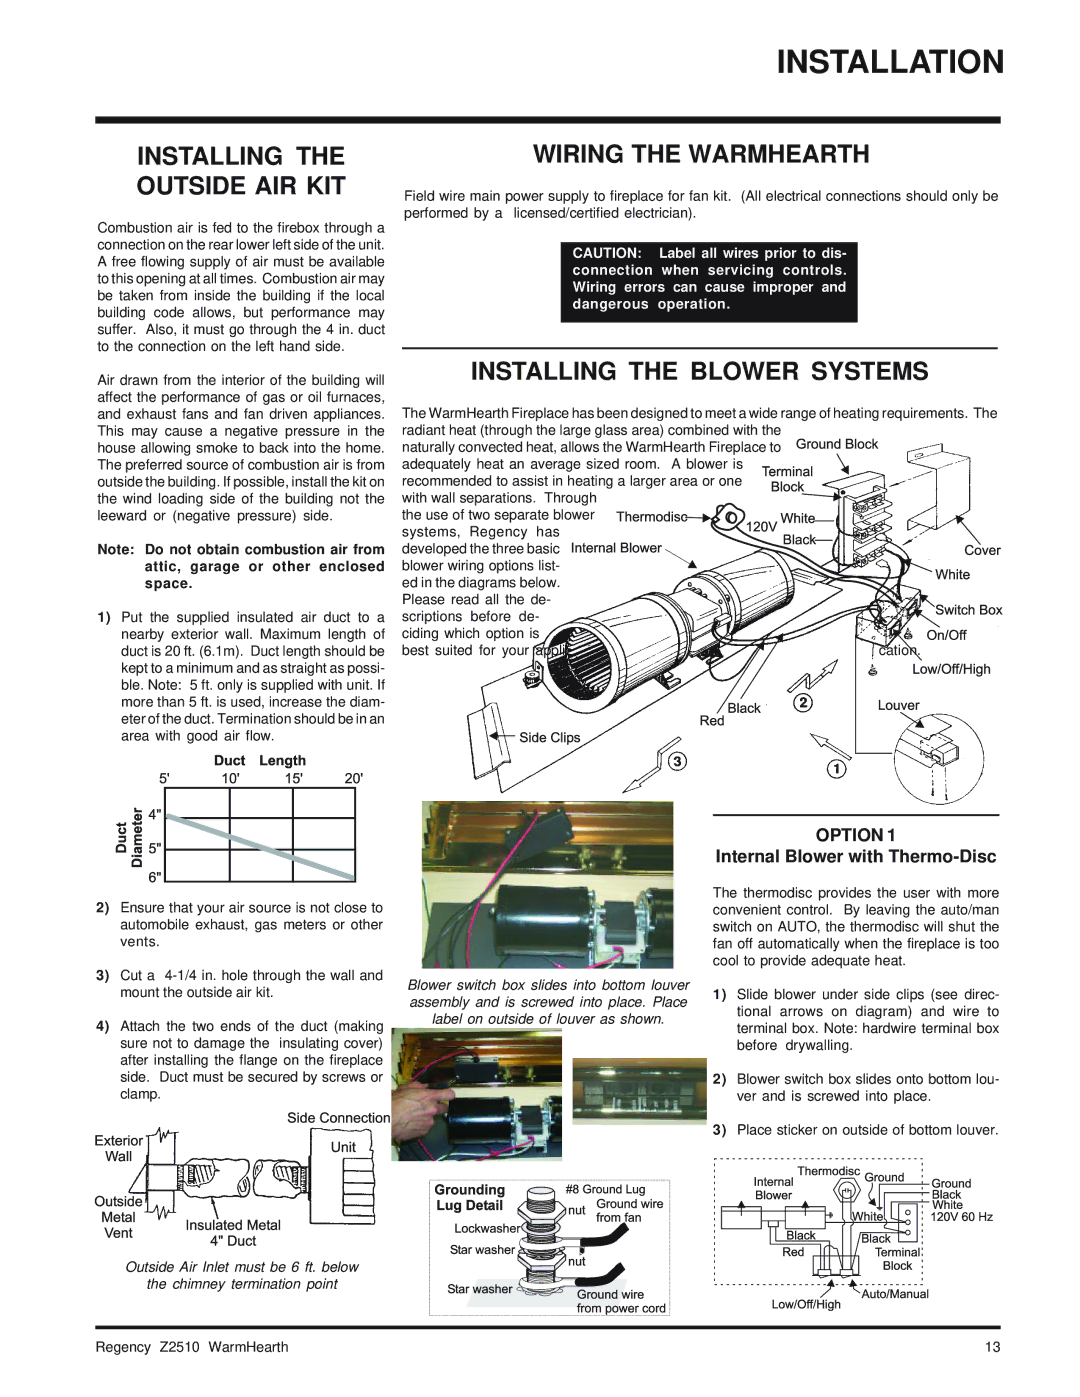
The WarmHearth Fireplace has been designed to meet a wide range of heating requirements. The

radiant heat (through the large glass area) combined with the


naturally convected heat, allows the WarmHearth Fireplace to


adequately heat an average sized room. A blower is


recommended to assist in heating a larger area or one


with wall separations. Through


the use of two separate blower


systems, Regency has


developed the three basic


blower wiring options list-


ed in the diagrams below.


Please read all the de-


scriptions before de-


ciding which option is


best suited for your appli-

cation.

2)Ensure that your air source is not close to automobile exhaust, gas meters or other vents.

3)Cut a 4-1/4 in. hole through the wall and mount the outside air kit.

4)Attach the two ends of the duct (making sure not to damage the insulating cover) after installing the flange on the fireplace side. Duct must be secured by screws or clamp.

Outside Air Inlet must be 6 ft. below

the chimney termination point

Blower switch box slides into bottom louver assembly and is screwed into place. Place label on outside of louver as shown.

OPTION 1

Internal Blower with Thermo-Disc

The thermodisc provides the user with more convenient control. By leaving the auto/man switch on AUTO, the thermodisc will shut the fan off automatically when the fireplace is too cool to provide adequate heat.

1)Slide blower under side clips (see direc- tional arrows on diagram) and wire to terminal box. Note: hardwire terminal box before drywalling.

2)Blower switch box slides onto bottom lou- ver and is screwed into place.

3)Place sticker on outside of bottom louver.

Regency Z2510 WarmHearth

13

Page 13
Image 13
Regency Wraps Z2510L installation manual Installing Outside AIR KIT, Wiring the Warmhearth, Installing the Blower Systems

Z2510L specifications

The Regency Wraps Z2510L is a standout product in the realm of kitchen essentials, designed with both functionality and aesthetics in mind. This versatile wrap features a range of characteristics that make it an ideal choice for culinary enthusiasts and professional chefs alike.

One of the main features of the Z2510L is its generous length, which measures 25 feet. This prolonged size allows users to wrap a variety of foods, from large cuts of meat to multiple servings of leftovers, without the hassle of using multiple pieces. The wrap's construction includes a durable, high-quality material that is not only strong and puncture-resistant but also maintains its elasticity when stored, ensuring longevity and reliability for repeated use.

In terms of technology, the Z2510L employs a unique non-stick surface that prevents food from sticking to the wrap, allowing for easy removal and presentation. This is particularly beneficial for delicate items such as pastries or roasted vegetables, ensuring that meals are served beautifully without compromising on taste or texture. Moreover, the wrap is microwave-safe, making it an excellent choice for reheating food without the risk of melting or chemical leaching, a common concern with lower-quality wraps.

Another characteristic that sets the Regency Wraps Z2510L apart is its ease of use. The roll is designed with a convenient dispenser that allows for controlled tearing, minimizing waste and maximizing efficiency in the kitchen. This thoughtful design feature is particularly advantageous in busy cooking environments where time is of the essence.

The Z2510L is also environmentally conscious, as it is made from materials that are biodegradable and free from harmful chemicals, appealing to eco-friendly consumers looking to reduce their environmental footprint.

In summary, the Regency Wraps Z2510L combines practicality, quality, and a commitment to sustainability, making it a must-have in any kitchen. Its standard features, user-friendly technology, and eco-conscious materials reflect a modern approach to food storage that meets the demands of today's consumers. Whether it's for wrapping, storing, or reheating, the Z2510L is engineered to uplift the culinary experience, ensuring that both home cooks and professional chefs have the best tools at their disposal.