room when the sensors on the source compo- nents are blocked by installation in a cabinet. See your authorized Rotel dealer for information on IR repeater systems.
NOTE: The EXT REM IN jack located to the right of these jacks is for use with an external IR sensor duplicating the
On-Screen Display and System Configuration
The
A more comprehensive
System
NOTE: On a PAL standard monitor, the OSD cannot be displayed until a video signal is present, irrespective of the type of video cables in use. For setup, connect the Com- posite video output from your DVD player and select its input on the
The
23
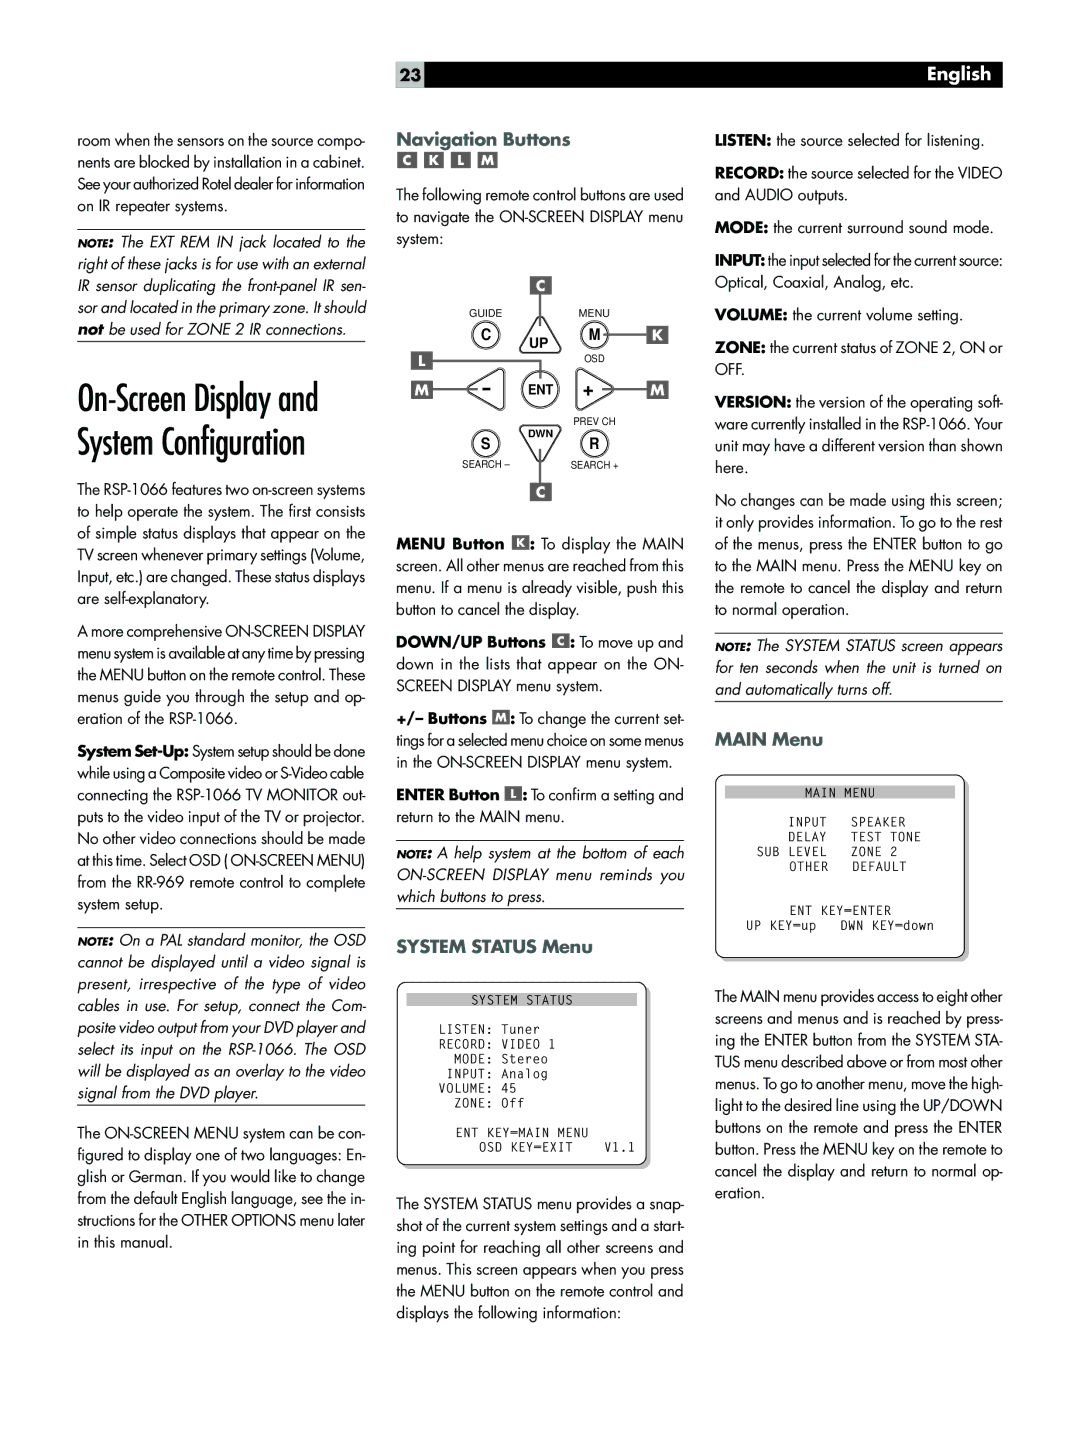
Navigation Buttons
The following remote control buttons are used to navigate the
C
GUIDE | MENU |
| C | UP | M | K |
|
|
|
| |
L |
|
| OSD |
|
M | - | ENT + | M | |
|
| DWN | PREV CH |
|
| S | R |
| |
|
|
| ||
| SEARCH – |
| SEARCH + |
|
C
MENU Button ![]() : To display the MAIN screen. All other menus are reached from this menu. If a menu is already visible, push this button to cancel the display.
: To display the MAIN screen. All other menus are reached from this menu. If a menu is already visible, push this button to cancel the display.
DOWN/UP Buttons  : To move up and
down in the lists that appear on the ON- SCREEN DISPLAY menu system.
+/– Buttons ![]() : To change the current set- tings for a selected menu choice on some menus in the
: To change the current set- tings for a selected menu choice on some menus in the
ENTER Button ![]() : To confirm a setting and return to the MAIN menu.
: To confirm a setting and return to the MAIN menu.
NOTE: A help system at the bottom of each
SYSTEM STATUS Menu
SYSTEM STATUS
LISTEN: | Tuner |
RECORD: | VIDEO 1 |
MODE: | Stereo |
INPUT: | Analog |
VOLUME: | 45 |
ZONE: Off |
|
ENT KEY=MAIN MENU |
|
OSD KEY=EXIT | V1.1 |
The SYSTEM STATUS menu provides a snap- shot of the current system settings and a start- ing point for reaching all other screens and menus. This screen appears when you press the MENU button on the remote control and displays the following information:
English
LISTEN: the source selected for listening.
RECORD: the source selected for the VIDEO and AUDIO outputs.
MODE: the current surround sound mode.
INPUT: the input selected for the current source: Optical, Coaxial, Analog, etc.
VOLUME: the current volume setting.
ZONE: the current status of ZONE 2, ON or OFF.
VERSION: the version of the operating soft- ware currently installed in the
No changes can be made using this screen; it only provides information. To go to the rest of the menus, press the ENTER button to go to the MAIN menu. Press the MENU key on the remote to cancel the display and return to normal operation.
NOTE: The SYSTEM STATUS screen appears for ten seconds when the unit is turned on and automatically turns off.
MAIN Menu
MAIN MENU
INPUT SPEAKER
DELAY TEST TONE
SUB LEVEL ZONE 2
OTHER DEFAULT
ENT KEY=ENTER
UP KEY=up DWN KEY=down
The MAIN menu provides access to eight other screens and menus and is reached by press- ing the ENTER button from the SYSTEM STA- TUS menu described above or from most other menus. To go to another menu, move the high- light to the desired line using the UP/DOWN buttons on the remote and press the ENTER button. Press the MENU key on the remote to cancel the display and return to normal op- eration.