ASSEMBLY

WARNING:

Make sure the spindle lock button is not engaged before reconnecting saw into power source. Never engage spindle lock button when blade is rotating.

MOUNTING THE LASER GUIDE

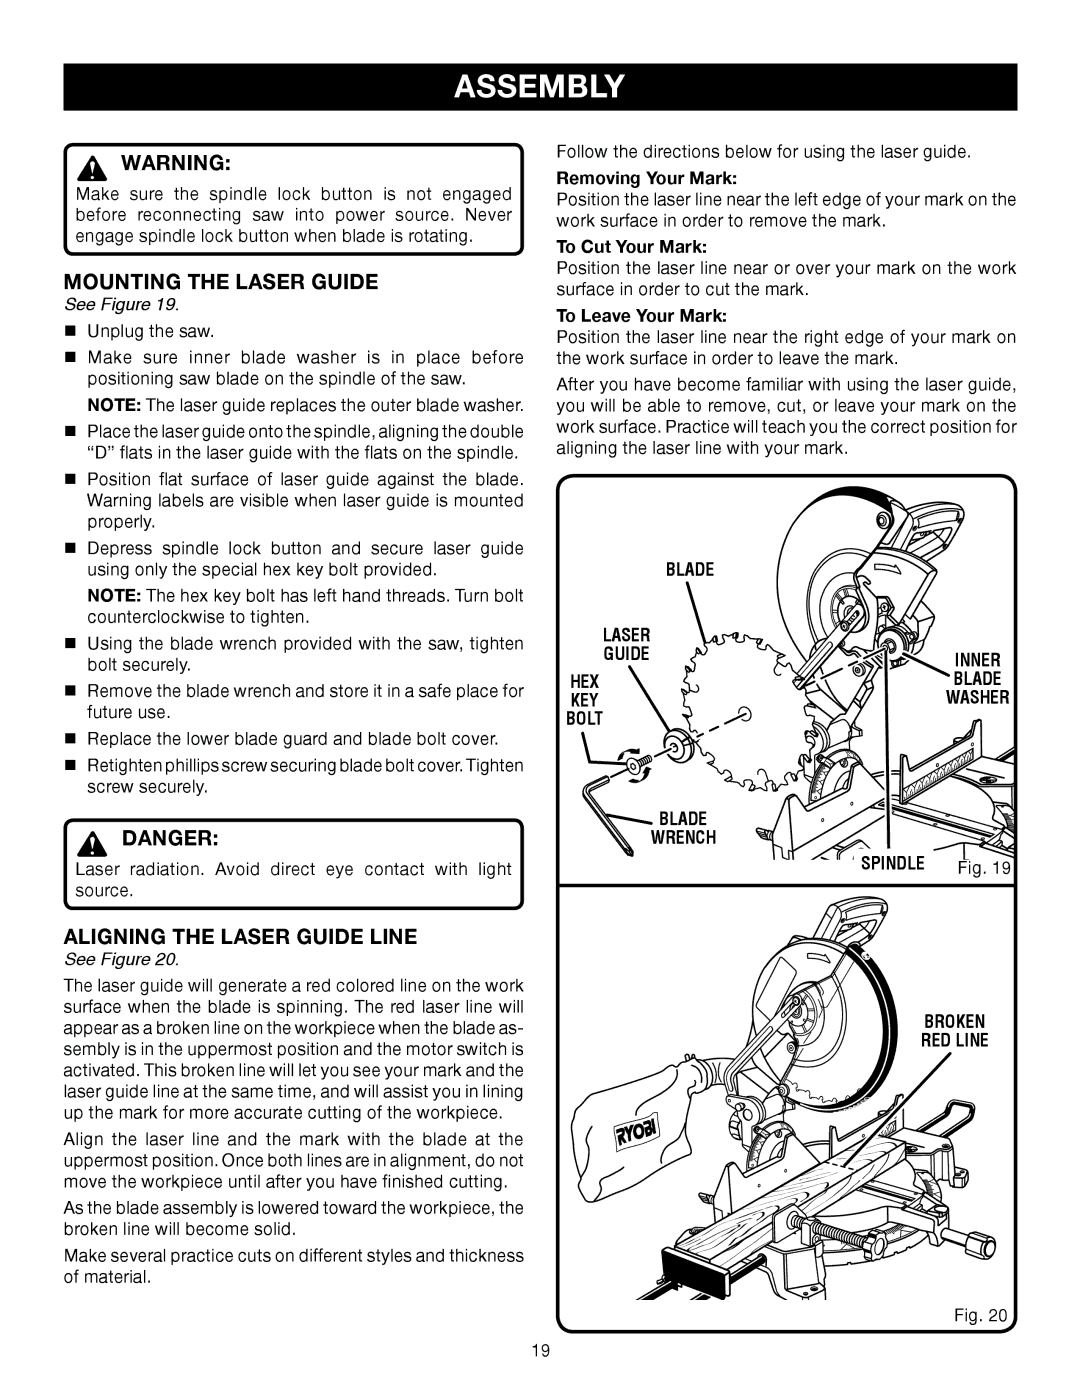
See Figure 19.

nUnplug the saw.

nMake sure inner blade washer is in place before positioning saw blade on the spindle of the saw. NOTE: The laser guide replaces the outer blade washer.

nPlace the laser guide onto the spindle, aligning the double “D” flats in the laser guide with the flats on the spindle.

nPosition flat surface of laser guide against the blade. Warning labels are visible when laser guide is mounted properly.

nDepress spindle lock button and secure laser guide using only the special hex key bolt provided.

NOTE: The hex key bolt has left hand threads. Turn bolt counterclockwise to tighten.

nUsing the blade wrench provided with the saw, tighten bolt securely.

nRemove the blade wrench and store it in a safe place for future use.

nReplace the lower blade guard and blade bolt cover.

nRetighten phillips screw securing blade bolt cover. Tighten screw securely.

DANGER:

Laser radiation. Avoid direct eye contact with light source.

ALIGNING THE LASER GUIDE LINE

See Figure 20.

The laser guide will generate a red colored line on the work surface when the blade is spinning. The red laser line will appear as a broken line on the workpiece when the blade as- sembly is in the uppermost position and the motor switch is activated. This broken line will let you see your mark and the laser guide line at the same time, and will assist you in lining up the mark for more accurate cutting of the workpiece.

Align the laser line and the mark with the blade at the uppermost position. Once both lines are in alignment, do not move the workpiece until after you have finished cutting.

As the blade assembly is lowered toward the workpiece, the broken line will become solid.

Make several practice cuts on different styles and thickness of material.

Follow the directions below for using the laser guide.

Removing Your Mark:

Position the laser line near the left edge of your mark on the work surface in order to remove the mark.

To Cut Your Mark:

Position the laser line near or over your mark on the work surface in order to cut the mark.

To Leave Your Mark:

Position the laser line near the right edge of your mark on the work surface in order to leave the mark.

After you have become familiar with using the laser guide, you will be able to remove, cut, or leave your mark on the work surface. Practice will teach you the correct position for aligning the laser line with your mark.


BLADE

LASER


GUIDE

INNER

HEX

BLADE

KEY

WASHER

BOLT


BLADE

WRENCH

SPINDLE

Fig. 19

BROKEN

RED LINE

Fig. 20

19

Page 19
Image 19
Ryobi TS1552DXL manual Mounting the Laser Guide, Aligning the Laser Guide Line, Blade Wrench Spindle Broken RED Line

TS1552DXL specifications

The Ryobi TS1552DXL is a highly regarded table saw designed to meet the needs of both DIY enthusiasts and professional carpenters. With a powerful 15-amp motor, this table saw is capable of handling a wide range of cutting tasks, from simple crosscuts to intricate bevel cuts with precision and ease.

One of the standout features of the TS1552DXL is its large 15-inch maximum rip capacity. This allows users to cut larger sheets of material, making it an ideal choice for those working with plywood or large boards. The saw’s adjustable cutting depths and an included miter gauge provide additional versatility, enabling users to make accurate crosscuts and angled cuts up to 60 degrees.

The Ryobi TS1552DXL is equipped with a foldable stand that enhances stability and portability. This convenient feature allows users to set up and store the saw easily, so it can be moved from one job site to another without hassle. The saw also incorporates a heavy-duty steel frame that not only ensures durability but also provides excellent support when working with larger materials.

Safety is a top priority with the Ryobi TS1552DXL. The saw comes with a blade guard that offers protection during operation while maintaining visibility of the cutting area. Additionally, the built-in push stick and safety switch further enhance user safety, making it a great choice for both seasoned professionals and those new to woodworking.

In terms of technology, the Ryobi TS1552DXL features a rack and pinion system for smooth adjustments. This system allows for quick and easy modifications to the blade height and angle, enabling users to achieve precise cuts consistently. The powerful motor, when combined with a high-quality carbide-tipped blade, delivers clean and efficient cuts, reducing the need for excessive sanding or finishing.

Overall, the Ryobi TS1552DXL boasts a range of features, reliable performance, and user-friendly technologies that make it a standout choice in the world of table saws. Whether you are working on small projects at home or tackling larger jobs on the worksite, this saw offers the reliability and precision needed to get the job done efficiently.