SyncMaster 460UTn-2, 460UT-2, 460UTn-B, 460UT-B
LCD Display
User Manual
Power
Safety Instructions
Notational
Warning / Caution
Installation
Clean
Others
Set a resolution and frequency appropriate to the product
Safety Instructions
When using headphones or earphones, do not turn the volume too high
Otherwise, this may result in electric shock or fire
When replacing the battery, insert it with the right polarity +
Safety Instructions
To avoid eyestrain, do not sit too close to the product
This reduces eye fatigue
Keep the small accessories in a location out of the reach of children
Safety Instructions
This may reduce the lifetime of the product, and may result in fire
Otherwise, this may result in electric shock or fire
Package Contents Checking the Contents of the Package
Introduction
Unpacking
Cables
Manuals
Others
Sold separately
POWER button
Your LCD Display Front
Sold separately
SOURCE button
POWER S/W ON / OFF
Rear
POWER
IR OUT/IN
RGB/COMPONENT IN PC/COMPO- NENT Connection Terminal Input
AV/COMPONENT AUDIO IN L-AUDIO R
Go to Multi Control and select RS232C MDC as the MDC Connection
Go to Multi Control and select RJ45 MDC as the MDC Connection
RJ 45 MDC MDC PORT
RS232C OUT/IN RS232C Serial PORT
To lock the product, follow these steps
USB USB Connection Terminal
Kensington Lock slot
Remote Control
DUAL
Mechanical Layout Mechanical Layout
Dimensions
Installation VESA Bracket
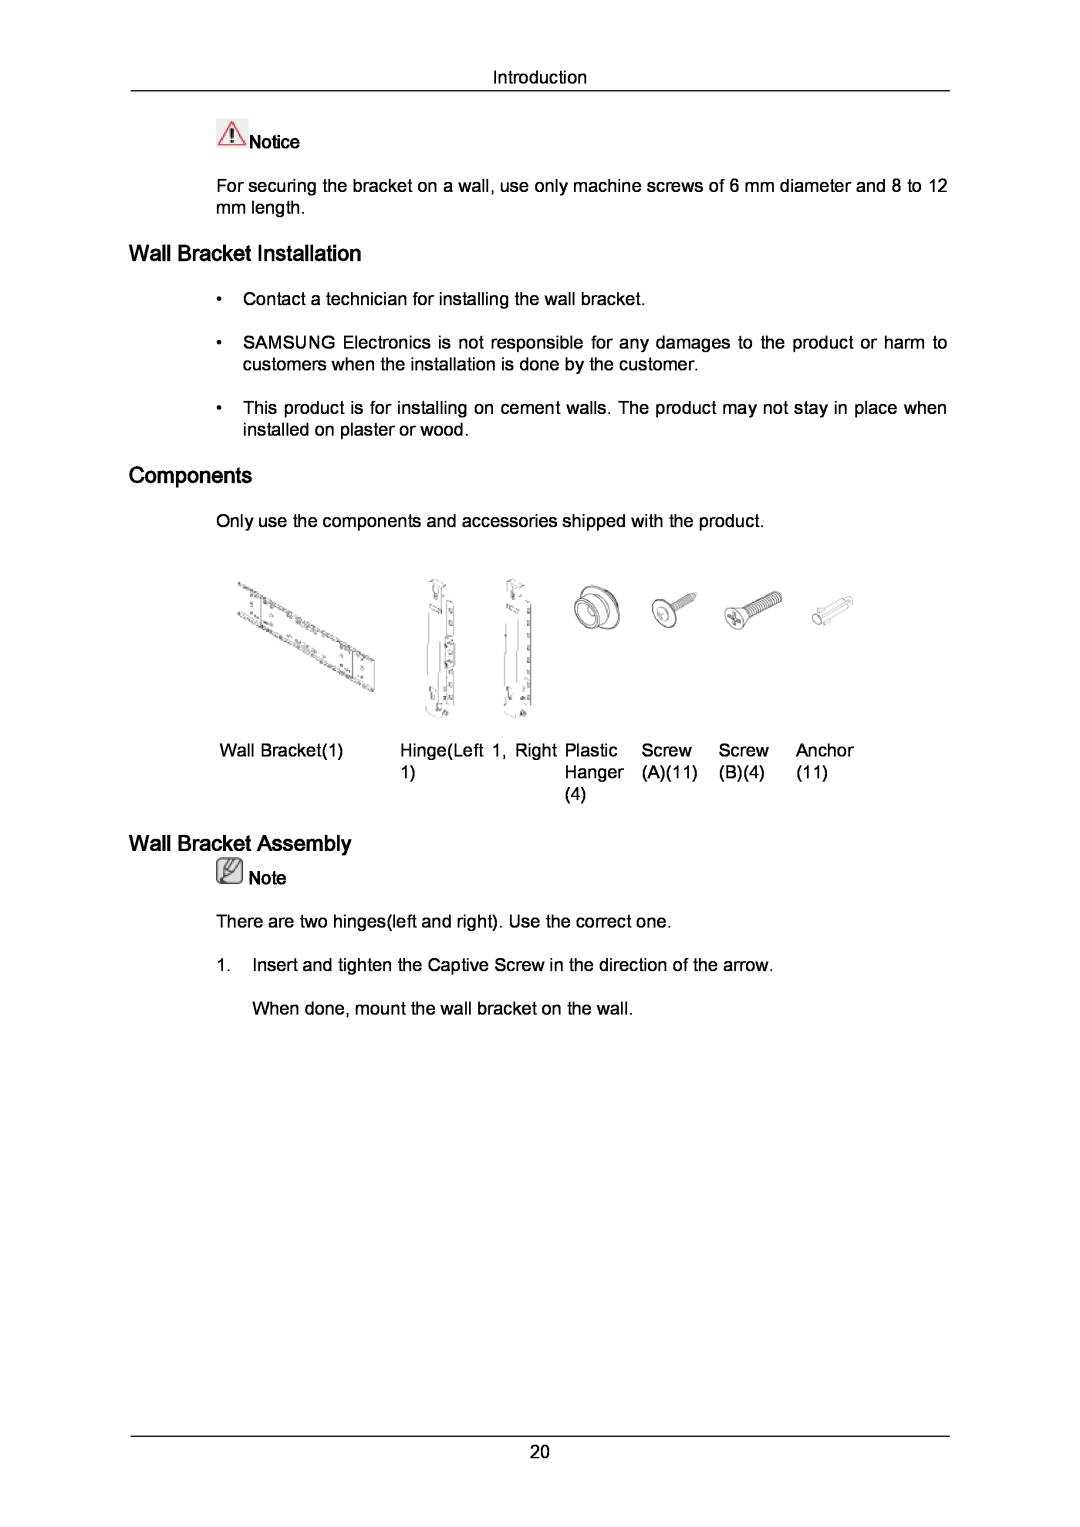
Wall Bracket Installation
Wall Bracket Assembly
Components
Captive Screw
Introduction There are two hingesleft and right. Use the correct one
Wall Bracket
Hinge Left
To mount the product on the wall bracket
Wall Bracket Angle Adjustment
Introduction
Connections
Connecting a Computer
Connecting an External Monitor
Connecting to Other devices
Connecting AV Devices
Connecting to a Camcorder
Connecting Using a DVI to HDMI Cable
Connecting Using a HDMI Cable
Connecting a DVD Player
Connecting to an Audio System
Connecting a DTV Set Top Cable/Satellite Box
Connecting a USB devices
Connecting a LAN Cable
Connections
Applicable to the 460UTn-2, 460UTn-B model only
Installing the Monitor Driver Automatic
Using the Software
Monitor Driver
Internet web site
Installing the Monitor Driver Manual
Using the Software
6. Click Update Driver... in the Driver tab
The certified driver will be posted on Samsung Monitor homepage
Microsoft Windows XP Operating System
Using the Software
3. Click Display icon and choose the Settings tab then click Advanced
Using the Software 1. Insert CD into the CD-ROM drive
Using the Software
The certified driver will be posted on Samsung Monitor homepage
9. Click the Close button, then click the OK button continually
1. Click Start, Setting, Control Panel
Using the Software
3. Select the Settings tab and click Advanced Properties button
1. Click Start, Setting, Control Panel
2. The third screen is for setting your mouse
Using the Software 4. Select the Monitor tab
6. The next screen is for setting your monitor
5. Click the Change button in the Monitor Type area
MDCMultiple Display Control Installation
Uninstall
Installation Problems
Main Screen
Introduction
Add a Device
System
1 Power On/Off Turns the power of the selected display On/Off
Input Source
Network
1 PC Changes the Input Source of the selected display to PC 2 BNC
PC Mode
Changes the Input Source of the selected display to BNC 3 DVI
Changes the Input Source of the selected display to DVI 4 TV
Image Size PC, BNC, DVI, DP
Time
Image Size TV, AV, S-Video, Component, DVIHDCP, HDMI1, HDMI2, DTV
Time Setting up Timer and Holiday Management
PIP PIP Size
PIP Size can be controlled with turning on the LCD Display power
PIP PIP Source
The Input source of TV works only on TV model
The Input source of MagicInfo works only on MagicInfo model
Setting Picture
Color Temp is only enabled if the Color Tone is set to Off
Setting Picture PC
Brightness Sensor may not be supported depending on the product
The Input source of MagicInfo works only on MagicInfo model
Color Temp is only enabled if the Color Tone is set to Off
Setting Audio
Brightness Sensor may not be supported depending on the product
The Input source of MagicInfo works only on MagicInfo model
Setting Image Lock
Maintenance Lamp Control
Maintenance Scroll
Maintenance Video Wall
1 Video Wall
2 Video Wall Control Video Wall properties can be configured
1 On / Off
Turns on/off the Video Wall function of the selected display 2 Format
Settings Value Display In Multiple Display Mode
Troubleshooting
Page
Input Available Modes
Adjusting the LCD Display
Source List
PC / DVI / DP AV Component HDMI MagicInfo
Source
Off On
PC DVI / AV / HDMI1 / DisplayPort DVI PC AV PC HDMI PC
Position
Size
Transparency
Edit Name
Mode
Picture PC / DVI / DP / MagicInfo Mode Available Modes
Custom
1. Information 2. Advertisement 3. Custom
Color Tone
Natural Mode Mode Mode
1. Contrast
2. Brightness
Color Temp
Color Control
Image Lock
1. Off 2. Cool 3. Normal 4. Warm 5. Custom
Signal Balance
Auto Adjustment
Coarse
Fine
1. R-Gain 2. G-Gain 3. B-Gain 4. R-Offset 5. G-Offset 6. B-Offset
Signal Control
Signal Balance
Size
PIP Picture
HDMI Black Level
1. Normal 2. Low
4. Color
Dynamic Contrast
Picture Reset
Lamp Control
5. Tint
Contrast
Picture AV / HDMI / Component Mode Available Modes
Dynamic, Standard, Movie, or Custom can be activated
1. Dynamic 2. Standard 3. Movie 4. Custom
Sharpness
Brightness
Color
Tint
Digital NR Digital Noise Reduction
Color Temp
Size
HDMI Black Level
Film Mode
1. Off 2. On
1. Normal 2. Low
Dynamic Contrast
PIP Picture
Lamp Control
1. Contrast
1. Standard
Sound Available Modes
2. Music
3. Movie
Bass
Auto Volume
Treble
Balance
Setup Available Modes
Sound Reset
Sound Select
1. Main 2. Sub
Language
Sleep Timer
Time
Clock Set
Timer1 / Timer2 / Timer3
Holiday Management
Delete Selected
Menu Transparency
Safety Lock Change PIN
Delete All
1. High 2. Medium 3. Low 4. Opaque
Energy Saving
Lock On
Video Wall
Video Wall
Horizontal
Format
Vertical
Full
Screen Position
Safety Screen
Pixel Shift Pixel Shift
Off On
Horizontal
Timer Timer
Vertical
Time
Period
Mode - Bar, Eraser, Pixel 10~50 sec
Bar Eraser Pixel
Mode
Eraser
Resolution Select
Pixel
Side Gray
OSD Rotation
Power On Adjustment
1. Off 2. 1024 X 3. 1280 X 4. 1360 x 5. 1366 X
1. Landscape 2. Portrait
Fan & Temperature
Advanced Settings
Fan Speed Setting
Temperature Control
Auto Power
Current Temperature
Button Lock
Off On
User Auto Color
2. Reset
Standby Control
1. Auto Color
No Signal OSD
Not Optimum Mode OSD
Lamp Schedule
OSD Display
Setup Reset
Software Upgrade
Reset All
MDC OSD
Network Setting IP Setting Manual, Auto
ID Setup
Multi Control
MagicInfo Available Modes
For an 460UT-2, 460UT-B model
MagicInfo
Adjusting the LCD Display
2. Select TCP/IP - step
3. Select Language - step
Adjusting the LCD Display
Shows the settings that have been selected by the user
Adjusting the LCD Display
Self-Test Feature Check
Troubleshooting
Maintenance and Cleaning
Warning Messages
Symptoms and Recommended Actions
Problems related to the Installation PC Mode
Check List
Problems related to the Screen
Q Check Signal Cable message
Q Not Optimum Mode message
Problems related to the Remote Control
Problems related to Audio
Q & A
Troubleshooting
Resolution
Specifications
Input Signal, Terminated
Power Supply
Environmental considerations
VESA Mounting Interface
Plug and Play Capability
Dot Acceptable
Preset Timing Modes
PowerSaver
PowerSaver
Class A Information Communication equipment for industrial use 460UTn-2, 460UTn
Specifications
Information
For a Better Display
PRODUCT INFORMATION Image Retention Free
Information
Apply the Screen Pixel function on Product
Change the characters color periodically
Information
Symptom 2 Vertical blocks move while erasing the display
Apply the Screen Erasing function on Product
Apply the Screen Erasing function
Contact SAMSUNG WORLDWIDE
Appendix
North America
Latin America
Europe
Terms
Asia Pacific
Middle East & Africa
shows the accuracy of the display. A high resolution is good
Correct Disposal
The number of horizontal and vertical dots used to compose
for performing multiple tasks as more image information can
Correct disposal of batteries in this product - Europe only
Authority