Safety Instructions
SyncMaster 700DXn / 820DXn
Using the Software
Adjusting the LCD Display
Safety Instructions
Safety Instructions
Notational Power Installation Clean Others
Introduction Connections Using the Software Adjusting the LCD Display
Use only a properly grounded plug and receptacle
Installation
Do not drop the LCD Display when moving it
Put down the LCD Display carefully
Clean
Others
Make sure to unplug the power cord before cleaning the product
Do not cover the vents on the LCD Display cabinet
Make sure there are more than two people when moving the product
z A falling product may cause injury to the person or even fatality
1995~2007 SAMSUNG. ALL Rights Reserved
Safety Instructions Introduction
Introduction
Package Contents Your LCD Display Mechanical Layout
Connections Using the Software Adjusting the LCD Display
3 Adjust buttons Left-Right buttons/ Volume buttons
Remote ControlNot available in all
Batteries AAA X
BNC to RCA
9 Power indicator
7 Power button
10 Remote Control Sensor
1 POWER IN
3 RS232C OUT/IN RS232C Serial PORT
2 REMOTE OUT/IN
5 DVI / PC / HDMI IN HDMI
6 DVI / PC / HDMI IN RGB PC Video Connection Terminal
Remote Control
1 ON / OFF
2 MAGICNET
4 LOCK
3 MDC
5 MagicNet buttons
6 +100
22 FM RADIO
21 STILL
23 P.SIZE
24 SRS
SyncMaster 700DXn
1. Mechanical Layout
2. Monitor Head
Dimensions
3. Installation VESA Bracket
4. Wall Bracket Installation
Wall Bracket Assembly
Components
There are two hingesleft and right. Use the correct one
When done, mount the wall bracket on the wall A. Captive Screw
Insert and tighten the Captive Screw in the direction of the arrow
B. Wall Bracket C. Hinge Left D. Hinge Right
To mount the product on the wall bracket
Wall Bracket Angle Adjustment
SyncMaster 820DXn
Dimensions
3. Installation VESA Bracket
4. Wall Bracket Installation
Wall Bracket Assembly
Components
There are two hingesleft and right. Use the correct one
When done, mount the wall bracket on the wall A. Captive Screw
Insert and tighten the Captive Screw in the direction of the arrow
B. Wall Bracket C. Hinge Left D. Hinge Right
To mount the product on the wall bracket
Wall Bracket Angle Adjustment
Safety Instructions Introduction Connections
Connections
Installing the Stand KIT Connecting the LCD Display
Using the Software Adjusting the LCD Display Troubleshooting
Connecting a Computer
Using a Power cord with Earth
Connecting a DVD Player
Connecting a VCR
Connecting a Camcorder
Connecting to an Audio System
Connecting a DTV Set Top Box
Connecting to a Wired Remote Control
Connecting HDMI
Connecting Using a DVI to HDMI Cable
Connecting a USB device
Connecting a LAN Cable
Safety Instructions Introduction Connections Using the Software
Using the Software
Installation MagicNet MDC MagicNet
Adjusting the LCD Display Troubleshooting Specifications Information
8. The Installation Status window appears
6. Choose a folder to install the MagicNet program 7. Click Install
RAM Ethernet
System Requirements
Library
What is MagicNet?
Option
Major Functions of MagicNet
to recover the operating system image for a monitor
and diagnose it 8. Update and PXE
schedules 5. Instants message
6. MDC and System
Using MagicNet
Connecting a Monitor to a Server
Running MagicNet
Server Name item
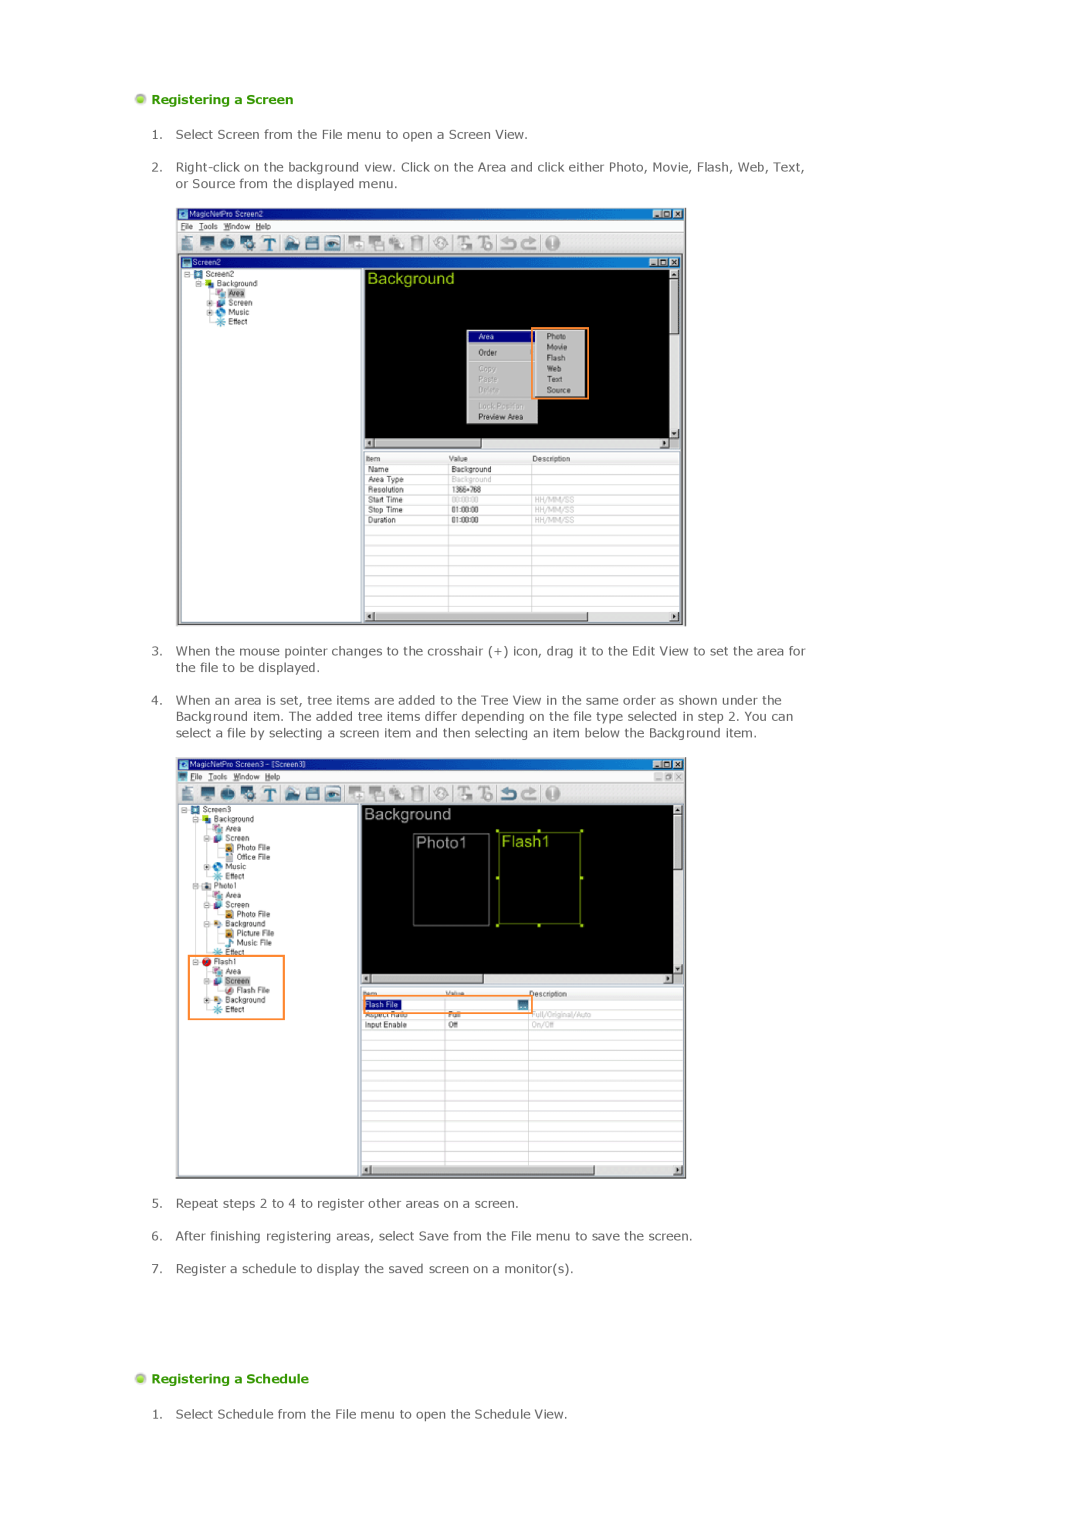
File Sub-Menus Registering a Library
Registering a Schedule
Registering a Screen
Sending a Message
Page
Library
Change Password
Library
File Menu
Option
Synchronize
Library
Tree View
Exploring Normal Files
Exploring Libraries
Exploring Screen Files
List View
Exploring Content Servers
z If you drag and drop library files into a library folder in the tree view or list view, they are moved to that folder if the content types of both the library files and the library folder are the same. However, the drag & drop function is not supported for folders
Exploring Screen
Page
Resolution The resolution of the selected screen
Location The location where the selected screen is registered
Date Modified The date when the selected screen was last modified
Name The name of the selected screen
Exploring the Content Server
Output View
Screen
Screen
Tool Menu
Screen
Background
Screen
z Download Downloads the file to the monitor and plays it
Volume Controls the volume of the background music
z Stream Streams the file to the monitor
Music Sound Turns the background sound on or off
Photo
Page
Background
Volume Controls the volume for the background music in the Photo area
Type Sets the background type Color, Picture File for the Photo area
Sound Turns the background sound for the Photo area on or off
Movie
Area Name Changes the area name
z Original The movie file is displayed at the original size
Movie File Selects the movie file to be played in the Movie area
Mute Mutes the sound of the movie file to be played in the Movie area
Type Sets the background type Color, Picture File for the Movie area
File Only one picture file can be selected in the Movie area
Volume Controls the volume of background music in the Movie area
Sound Turns the background sound for the Movie area on or off
Music File Selects a music file for the background in the Movie area
Flash
Name Changes the area name
Type Sets the background type Color, Picture File for the Flash area
Volume Controls the volume of the background music in the Flash area
Sound Turns the background sound for the Flash area on or off
Music File Selects a music file for the background in the Flash area
Page
Area Name Changes the area name
Website Sets a web page to display in the Web area
Input Enable You can input using the mouse in the Web area
Only one URL can be selected in the Web Area
Refresh Sets the refresh time for the URL displayed in the Web area
Sound Turns the background sound for the Web area on or off
Volume Controls the volume of the background music in the Web area
Music File Selects a music file for the background in the Web area
Photo File / Music File
Text
Name Changes the area name
Page
Source
Area Name Changes the area name
Edit View
Schedule
Schedule
Schedule
z Cancels the previously performed command or performs the canceled command again. You can change the maximum number of commands that you can undo using the Option menu
Network
Local
EPG View
Delete Deletes the screen currently selected in the EPG window
Publish View
Remote Management
Remote Management
Refresh
Tree View
System
MDC Displays the current state of the External source,channel,volume,mute and panel. You can control each item by clicking on it and changing the setting in the list view
1 Interval Enter the time interval when the screensaver is activated
z Safety Screen
z Lamp Control 1 Automatic
2 Manual - Select a value to apply to the lamp by moving the slider
System
2 EWF command Changes the EWF status of the selected client
Default gateway Enter the address of the default gateway
4 Screen Resolution Displays the resolution of the selected client
6 The Current Status and Screen Resolution items cannot be changed
Page
Combo View
Message
Message
Message
Tree View List View
Option
Option
General
Schedule
Screen
MagicNet Client Configurations
Contents Server
Connection
Client Functions
Password Manages the password
Displays or changes the drive settings
Setup
EWF Displays and changes the Drive settings
Connection Tab
Setup
Program Tab
Screen Tab
Options Tab
When publishing is not performed successfully
Troubleshooting When a monitor is not connected to the server
When a schedule is not performed normally
Password / Log In
When a movie file is not registered to the library
When the monitor update function does not work
Removing the Program
5. Click Change/Remove
Main Screen
Introduction
Safety Lock
Port Selection
Main Icons
Select Button
Power Control
1 Power Status 2 Input 3 Image Size 4 On Timer 5 Off Timer
Info Grid shows some basic information necessary to Power Control
The Power Control feature is available for all displays
Input Source
Image Size PC, BNC, DVI
Image Size TV, AV, S-Video, Component, DVIHDCP, HDMI, DTV
The Input source of MagicNet works only on MagicNet model
The Input source of TV works only on TV model
Time
PIP PIP Size
PIP Size can be controlled with turning on the LCD Display power
PIP PIP Source
Settings Picture
Settings Picture PC
Settings
Audio
Settings Image Lock
Maintenance Lamp Control
Maintenance Scroll
Maintenance Video Wall
Troubleshooting
Settings Value Display In Multiple Display Mode
Adjusting the LCD Display
Adjusting the LCD Display
Component / HDMI Mode Sound Setup Multi Control Direct Functions
The direct button on the remote control is the SOURCE button
The direct button on the remote control is the SWAP button 4 Size
The direct button on the remote control is the SOURCE button 3 Swap
The direct button on the remote control is the SIZE button 5 Position
6 Transparency
MagicBright
The direct button on the remote control is the M/B button
1 Entertain
2 Internet
The direct button on the remote control is the AUTO button
Auto Adjustment
Signal Balance
1 Red 2 Green 3 Blue
2 Signal Control
1 Signal Balance
Size
PIP Picture
2 Standard 3 Movie 4 Custom
The direct button on the remote control is the P.MODE button
1 Off 2 Cool2 3 Cool1 4 Normal 5 Warm1 6 Warm2
2 Zoom 3 Zoom
Dynamic Contrast
1 Off 2 On
Digital NR Digital Noise Reduction
Film Mode
Auto Volume
You can hear the sound even when sound value is set to
1 Off 2 On The direct button on the remote control is the SRS button
1 Standard
2 Sleep Timer
1 Main 2 Sub Available Modes PIP ON Setup Available Modes
3 On Timer
4 Off Timer
Menu Transparency
Safety Lock PIN
1 High 2 Medium 3 Low 4 Opaque
Energy Saving
Five adjustment levels 1, 2, 3, 4, and 5 Screen Divider
Five adjustment levels 1, 2, 3, 4, and 4 Vertical
Safety Screen
1 Safety Screen
Reset
Power On Adjustment
1 Image Reset
2 Color Reset
Multi Control Available Modes
1 ID Setup
Multi Control
2 ID Input
Photo
MagicNet Available Modes
1 Auto
Original
4 Password
Setup
4 Rotation
5 Zoom
6 Play Option
5 File
Adjusting the LCD Display Troubleshooting
Troubleshooting
Self-Test Feature Check Check List Q & A
Self-Test Feature Check
Symptoms and Recommended Actions
Maintenance and Cleaning
Problems related to the Installation PC Mode
Problems
The screen is blank and the power indicator is off
Problems related to the Screen
Check Signal Cable message Not Optimum Mode message
The power Indicator blinks green
The remote control buttons do not respond
Problems related to the Remote Control
Problems related to MagicNet
ProblemsSolutions
How can I clean the outer case/LCD Panel? How can I play the video?
How can I set the Power Saving function?
Adjusting the Monitor Troubleshooting Specifications
Specifications
General PowerSaver Preset Timing Modes
Resolution
Specification
Audio Characteristics
PowerSaver
Plug and Play Capability
PowerSaver When used as a normal monitor
PowerSaver When used as a Network monitor
Preset Timing Modes
Preset Timing Modes
Vertical Frequency
Horizontal Frequency
Safety Instructions Introduction Connections Using the Software
Specifications
Adjusting the Monitor Troubleshooting Specifications
General PowerSaver Preset Timing Modes
Specification
Audio Characteristics
PowerSaver
Plug and Play Capability
PowerSaver When used as a normal monitor
PowerSaver When used as a Network monitor
Preset Timing Modes
Preset Timing Modes
Vertical Frequency
What is Image Retention ?
Information
For Better Display PRODUCT INFORMATION Image Retention Free
For Better Display
Power Off, Screen Saver, or Power Save Mode
Change the Color Information periodically
Change the characters color periodically
Apply the Screen Pixel function on Product
Apply the Screen Scroll function on Product
Apply the Screen Erasing function on Product
Contact SAMSUNG WORLDWIDE Terms Correct Disposal Authority
Appendix
Contact SAMSUNG WORLDWIDE
U.S.A CANADA MEXICO ARGENTINE BRAZIL
LUXEMBURG NETHERLANDS NORWAY POLAND PORTUGAL
CZECH REPUBLIC DENMARK FINLAND FRANCE GERMANY HUNGARY ITALIA
REPUBLIC OF IRELAND SLOVAKIA SPAIN SWEDEN SWITZERLAND U.K ESTONIA
LATVIA LITHUANIA KAZAKHSTAN KYRGYZSTAN RUSSIA UKRAINE UZBEKISTAN
Resolution
Terms Sync Signal
THAILAND
TAIWAN
Authority
Correct Disposal