Outer diameter (mm) | Torque (N•m) | Torque (kgf•cm) |
|
|
|
ø 6.35 | 14 to 18 | 140 to 180 |
|
|
|
ø 9.52 | 34 to 42 | 350 to 430 |
|
|
|
ø 12.70 | 49 to 61 | 500 to 620 |
|
|
|
ø 15.88 | 68 to 82 | 690 to 830 |
|
|
|
NOTE
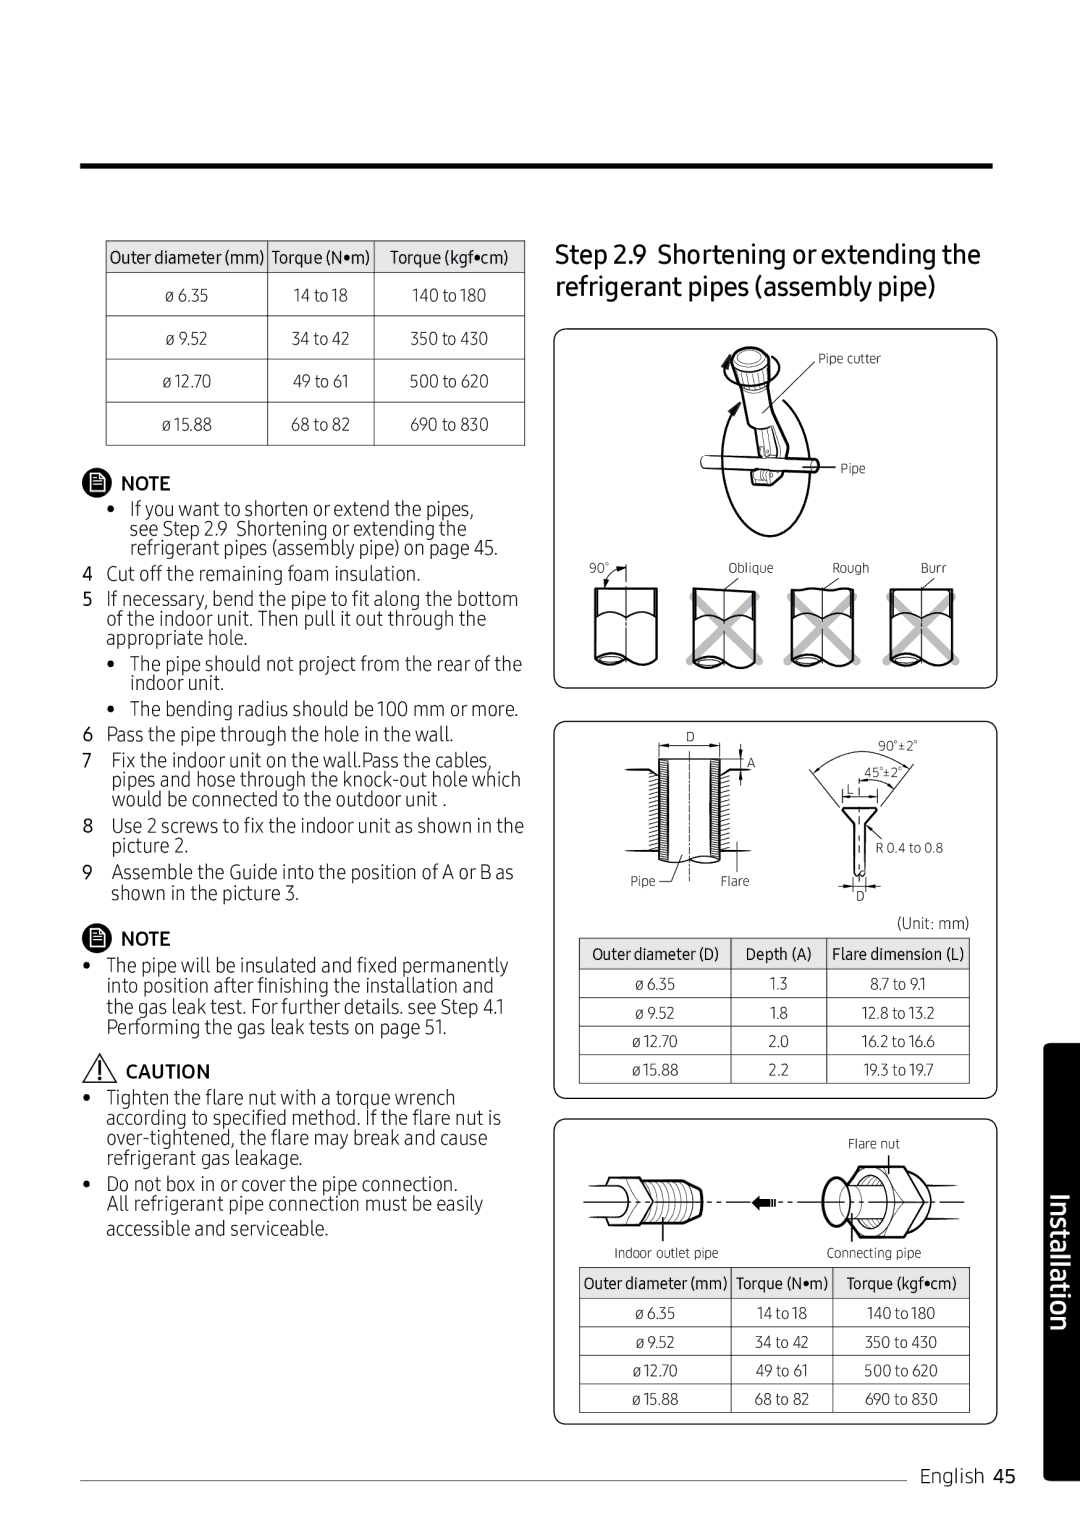
•If you want to shorten or extend the pipes, see Step 2.9 Shortening or extending the refrigerant pipes (assembly pipe) on page 45.
4Cut off the remaining foam insulation.
5If necessary, bend the pipe to fit along the bottom of the indoor unit. Then pull it out through the appropriate hole.
•The pipe should not project from the rear of the indoor unit.
•The bending radius should be 100 mm or more.
6Pass the pipe through the hole in the wall.
7Fix the indoor unit on the wall.Pass the cables, pipes and hose through the
8Use 2 screws to fix the indoor unit as shown in the picture 2.
9Assemble the Guide into the position of A or B as shown in the picture 3.
NOTE
•The pipe will be insulated and fixed permanently into position after finishing the installation and the gas leak test. For further details. see Step 4.1 Performing the gas leak tests on page 51.
![]() CAUTION
CAUTION
•Tighten the flare nut with a torque wrench according to specified method. If the flare nut is
•Do not box in or cover the pipe connection.
All refrigerant pipe connection must be easily accessible and serviceable.
Step 2.9 Shortening or extending the refrigerant pipes (assembly pipe)
|
| Pipe cutter |
|
|
| Pipe |
|
90° | Oblique | Rough | Burr |
D |
| 90°±2° |
|
| |
| A | 45°±2° |
|
| |
|
| L |
|
| R 0.4 to 0.8 |
Pipe | Flare | D |
|
| |
|
| (Unit: mm) |
Outer diameter (D) | Depth (A) Flare dimension (L) | |
ø 6.35 | 1.3 | 8.7 to 9.1 |
ø 9.52 | 1.8 | 12.8 to 13.2 |
ø 12.70 | 2.0 | 16.2 to 16.6 |
ø 15.88 | 2.2 | 19.3 to 19.7 |
|
| Flare nut |
Indoor outlet pipe | Connecting pipe | |
Outer diameter (mm) Torque (N•m) | Torque (kgf•cm) | |
ø 6.35 | 14 to 18 | 140 to 180 |
ø 9.52 | 34 to 42 | 350 to 430 |
ø 12.70 | 49 to 61 | 500 to 620 |
ø 15.88 | 68 to 82 | 690 to 830 |
Installation
English 45
