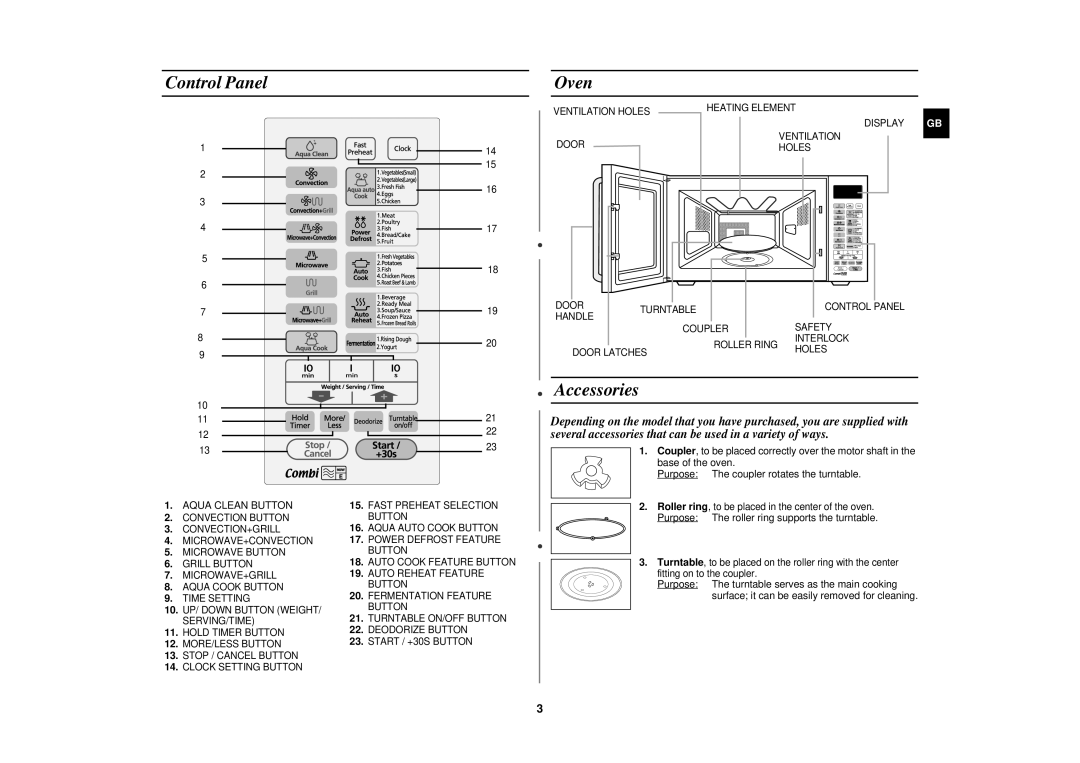
Control Panel
Oven |
|
|
VENTILATION HOLES | HEATING ELEMENT |
|
| GB | |
| DISPLAY | |
| VENTILATION |
|
1
2
3
4
5
6
7
8
9
10
11
12
13
1.AQUA CLEAN BUTTON
2.CONVECTION BUTTON
3.CONVECTION+GRILL
4.MICROWAVE+CONVECTION
5.MICROWAVE BUTTON
6.GRILL BUTTON
7.MICROWAVE+GRILL
8.AQUA COOK BUTTON
9.TIME SETTING
10.UP/ DOWN BUTTON (WEIGHT/ SERVING/TIME)
11.HOLD TIMER BUTTON
12.MORE/LESS BUTTON
13.STOP / CANCEL BUTTON
14.CLOCK SETTING BUTTON
14
15
16
17
18
19
20
21
22
23
15.FAST PREHEAT SELECTION BUTTON
16.AQUA AUTO COOK BUTTON
17.POWER DEFROST FEATURE BUTTON
18.AUTO COOK FEATURE BUTTON
19.AUTO REHEAT FEATURE BUTTON
20.FERMENTATION FEATURE BUTTON
21.TURNTABLE ON/OFF BUTTON
22.DEODORIZE BUTTON
23.START / +30S BUTTON
DOOR |
| HOLES | |
DOOR | TURNTABLE | CONTROL PANEL | |
HANDLE |
| ||
| SAFETY | ||
| COUPLER | ||
| ROLLER RING | INTERLOCK | |
| HOLES | ||
DOOR LATCHES | |||
| |||
Accessories
Depending on the model that you have purchased, you are supplied with several accessories that can be used in a variety of ways.
1.Coupler, to be placed correctly over the motor shaft in the
base of the oven.
Purpose: The coupler rotates the turntable.
2.Roller ring, to be placed in the center of the oven.
Purpose: The roller ring supports the turntable.
3.Turntable, to be placed on the roller ring with the center
fitting on to the coupler.
Purpose: The turntable serves as the main cooking surface; it can be easily removed for cleaning.
3
