DVD-HR749 DVD-HR750
DVD-HR749 DVD-HR750
No rights are granted for commercial use
Getting Started
English
Maintenance of Cabinet
Precaution
Important Safety Instructions
Handling Cautions
DVD-RAM, DVD-RW and DVD-R
Disc Handling
Holding discs
DVD-Video, Audio-CD
DVD-RW Disc Playback and Recording
CD-R/-RW
DVD-R Disc Playback and Recording
DVD-RAM Disc Playback and Recording
Using DivX disc
Using MP3 disc
Using Jpeg disc
Disc Copy
Do not use the following discs
Disc compatibility
Contents
Deleting a Scheduled List
Unfinalising a Disc V/VR mode
Editing the Disc Name
General Features
Before reading the user’s manual
How to use the HDD & DVD Recorder
Select the disc type or HDD
Recording
Using a DVD-R
Editing a recorded disc
Playing
Install Batteries in the Remote Control
Accessories
Preparing the Remote Control
Unpacking
Controllable TV Codes
Button Function
Description
Front Panel
Front Panel Display
Lights when a DVD-RAM/-RW/-R disc is loaded
Rear Panel
Fan
Tour of the Remote Control
DVD mode
Connecting & Setting Up
Connecting the HDD & DVD Recorder
TV mode
Video, Component video and Progressive Output Modes
Other type of connecting the Video Output cable
Antenna + HDD & DVD Recorder + External decoder box + TV
Connect RF antenna cables as shown
Audio in jacks on TV or AV amplifier
Case 2 Connecting to an S-Video output jack
Case 1 Connecting to a Video Composite output jack
See pages 21~22
See pages 21~22 After connecting, refer to the pages 33~34
Other type of connecting the Audio Output cable
Case 1 Connecting to your TV
Case 3 Component Video output jacks
Case 2 Connecting to a stereo amplifier with AV output jacks
Case 2 Connecting a Camcorder to the DV in jack
Connecting to AV 3 IN, DV input jack
Copy protected content cannot be recorded
On-Screen Menu Navigation
System Setup
Plug & Auto Setup
Return button
Setting the Clock
Auto channel scan will be started
Refer to following table when selecting your country
Auto Setup
Manual Setup
Press the OK button to stop the Auto Setup
Select Edit, Delete or Swap
Setting up the Language Options
With the unit in Stop mode, press the Menu button
Auto Power Off Setting
Setting up the System Options
Automatic Chapter Creator
Press the Stop button to stop recording
EP Mode Time Setting
EZ Record
Hours
DivXR Registration
Setting up the Audio Options
Digital Output
Off Timer Record Disc Manager
Mode Compatibility
Off You can enjoy the movie with the standard Dynamic Range
3D Noise Reduction motion adaptive noise reduction
Setting up the Video Options
TV Aspect
TV Aspect
Available Video Output Jack
Setting up the Progressive scan
Video Output
Component
Canceling the Progressive scan
Setting the Rating Level
Setting up the Parental Lock
If you forgot your password
Changing the Password
Logos of Discs that can be played
Playback
Region code DVD-Video only
Disc types that can be played
Discs that cannot be played
Playing a Disc
Press the Play button to start playback
For HDD/DVD-RAM/-RW/-R Disc
Using the Disc Menu & Title Menu
For DVD-VIDEO Disc
Title List
Skipping Chapters, Titles or Markers
Using the playback related buttons
Searching through a Chapter or Track
If you press the Skip button
Step Motion Play
Pause mode, press the Search buttons on the remote control
Slow Motion Play
If you press the Search button
Moving to a scene directly using the Info
Using the Info button
Selecting the Subtitle Language
Changing the Camera Angle
Selecting the Soundtracks & Audio Channels
Search Subtitle
Repeat A-B
Repeat Play
Playing Repeatedly Repeat Playback
Search Subtitle None Audio 2/0 L+R Repeat Zoom Off
Normal size X2
Zooming-In
X2 normal size
Playing back a marker
Using Markers
Setting Markers
Clearing a marker
Playing back a bookmark
Using the Bookmarks
Setting Bookmarks
Clearing a bookmark
Playing an Audio CDCD-DA
Blued button Selects a contents. MP3 disc only
Playing an Audio CD/MP3
Audio CDCD-DA Screen Elements
Repeat CD CD-DA & MP3
Playing an MP3 Disc
MP3 Screen Elements
Go To Playlist
New Playlist
Playlist
Go To Music List
Delete the Playlist
Go To Edit Playlist
Do you wantE toPLAYLIST01delete?
Using the Sort
Select Contents
Rotate
Viewing a Picture
Slide Show
To stop the Slide Show
To stop the Zoom
Zoom
Go To Photo List
X2 X4 X2 Normal
DivX Function Description
Using the Menu button
Playing a DivX
Function Description
Afrikaans, Basque, Catalan, Danish, Dutch, English
DivX Subtitle Encoding
Romanian, SerbianLatin, Slovak, Slovenian
English, Albanian, Croatian, Czech, Hungarian, Polish
Compatibility between Samsung and Other Company’s Recorder
Recording
Recordable Discs
This HDD & DVD Recorder can record on the following discs
Recording Formats
DVD-RAM/-RWVR mode
DVD-RWV mode/-R
Recording Mode
Signal type Copy-Free Copy-Once Copy-Never Media
Concerning Copy Control Signals
Content Protection for Recordable Media Cprm
DVD-RWVer.1.1 With Cprm VR mode Mode
Recording the current TV programme you are watching
Recording immediately
Before you start
Recording from external equipment you are watching
To pause recording
To stop recording
Press the Input SEL. button to select DV
Copying from a Camcorder
DV device is connected
030 100 .. Off
5OTR Mode 030
Making a One Touch Recording OTR
Or press the Stop button again
Simultaneous Recording and Playback
Using the Play button
NUsing the Title List button
Stopping Playback / Recording
Buttons on the Remote Control used for Time Shift function
Time Shift function as a live signal
Using the Time Shift function
Time Shift Screen Elements
Using the Timer button
Making a Timer Recording
Mode Recording Mode
Press the Exit button
If the timer settings overlap
To exit without saving the current setting
To return to the previous menu
Adding a Scheduled List
Editing the Scheduled List
Start End
Deleting a Scheduled List
Yes
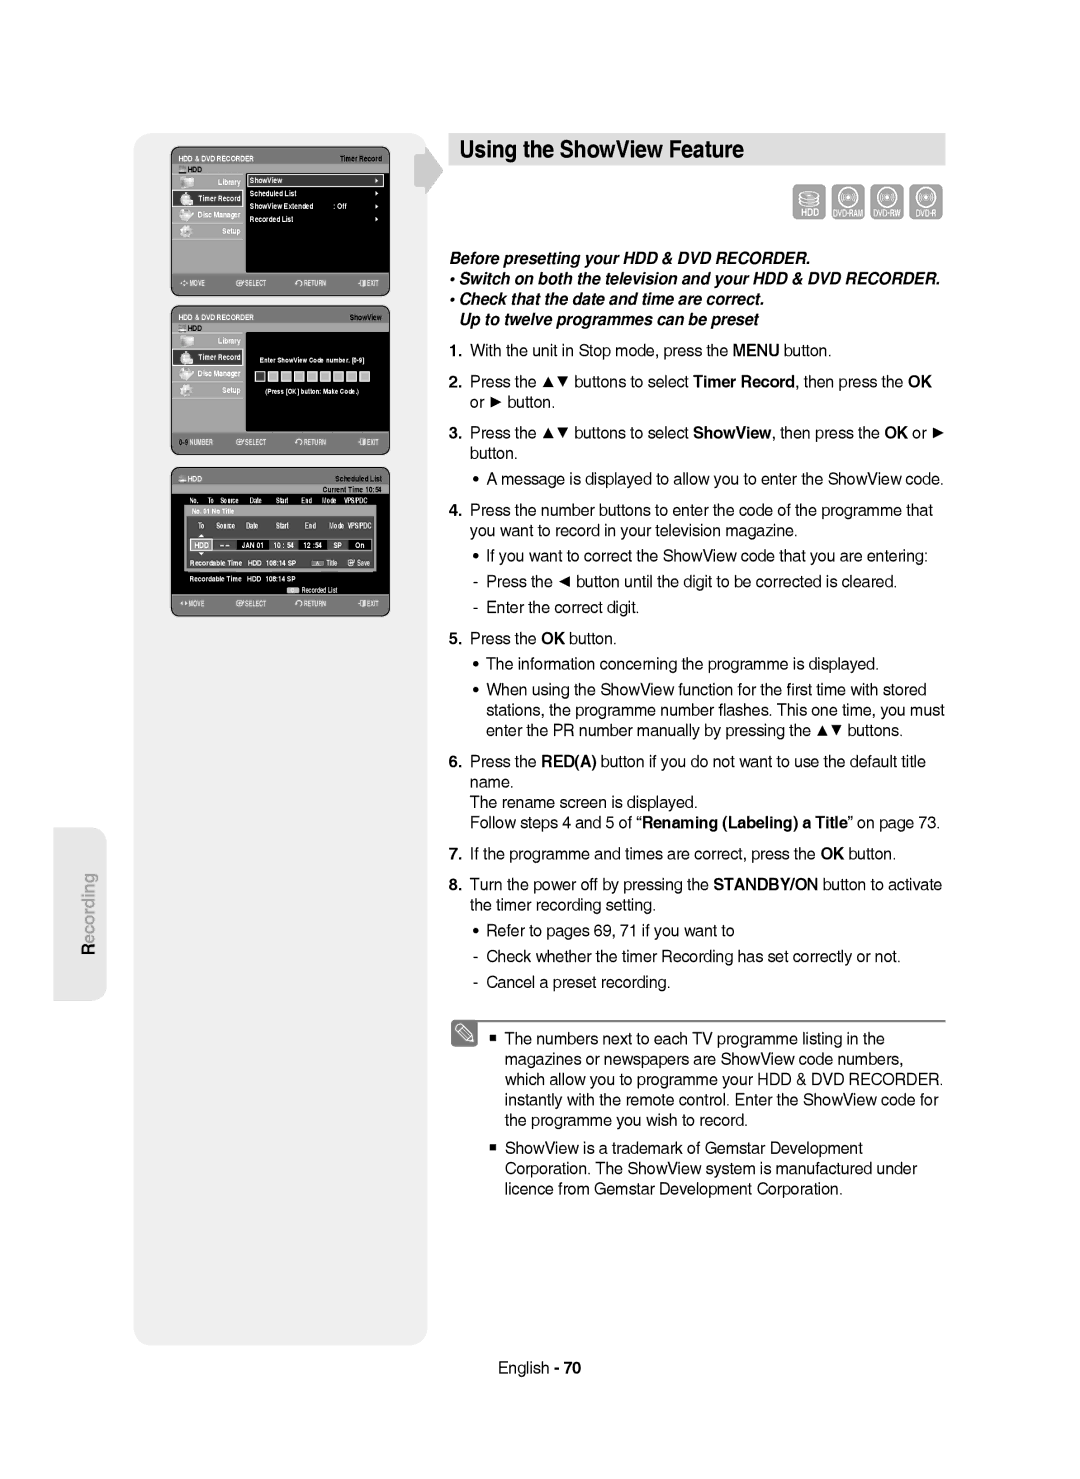
Using the ShowView Feature
Information about Recorded List
ShowView Extended
Go To Recorded List
Press the Exit button after finishing the operation
Go to Scheduled List
Delete Recorded List
Clear Recorded List
Current Time
Basic Editing Title List
Using the Title List button
Editing
Playing the Title
Locking Protecting a Title
To the locked status
Items are selected
Deleting a Title
Select1 SPAll
Related
Splitting a Section of a Title Split
Playback related buttons Play
Using the playback related buttons
Deleting a Section of a Title Partial Delete
Press the OK button at the end point
Time Navigation
Using the Sort function Title List
Navigation Menu
Length
Scene Navigation
Select Contents
000105
Play , Search , Skip
Advanced Editing Playlist
Creating a Playlist
Press the Reda button. The Edit menu is displayed
Playing Entries in the Playlist
Using the Play List button
Renaming a Playlist Entry
Modifying a Scene Replacing a Scene
Editing a Scene for the Playlist
Playing a Selected Scene
Search , Skip
Moving a Scene Changing the Position of a Scene
Adding a Scene
Deleting a Scene
Deleting a Playlist Entry from the Playlist
Select7 6AllScenes Unselect All
About the Copy Screen
Using the Sort Playlist
Copying from HDD to DVD
Recorded Video Title
21%
Available 4099MB
Available 3975MB
Title is successfully copied
Copying from DVD to HDD
Available 235993MB
File Copy
Copying MP3, Jpeg or DivX
Folder Copy
HDD HDD DVD-R, DVD-RWV
DiscCD-R/ CD-RW/DVD-RAM/DVD-RFinalise DVD-RWFinalise
To Playlist Select All
Changing the name of Music/Photo/DivX file
Song 1.mp3
Dream
Editing the Disc Name
Disc Manager
Disc Protection
Delete All Format
Delete All Title Lists
Delete All Title Lists/DivX Lists /Music Lists/Photo Lists
Yes Rename
Current media HDD Do you want format?
Formatting a Disc
Delete Format
Delete All Finalise Format
Finalising a Disc
Finalise Format
Unfinalising a Disc V/VR mode
Finalise Unfinalise
Reference
Troubleshooting
Power
Playback
Video
Remote Control Unit
Timer Recording
Sound
Specifications
Disc Type
Ελλασ Greece
Region Country Customer Care Centre Web Site
Contact Samsung World Wide
Επικοινωνήστε με τη Samsung World Wide
Της Samsung
English Ελληνικά Български Română
DVD-HR749 DVD-HR750
Προειδοποίηση
Έναρξη
Ελληνικά
Προφυλάξεις κατά το χειρισμό
Προφυλάξεις
Σημαντικές οδηγίες ασφάλειας
Συντήρηση του περιβλήματος
DVD-RAM, DVD-RW και DVD-R
Χειρισμός των δίσκων
Κράτημα των δίσκων
DVD βίντεο, CD ήχου
Αναπαραγωγή και εγγραφή δίσκου DVD-RW
Αναπαραγωγή και εγγραφή δίσκου DVD-R
Αναπαραγωγή και εγγραφή δίσκου DVD-RAM
Χρήση δίσκων MP3
Αντιγραφή δίσκου
Διαμόρφωση δίσκου
Χρήση δίσκων Jpeg
Συμβατότητα δίσκων
Μη χρησιμοποιείτε τους παρακάτω δίσκους
Δεν είναι όλοι οι τύποι δίσκων συμβατοί με αυτή τη συσκευή
Περιεχόμενα
Η λειτουργία Χρονικής μετατόπισης ως σήμα
Επιλογή των καναλιών ηχητικής επένδυσης και
Εκτέλεση εγγραφής με το πάτημα ενός κουμπιού
Διαγραφή μιας ενότητας τίτλου
Γενικά χαρακτηριστικά
Βήμα 2 Διαμορφώστε το δίσκο για να ξεκινήσει η εγγραφή
Πριν διαβάσετε το εγχειρίδιο χρήσης
Τρόπος χρήσης αυτής της συσκευής
Βήμα 1 Επιλέξτε τύπο δίσκου ή τον ενσωματωμένο σκληρό δίσκο
Χρήση ενός DVD-R
Βήμα 3 Εγγραφή
Βήμα 4 Αναπαραγωγή
Βήμα 6 Ολοκλήρωση και αναπαραγωγή σε άλλες συσκευές DVD
Προετοιμασία του τηλεχειριστήριου
Αποσυσκευασία
Εξαρτήματα
Τοποθέτηση των μπαταριών στο τηλεχειριστήριο
Κουμπί Λειτουργία
Πρόσοψη
Οθόνη πρόσοψης
Πίσω όψη
Ήχου/βίντεο ή Scart
Ρύθμιση του τηλεχειριστηρίου
Πρόσθετες συνδέσεις
Σύνδεση και Ρύθμιση
Σύνδεση της συσκευής
Τρόπος λειτουργίας DVD
Εξωτερικός αποκωδικοποιητής + τηλεόραση
Άλλοι τύποι σύνδεσης του καλωδίου Εξόδου βίντεο
Κεραία + συσκευή εγγραφής DVD +
Συνδέστε τα καλώδια της κεραίας RF όπως φαίνεται
Εξόδου βίντεο Composite
Εξόδου S-Video
Άλλοι τύποι σύνδεσης του καλωδίου Εξόδου ήχου
Περίπτωση 1 Σύνδεση με την τηλεόραση
Περίπτωση 2 Σύνδεση σε στερεοφωνικό
Περίπτωση 3 Σύνδεση με ενισχυτή
AV με υποδοχή ψηφιακής εξόδου
Αν ο στερεοφωνικός ενισχυτής έχει μόνον υποδοχές
Περίπτωση 2 Σύνδεση Βιντεοκάμερας στην υποδοχή DV
Σύνδεση στην υποδοχή εισόδου AV3 IN, DV
Σύνδεση και αυτόματη ρύθμιση
Ρύθμιση συστήματος
Πλοήγηση στο μενού επί της οθόνης
Κουμπιά
Ρύθμιση της ώρας
Ελέγξτε την ημερομηνία και την ώρα
Αυτόματη Ρύθμιση
Ρύθμιση Καναλιού
Χειρορύθμιση
Ρύθμιση των επιλογών της γλώσσας
Επιλέξτε Επεξ., Διαγρά. ή Ανταλλά
Αυτόματη δημιουργία κεφαλαίων
Ρυθμίσεις των επιλογών Συστήματος
Ρύθμιση αυτόματης απενεργοποίησης της συσκευής
Eγγραφή ΕZ
Ρύθμιση χρόνου τρόπου λειτουργίας ΕΡ
Ώρες
Καταχώριση DivXR
Ρύθμιση των επιλογών ήχου
Ψηφιακή Έξοδος
Vφφ Oφφ
Ψηφιακή Έξοδος
OVν Oφφ
Dual L
3D Μείωση Θορύβου Τριδιάστατη μείωση του θορύβου
Ρύθμιση των επιλογών βίντεο
Λόγος πλευρών εικόνας στην τηλεόραση
Έξοδος Βίντεο Oν
Ρύθμιση της προοδευτικής σάρωσης
Έξοδος Βίντεο
Διαθέσιμη υποδοχή εξόδου βίντεο
Εξάρτημα
Ακύρωση της προοδευτικής σάρωσης
Ρύθμιση του επιπέδου αξιολόγησης
Ρύθμιση του γονικού ελέγχου
Αν ξεχάσετε τον κωδικό πρόσβασης
Αλλαγή του κωδικού πρόσβασης
Τύποι δίσκων που μπορούν να αναπαραχθούν
Αναπαραγωγή
Κωδικός περιοχής μόνο για DVD-Video
Λογότυπα δίσκων που μπορούν να αναπαραχθούν
Αναπαραγωγή ενός δίσκου
DVD-ROM/PD/MV-Disc κ.λπ
Για δίσκους HDD/DVD-RAM/-RW/-R
Χρήση του μενού δίσκου και του μενού τίτλων
Για τους δίσκους DVD-Video
Τίτλος Λίσ
Χρήση των κουμπιών που σχετίζονται με την αναπαραγωγή
Αναζήτηση σε κεφάλαιο ή κομμάτι
Παράλειψη κεφαλαίων, τίτλων ή δεικτών
X CD-DA
Αν πατήσετε το κουμπί Search
Αναπαραγωγή σε αργή κίνηση
Αναπαραγωγή καρέ-καρέ
1/2 1/4 1/8
Επιλογή της γλώσσας υποτίτλων
Χρήση του κουμπιού Info
Μετακίνηση απευθείας σε μια σκηνή με το Info
Αναζήτηση Κανένα Υπότιτλ Ήχος 2/0 L+R Επ/άλψ Oφφ Ζουμ
Αλλαγή της οπτικής γωνίας της κάμερας
Υπότιτλ Ήχος
Επανάληψη αποσπάσματος
Επαναλαμβανόμενη αναπαραγωγή
Επαναλαμβανόμενη αναπαραγωγή
Αναζήτηση Κανένα Υπότιτλ Ήχος 2/0 L+R Επ/άλψ Ζουμ Oφφ
Κανονικό μέγεθος X2
X2 κανονικό μέγεθος
Αναπαραγωγή από ένα δείκτη
Χρήση δεικτών
Ρύθμιση δεικτών
Διαγραφή ενός δείκτη
Αναπαραγωγή από ένα σελιδοδείκτη
Χρήση σελιδοδεικτών
Ρύθμιση σελιδοδεικτών
Διαγραφή σελιδοδείκτη
Στοιχεία οθόνης CDCD-DA ήχου
Αναπαραγωγή ενός CD ήχου/MP3
Αναπαραγωγή ενός CD CD-DA ήχου
Επιλέγει ένα κομμάτι τραγούδι
Επανάληψη CD CD-DA και MP3
Αναπαραγωγή ενός δίσκου MP3
Μουσική Λίστα
Πατήστε το κουμπί Κοκκινοa κατά την αναπαραγωγή Λίστας
Νέα λίστα αναπαραγωγής
Μετάβαση στη λίστα αναπαραγωγή
Μουσικής
Μετάβαση στην επεξεργασία λίστας αναπαραγωγής
Διαγραφή της λίστας αναπαραγωγής
Μετάβαση στη λίστα μουσικής
Μέγεθος
Χρήση της Ταξινόμησης
Επιλογή Περιεχομένων
Τίτλος5.1MB
Περιστροφή
Προβολή φωτογραφίας
Διαδοχική προβολή φωτογραφιών
Για να διακόψετε τη διαδοχική προβολή των φωτογραφιών
Για να διακόψετε το ζουμ
Ζουμ
Μετάβαση στη λίστα φωτογραφιών
X2 X4 X2 Κανονικό
Περιγραφή λειτουργίας DivX
Αναπαραγωγή DivX
Χρήση του κουμπιού Μενu
Λειτουργία Περιγραφή
Όνομα Μέγεθος
Κωδικοποίηση υπότιτλων DivX
Λίστα DivX
Εγγράψιμοι δίσκοι
Εγγραφή
Συσκευή
DVD-RAM/-RWτρόπος λειτουργίας VR
Μορφές εγγραφής
DVD-RWτρόπος λειτουργίας V/-R
Χρόνοι εγγραφής
Τρόπος λειτουργίας εγγραφής
Εγγραφής HDD 160GB
Προστασία περιεχομένου για εγγράψιμα μέσα Cprm
Μη εγγράψιμες εικόνες
Σχετικά με σήματα ελέγχου αντιγραφής
Copy-Free Copy-Once Copy-Never Μέσο
Εγγραφή από εξωτερικές συσκευές που παρακολουθείτε
Άμεση εγγραφή
Προτού ξεκινήσετε
SP LP EP XP
Για παύση της εγγραφής
Για να διακόψετε την εγγραφή
Αντιγραφή από βιντεοκάμερα
Συσκευή DV είναι συνδεδεμένη
030 100 .. Off
Εκτέλεση εγγραφής με το πάτημα ενός κουμπιού OTR
5Τύπος OTR 030
Διακοπή αναπαραγωγής / Εγγραφής
Ταυτόχρονη εγγραφή και αναπαραγωγή
Χρήση του κουμπιού Play
Χρήση του κουμπιού Title List
Λειτουργία Χρονικής μετατόπισης ως σήμα ζωντανής εκπομπής
Χρήση του funkci Časový posun
Στοιχεία Οθόνης Χρονικής Μετατόπισης
Time Shift Ον
Εκτέλεση εγγραφής με χρονοδιακόπτη
NΧρήση του κουμπιού Timer
Λειτ. τρόπος λειτουργίας εγγραφής
Εμφανίζεται η οθόνη μετονομασίας του τίτλου
Εάν οι ρυθμίσεις του χρονοδιακόπτη επικαλύπτονται
Προσθήκη προγραμματισμένης λίστας
Χρήση του κουμπιού Timer
Επεξεργασία της λίστας προγραμματισμού
Χρονοδιακόπτης
Διαγραφή της λίστας προγραμματισμού
Χρήση της λειτουργίας ShowView
Μετονομασία ενός τίτλου στη σελίδα
Πληροφορίες για τη Recorded List Λίστα εγγραφών
Εκτεταμμένο ShowView
Μετάβαση στη λίστα εγγραφών
Οθόνη Αποθηκευμένη λίστα θα εξαφανιστεί
Μετάβαση στη λίστα προγραμματισμένων εγγραφώ
Διαγραφή Λίστας εγγραφών
Διαγραφή περιεχομένων λίστας εγγραφών
Πατήστε το κουμπί Κιτρινοc
Αναπαραγωγή τίτλου
Eπεξεργασία
Βασική επεξεργασία λίστα τίτλων
Μετονομασία ενός τίτλου
Κλείδωμα Προστασία ενός τίτλου
JAN/02/2007 2100 PR1 Προστασία
Διαγραφή ενός τίτλου
Διαχωρ
Χωρισμός τμήματος τίτλου Χωρισμός
Τίτλο
Διαγραφή μιας ενότητας τίτλου Τμηματική διαγραφή
Χρήση της λειτουργίας Ταξινόμησης Λίστα τίτλων
Μενού πλοήγησης
Πλοήγηση στο χρόνο
Πλοήγηση Σκηνών
Επιλογή Περιεχομένων
Πλοήγηση σε σκηνές
JAN/01/2007 1730 PR1 Αριθμός Σκηνής 1/3
Έναρξη Τέλος
Σύνθετη επεξεργασία λίστα αναπαραγωγής
Δημιουργία λίστας αναπαραγωγής
Έναρξη Τέλος Δημιουργ
Μετονομασία μιας εγγραφής της λίστας αναπαραγωγής
Χρήση του κουμπιού Play List
Αναπαραγωγή εγγραφών από τη λίστα αναπαραγωγής
Επιλογή όλων
Τροποποίηση μιας σκηνής αντικατάσταση μιας σκηνής
Επεξεργασία μιας σκηνής για τη λίστα αναπαραγωγής
Αναπαραγωγή μιας επιλεγμένης σκηνής
JAN/02/2007 Αριθμός Σκηνής 1/6
Play , Skip , Skip
Προσθήκη μιας σκηνής
Μετακίνηση μιας σκηνής αλλαγή της θέσης μιας σκηνής
Έναρξη Τέλος Αλλαγή
Διαγραφή μιας σκηνής
Αποεπιλ.όλων
Ημ/ία Όνομα
Χρήση της Ταξινόμησης Λίστα αναπαραγωγής
Επιλεγμένα στοιχεία Διαθέσιμο 4099MB
Διαθέσιμο 3975MB
Επιλεγμένα στοιχεία Available 4099MB
Τίτλος έχει αντιγραφεί επιτυχώς
Τίτλος με προστασία αντιγραφής
Αντιγραφή από το DVD στο σκληρό δίσκο
Τίτλος εγγεγραμένου βίντεο
Τίτλος μίας αντιγραφής
Αντιγραφή αρχείου
Αντιγραφή αρχείων MP3, Jpeg ή Divx
Αντιγραφή φακέλου
DiscCD-R/CD-RW/DVD-RAM/DVD-RΟριστικ./DVD-RWΟριστικ. HDD
JPEGφωτογραφίες
Στοιχείου
Αλλαγή ονόματος αρχείου μουσικής/φωτογραφίας/DivX
Προστασία δίσκου
Λειτουργία Διαχειριστής Δίσκων
Επεξεργασία του ονόματος του δίσκου
Προστασία Δίσκου
Τίτλος
Διαγραφή όλων των λιστών τίτλων
Όχι Διαγρά
Διαμόρφωση ενός δίσκου
Δίσκου
Ολοκλήρωση δίσκου
Οριστικ
Ολοκλήρωση Κατάργηση
Ολοκλήρωση
Ένδειξη DVD-VideoRW
Finalise Unfinalise
Λειτουργία
Παραπομπές
Αντιμετώπιση προβλημάτων
Εγγραφή
Εγγραφή με χρονοδιακόπτη
Σήμα βίντεο
Ήχος
Τηλεχειριστήριο
Τεχνικές προδιαγραφές
Τύπος δίσκου
Ελλασ Greece
Contact Samsung World Wide
Σωστή Διάθεση αυτού του Προϊόντος