User’s Manual
Instructions
Contents
Dpof Standard
Dpof Cancel
FAQ
Dpof
《5》
Getting to know your camera
《6》
An FCC warning
System chart
Pouch Camera strap
AC cord
《9》
Back
Identification of features
Camera status lamp Play mode button Effect button
Front & Top
Menu
Flash SELF-TIMER
Side/ 5-function button
Voice memo/ Voice recording/ UP button
Close UP
Mode Movie Clip
Auto Program Play Icon Mode Scene Night Portrait Children
Icon Mode Sunset
CR-V3 type Lithium Ion battery
Connecting to a Power Source
Polarity +
To close the battery chamber cover, push it until it clicks
Instructions on how to use the memory card
Fine Normal 30FPS 15FPS
Removing the memory card
Inserting the memory card
ISO
LCD monitor indicator
Changing the recording mode
Changing the recording mode
《21》
Starting the recording mode
Press the Pause button To pause recording
Landscape
Dawn
Fireworks
《25》
Pressing the shutter button down half way
Things to Watch Out for When Taking Pictures
Zoom W/ T button
Using the camera buttons to adjust the camera
Wide Zoom Optical zoom Wide
Zoom W/ T button
Subject will appear nearer
Digital zoom Tele
《29》
Voice recording / Voice memo / UP button
Macro / Down button
Focus lock
Wide Tele
Flash Left button
Unit m
Normal Macro Auto macro
Flash / Left button
Before the image is taken
Self-timer / Right button
Custom
Mode button
MENU/ OK button
Menu button
Pressing the Right button Pressing the Left button
Mode button
《38》
Effect button
Special Effect Colour
Special Effect Photo Frame
RGB
+/- button
Tungsten
Auto
Daylight
Cloudy
《44》
Size
Using the LCD monitor to adjust the camera settings
Children Mode SET
Movie Night
OSD
Information Save Mode
Metering Multi Spot
Soft
Use the UP and Down buttons to select a sub menu
How to use the menu
Mode SET menu
Mode
Backlight
Movie
640 320 160
Size
Avi
Quality/ Frame rate
Area. However, the calculation will be
Default metering mode is Multi pattern metering
Metering
Exposure will be calculated based on an
Sharpness
OSDOn Screen Display information
Vivid
Starting play mode
《54》
Recorded voice file
Using the LEFT/ Right button. If you select a recorded
Voice file, the voice indicator
Select the recorded voice that you want to play back by
Flash OFF
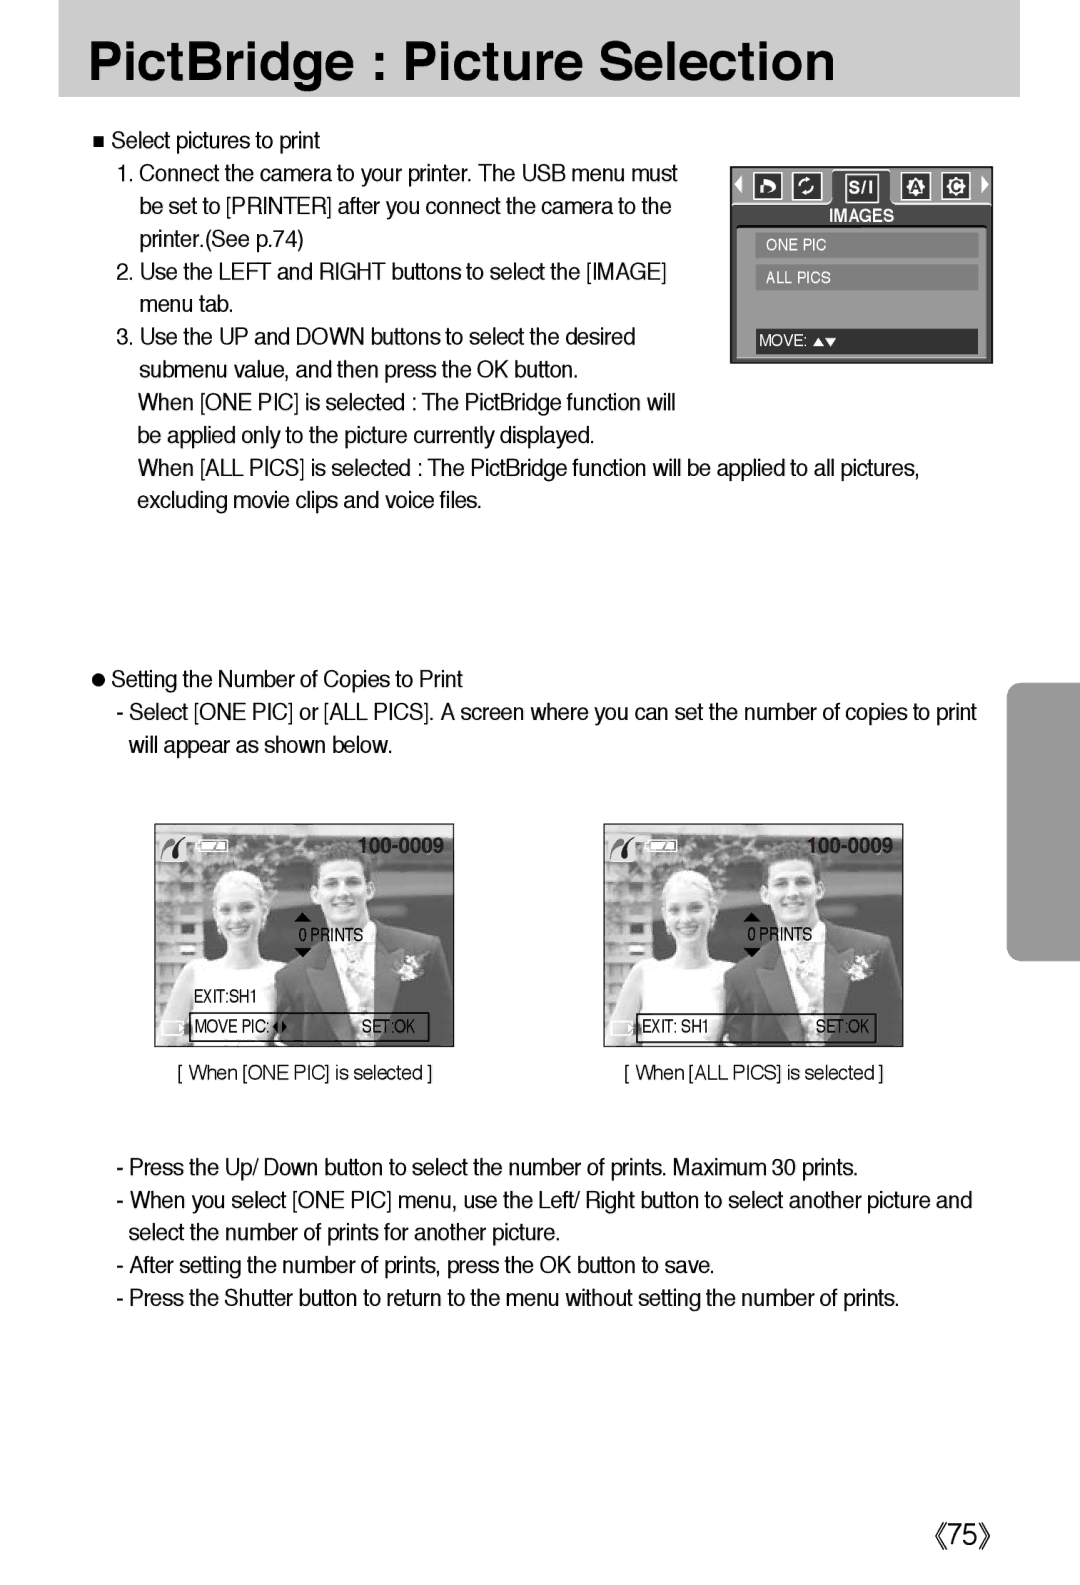
100-0009
F2.8
100
《57》
Enlargement button
Voice memo/ Up button
X6.4
Save it separately
Temporarily stops playback
Pause mode Resumes playback
Voice memo/ Up button
Play & Pause / Down button
Delete button
Display
Left/ Right/ Menu/ OK button
To the left of the cursor
Right button
Album button
Selected image will be removed
Cancels the inserting image
Cancels the removing image
YES
Slide show is repeated until the OK button is pressed
Dpof Index
Setting up the play back function using the LCD monitor
Resize
Protect Select
Letter
Dpof Print
Reset
Menu tab Main menu Sub menu Secondary menu
Print
Resize
Image Resize Types
VGA User Image
Lock
Protecting images
ALL
Unlock
Press the LEFT/ Right button and select
Deleting all images
Use the UP and Down buttons to select ONE PIC or
Press the LEFT/ Right button and select the Dpof
Select the Standard menu by pressing
UP/ Down button and press the Right button
Press the LEFT/ Right button and select the Dpof menu tab
Setting the Print Size
Select the Cancel menu by pressing the UP/ Down
If Index is selected Cancels the index print setting
LEFT/ Right button
Cancels the Copy to Card function
Dpof Auto Print
Printer Setup
PictBridge
Images
Menu tab Use the UP and Down buttons to select the desired
PictBridge Picture Selection
Printer.See p.74
Use the Left and Right buttons to select the Image
AUTO, DRAFT, NORMAL, Fine
PictBridge Print Setting
Auto SET
Type
Standard
PictBridge Printing
Connect the camera to the printer.See p.74
Use the Left and Right buttons to select the Print
Use the Left and Right buttons to select the Reset menu tab
PictBridge Reset
Setup menu
File name
LCD
Bright
5 MIN
Auto power off
Power off function will not operate
File name
Select the Format menu by pressing the UP/ Down
Language
Formatting a memory card
Select the Language menu by pressing
Select the DATE&TIME menu by pressing
Setting up the Date/ Time/ Date type
Changes the setting value
Imprinting the recording date
Sound
Auto Focus lamp
Quick view
LCD brightness
Select the Reset menu by pressing the UP/ Down
Initialisation
Initialising the Camera
Setting up the Mycam menu
Start up image
Menus are subject to change without prior notice
Start up sound
Shutter sound
Important notes
《90》
Card Locked
Card Error
Memory Error
LOW Battery
Please check the following
Before contacting a service centre
LOW Light
OUT of Number
→ Reset the date and time correctly
Before contacting a service centre
《94》
Specifications
4M Super Fine 4, Fine 7, Normal
Dimensions WxHxD
File Format
Audio WAV
System Requirements
Software Notes
About the software
Setting up the application software
Window will open. Click the Next button
Requirements
For information on application software, please refer to
Click InstallI button and Digimax Master starts installing
If your OS is Windows XP, an image viewer program will open
《103》
Starting PC mode
Cut
《106》
Click the OK button Camera is removed from the system
Removing the USB Driver for Windows 98SE
《108》
Click Removable Disk under My Computer or Windows Explorer
Removable Disk
Removing the removable disk
Using the USB Driver for MAC
Setting up the USB Driver for MAC
Click NextN button
Digimax Master
Downloaded images will be displayed
Window will open as shown alongside
《114》
《115》
Movie clip edit functions are listed below
Case Camera is not recognized by your PC
Case USB Driver is not installed correctly
Specification
→ Use a USB cable with the correct specification
Bus controllers
Beside them
Type regsvr32 /u m3jpgdec.ax and press the Enter key
《121》
《122》
Memo
6806-2897