Page
Instructions
Getting to Know your camera
Use this camera in the following order
Thank you for buying a Samsung Digital Camera
Danger
Contents
READY RECORDING
PLAY
Contents
Using the camera buttons to adjust the
Using the remote control in play mode
SETUP
Contents
SOFTWARE
Contents
Before contacting a service centre
Setting up the application software
System chart
Identification of features
Front & Top
Back
Identification of features
Bottom
Identification of features
Identification of features
Connecting to a Power Source
SLB-1137D rechargeable battery specification
Connecting to a Power Source
Using the SAC-47 as an AC charger
How to charge the rechargeable battery SLB-1137D
Connecting to a Power Source
Charging LED of the AC Adapter
Charging LED
Inserting the Battery
Insert the battery as shown
Inserting the memory card
Insert the memory card as shown
Instructions on using the memory card
Instructions on using the memory card
The camera can use SD/SDHC Memory Cards and MMC Multi Media Cards
NORMAL
When Using the Camera for the First Time Smart button
Setting up the language
vertical smart button
1. Press the Language menu button
2. Select a desired language by pressing the vertical smart button
LCD monitor indicator
Number of available shots remaining
How to use the AUTO mode
Starting the recording mode
How to use the PROGRAM mode
How to use the MANUAL mode
How to use the DUAL IS Dual Image Stabilization mode
Things to watch out for using the DUAL IS mode
Starting the recording mode
Night, Portrait scene mode
How to use the SCENE mode
Select a desired mode by rotating the mode dial
Starting the recording mode
How to use the MOVIE mode
Using Successive Recording
Recording the movie clip without sound
You can record the movie clip without sound
Using Photo Style Selector Mode
Starting the recording mode
Things to Watch Out for When Taking Pictures
Using the camera buttons to set the camera
POWER button
SHUTTER button
OIS Optical Image Stabilization button
Using both will offer a total zoom ratio of TELE Zoom
ZOOM W / T button
This camera has a 3X optical zoom and a 5X digital zoom function
Using the camera buttons to set the camera
Using the camera buttons to set the camera
WIDE Zoom
ZOOM W / T button
Using the LCD monitor to set the camera
ADJUST
MOTION CAPTURE
EFFECT
Selecting focus type
You can select the focus type in accordance
with the subject distance
The distance ranges are show below
Flash
Flash mode indicator
Size
You can select the image size appropriate for your application
Movie clip mode
Focus Area
Focus Area
It can only be set if is selected on the photo style selector dial
MULTI AF
Continuous shot
Metering
Image Adjust
Pictures can be adjusted prior to shooting
Saturation control
Sharpness
By using the camera’s digital processor, it is
Effect
Quality / Frame rate
possible to add special effects to your images
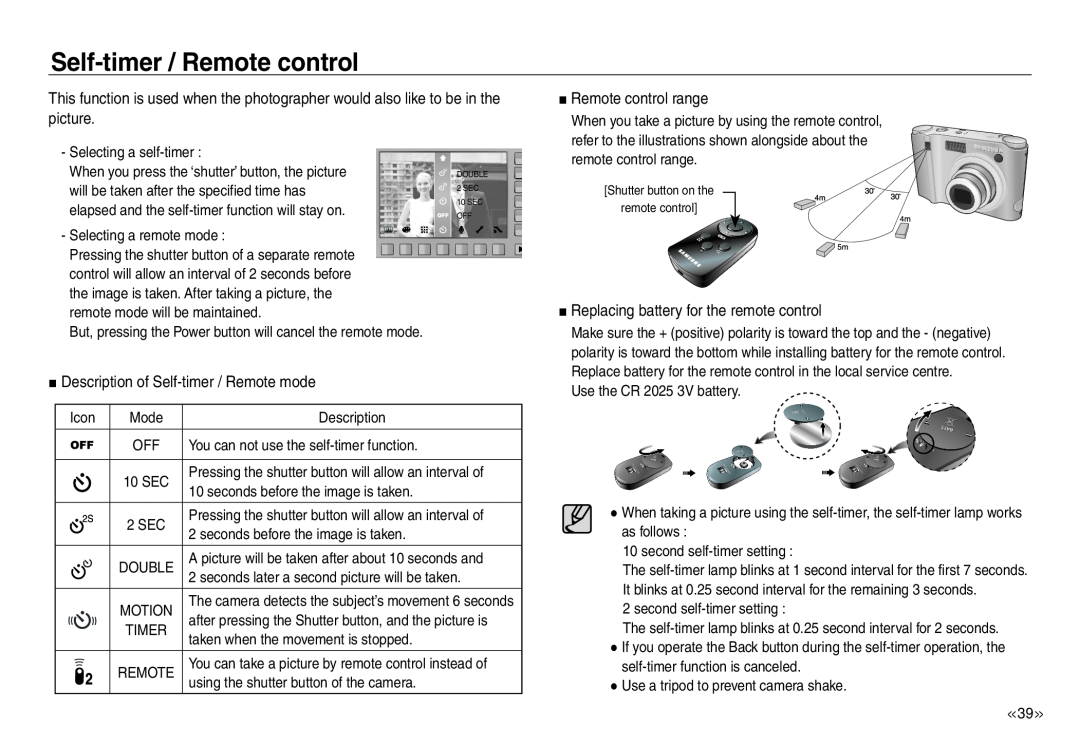
Self-timer / Remote control
Description of Self-timer / Remote mode
Remote control range
Replacing battery for the remote control
The Motion Timer flows are as followings. Movie Clip mode excluded
Motion Timer
Self-timer / Remote control
Voice memo
Voice recording / Voice memo
Voice recording
Using the Custom White Balance
White balance
Exposure compensation
You can select the ISO sensitivity when taking pictures
Compensating Exposure
ACB Auto Contrast Balance
Setting up the shutter speed
Shutter Speed
Aperture Value
2. The recording frame range becomes narrow when you select this menu
Movie Clip frame stabiliser
Scene menu
Playing back a still image
Starting play mode
Playing back a movie clip
Movie clip capture function
On camera movie trimming
Playing back a recorded voice
Capture still images from the movie clip
Playing back a recorded voice memo
Starting play mode
LCD monitor indicator
LCD monitor indicator
Using the remote control in play mode
Play mode button
You can play the movie clip and images by remote control
BACK button
Thumbnail / Enlargement button
Thumbnail display
Image enlargement
The maximum enlargement rate in proportion to the image size
Images for a specific date or all images can be played
Playing Images
Thumbnail / Enlargement button
Setting play interval
Configure slide show effects
Starting the slide show
Images can be displayed continuously at pre-set intervals
Deleting images
Protecting images
This is used to delete the displayed image
DPOF
DPOF IMAGES
DPOF Print size
Setting the Print Size
DPOF Index
Resize
Rotating an image
Image Resize Types
Effect
Resize
Captured images will be stored in black
Noise effect
Elegant
rich for an elegant feel
Brightness control
Red eye removal
Contrast control
You can change the brightness of the image
Setting up the camera for connection to a printer
PictBridge
Movie clips and voice files cannot be printed
Image Adjust
Easy printing
Print mode
PictBridge
Printing images Custom mode
Reset
PictBridge
FRANÇAIS
Setup menu
ESPAÑOL
Setup menu
How to select the setup menu
p.73~74
You can adjust the LCD brightness
OSD set
LCD brightness
LCD save
Sound Volume
Start up image
Operation Sound
Setup menu
Shutter sound
File name
Start up sound
AF sound
Self Portrait
Quick view
Auto Focus lamp
Setup menu
Imprinting the recording date
Copy To Card
There is an option to include DATE / TIME on still images
Setup menu
Formatting a memory
Delete All
Setup menu
Language
Setting up the Date / Time / Date type
Setup menu
The Movie output signal from the camera can be NTSC or PAL
Connecting to an external monitor
Initialisation
Selecting Video out type
Auto power off
Setup menu
U.S.A, Canada, Japan, South Korea, Taiwan, Mexico etc
Australia, Austria, Belgium, China, Denmark, Finland, Germany
Be sure to observe the following precautions
Extremes in temperature may cause problems
Caution on Using the Lens
Important notes
Warning indicator
Camera Maintenance
Memory Error
File Error
Before contacting a service centre
Low Battery
DCF Full Error
Please check the following The camera doesn’t switch on
Camera does not take images when pressing the Shutter button
A card error has occurred while the memory card is in the camera
The camera suddenly stops working while in use
The images are unclear
Specifications
Images are too bright
No image on external monitor
Before contacting a service centre
Specifications
Sharpness
Effect
Storage
Software Notes
Specifications
Power Source
Dimensions
System Requirements
About the software
You can visit the Samsung web-site through the internet
Setting up the application software
About the software
Setting up the application software
4. Install the Samsung Master in the order shown
Connecting the camera to a PC
Starting PC mode
Setting up the application software
Using Removable Disk
Disconnecting the camera and PC Refer to page
Removing the removable disk
Downloading stored images
Using Removable Disk
5. Click a folder where you want to paste the file
Windows 98SE
Removing the removable disk
Windows 2000/ME/XP/Vista
Setting up the USB Driver for MAC
Using the USB Driver for MAC
To remove the USB driver, refer to the process shown below
Removing the USB Driver for Windows 98SE
Samsung Master
Downloading images
Image edit You can edit the still image
Image viewer You can view the stored images
Samsung Master
Please check the following if the USB connection malfunctions
Samsung Master
Edit menu
Add Media
When the movie clip doesn’t play back on the PC
Installing codec for Windows
When the DirectX 9.0 or later is not installed
FCC notice
Correct Disposal of This Product
Declaration of Conformity
MEMO
MEMO
MEMO