ENG
Copyright information
Health and safety information
Do not touch the flash while it fires
Use the battery only for its intended purpose
Never use a damaged battery, or memory card
Keep cards with magnetic strips away from the camera case
Check that the camera is operating properly before use
Protect your camera’s lens
Additional information
Safety warnings and precautions
Indications used in this manual
Shutter button
Contents
Scene mode
Smart Auto mode
Magic mode
Playback/Editing
106
104
105
107
124
121
122
126
Holding the camera
Standing photography
Aperture
Crouching photography
Aperture value and the depth of field
Shutter speed
ISO sensitivity
Photo
Correlation between focal length, angle, and perspective
DOF depends on aperture value
What controls out-of-focus effects?
DOF depends on focal length
DOF preview
Rule of Thirds
Photos with two subjects
Compositions. Below are a few examples
Flash
Flash guide number
Bounce Photography
My Camera
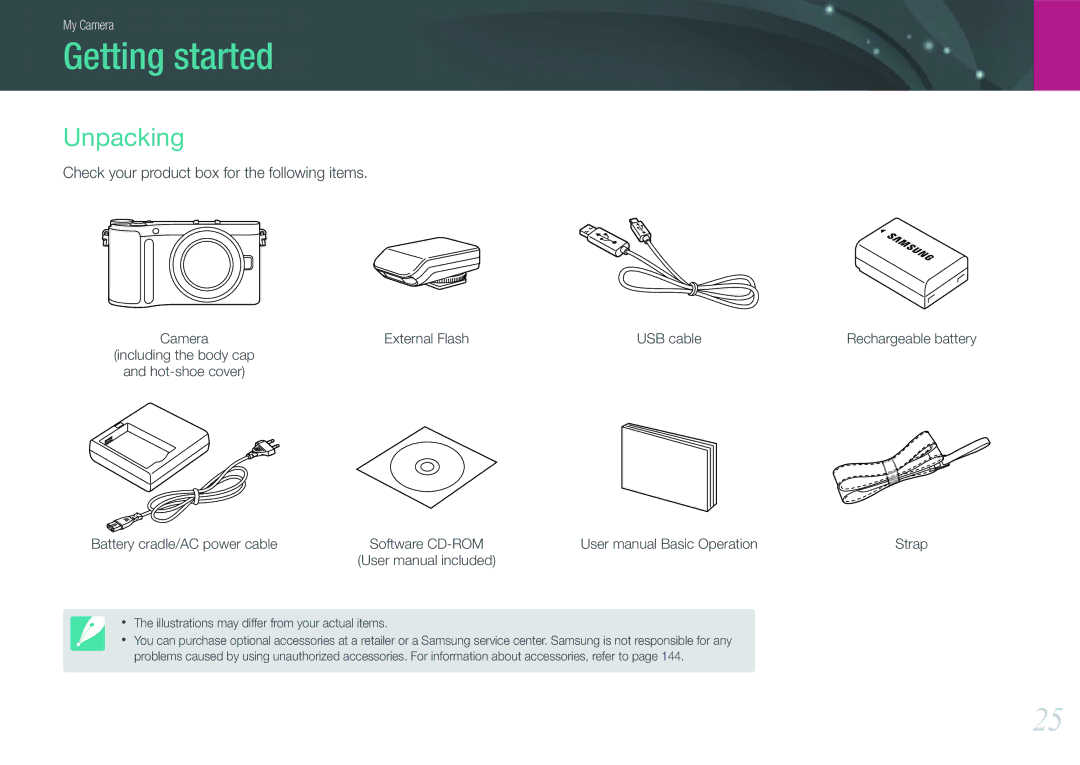
Check your product box for the following items
Getting started
Unpacking
Camera layout
Transfer or when data transfer to a
Blinking When saving a photo
Steady When there is no data
EV adjust button W p
Hdmi port
Insert a memory card and battery
USB and A/V port
Tripod mount
Capturing photos
Shooting mode
Display icons
Recording videos
Playback mode
Viewing photos Playing videos
Lenses
Lens layout
Locking or unlocking the lens
Samsung 16 mm F2.4 lens example
Samsung 18-55 mm F3.5-5.6 OIS II lens example
Focal length
Lens markings
Find out what the numbers on the lens signify
Accessories
External flash layout
Connecting the flash
SEF8A example
My Camera Accessories
GPS module layout optional
Attaching the GPS module
My Camera Accessories
Smart Auto mode
Shooting modes
Program mode
Program Shift
Aperture Priority mode
Shutter Priority mode
Using bulb
Manual mode
Framing mode
Lens Priority mode
Using the E mode
Using i-Function in Pasm modes
Using i-Zoom
Available options
Magic mode
Panorama mode
Landscape Capture still-life scenes and landscapes
Scene mode
Beauty Shot Hide facial imperfections
Icon
Movie mode
Available functions by shooting mode
For details about shooting functions, see Chapter
Shooting Functions
2640X2640
Size
Photo size options
2000X2000
Video size options
Video quality options
Quality
Photo quality options
Camera saves photos in either the Jpeg or RAW format
ISO sensitivity
Examples
White Balance light source
White Balance options
Customizing preset options
You can also customize preset White Balance options
Auto WB
Picture Wizard photo styles
AF mode
Single AF
Continuous AF
Manual focus
AF area function changes the positions of the focus area
AF area
Selection AF
Multi AF
Face detection AF
Self-portrait AF
Focus ring
MF assist
Off Do not use the function
Enlarge
OIS options
Continuous
Drive shooting method
Single
Burst Timer
Auto Exposure Bracketing AE Bracket
White Balance Bracketing WB Bracket
Value the same amount Wiz Bracket Set
Bracketing setting
Picture Wizard Bracketing Wiz Bracket
To capture the 3 bracketed photos
Flash
Flash options
Adjusting the flash intensity
Correcting the red-eye effect
Metering
Multi
Center-weighted
Spot
Measuring the exposure value of the focus area
Smart Range
Color space
Exposure compensation/lock
Multi Motion
Movie AE mode
Video functions
Fader
Voice
Playback/Editing
Searching and managing files
Protecting files
Viewing files by category in Smart Album
Viewing files as a folder
Protect your files from accidental deletion
Deleting multiple files
Deleting files
Deleting a single file
Deleting all files
Viewing a slide show
Viewing photos
Enlarging a photo
Auto rotating
Video viewing controls
Playing videos
Trimming a video during playback
Press o at the point where you want to save a still image
Capturing an image during playback
Editing photos
Options
Brightness Adjust the brightness of a photo
Contrast Adjust the sharpness of a photo
Camera settings menu
Noise reduction
User settings
ISO customizing
AF Priority
Zoom Set to adjust the zoom ratio
Set to adjust ISO sensitivity
Set to adjust the white balance
Distortion Correct
User display
You can add or remove shooting information from the display
AF lamp
Key mapping
Grid Line
You can change the function assigned to the Custom button
Setting
Learn about the menu items of the Setting
Reset
Do not change. Yes, No
100
101
GPS
102
Connecting to external devices
Viewing files on a TV
Viewing files on a TV or Hdtv
104
105
Viewing files on an Hdtv
106
Viewing files on a 3D TV
Printing photos with a PictBridge photo printer
Printing photos
107
Creating a print order Dpof
Configuring print settings
108
Images
109
Dpof options
110
Connecting the camera as a removable disk
Transferring files to your computer
Transferring files to your Windows computer
Transferring files to your Mac computer
Disconnecting the camera for Windows XP
111
112
Using programs on a PC
Installing software
Programs contained on the CD
Requirements
Using Intelli-studio
113
Enlarge or reduce the thumbnails in the list
Using the Intelli-studio Interface
114
Faces
Transferring files using Intelli-studio
115
Requirements for Windows
Using Samsung RAW Converter
116
Requirements for Mac
117
To adjust the exposure of an image
Using the Samsung RAW Converter Interface
Editing RAW format files
118
To save RAW files in Jpeg or Tiff formats
Appendix
Center
Error messages
120
121
Cleaning the camera
Maintaining the camera
122
Using or storing the camera
Using on beaches or shores
Inappropriate places to use or store the camera
Other cautions
Using the camera with caution in humid environments
123
Supported memory card
124
About memory card
Memory card capacity
762 13.3M 147 284 413 272 513 728 454 823 130 344 062 508
125
20.0M 185 272 10.1M 192 368 530 318 593 834 827
126
About the battery
Battery specifications
Use only Samsung-approved batteries
127
128
Battery life
Low battery message
129
130
131
Camera specifications
132
133
134
135
Sunset, Dawn, Beach & Snow, Night
Lens specifications
136
137
Supported Beauty Shot, Portrait, Children, Backlight
138
Close Up, Text
Glossary
139
140
141
142
143
Optional accessories
144
Index
145
Photos
Shutter speed 14 Slide show Smart Album Timer Videos
146
3D Panorama 3D Shot
147
Correct disposal of batteries in this product
FCC notice
148
Please refer to the warranty that came with your product