Getting Started Guide
Page
Samsung Mondi
Intellectual Property
Headquarters
Disclaimer of Warranties Exclusion of Liability
Open Source Software
Table of Contents
110
Powering On your Device
Accessing the Online User Guide
Powering the Device
Powering Off your Device
Introduction
Initial Device Setup
Stylus
Using the Travel Adapter
Charger and Battery Replacement
Charging the Battery
Locate the Power/USB Data jack
Away from the device
Installing the Battery
Incorrect
Replacing the Battery
MicroSD Card Overview
Using the Kickstand
Turn the unit over to reveal the back battery cover
Lay the device on a flat surface
Installation of the microSD Card
Incorrect Correct
Removal of the microSD Card
Rebooting the Device After a Lockup
Reset Slot
Outlook email client
Features of Your Device
Basics
Video Output via optional mini-USB to Hdmi cable
Basics
Your Device
On onscreen
Page
Speakers left and right stereo speakers
Reset
Navigating the Today Screen
Today Screen Functions
Information, Internet Phone, and any Upcoming Appointments
Bookmarks or Browsing History
Clock displays the current date and time information
Title Bar Icon Overview
Screen
Manually Unlocking the Device
Locking Your Device
Manually Locking the Device
Indicates an inactive Mobile WiMAX connection
Setting Up an Automatic Lock State
Creating a Password Hint
Menu Navigation
Unlocking the Device after a Timeout
Calibrating your Touchscreen
Opening an Application
Press and hold left action key to launch
TaskSwitcher application
To close your applications
Navigating Through Menus
Scrolling Through Options/Selections
Quick Navigation Among the Device Panels
Updating Sound Events
Adjusting Your Volume Levels
Select again to exit
Touch the System tab and tap Hard Reset
Formatting the Device’s Memory
Formatting the microSD Card
Entering Text Using the Qwerty Keyboard
To access the Qwerty keyboard
Tap Clear Memory to delete both locations
Examples 1, 5, 0, $, @, #, ?
Keyboard
Entering Characters
Entering Numbers
Entire word
Entering Symbols
Symbols can be entered from the keyboard using the key
Left button. Ex 1/8 thru 8/8
Once complete, touch again to close the onscreen keyboard
Entering Text using the Onscreen Keyboard
Adjusting Text Input Settings
Widget Bar Navigation
Accessing the Widget Bar
Widgets
From the Today screen, touch Start Programs Widget
Widget Bar Desktop Pages
Touch and hold the widget
Activating a Widget
Placing Widgets on Separate Pages
Rearranging Widgets within the Widget Bar
For more information, refer to Calendar on
Widget Icons
Digital clock
Write memos to keep track of your schedule
You can also view times from other parts of the world
Set an alarm to act as a reminder, if necessary
For more information, refer to Widgets on
For more information, refer to Clocks on
Wireless Manager Overview
Communication Setup
Wi-Fi access Mobile WiMAX connection
Accessing the Wireless Manager
Communication Methods Overview
Airplane Mode
Accessing the Wireless Manager Widget
Widget from the Widget Bar to the Widget Desktop area
Touch Menu right softkey Wi-Fi Settings
Activating Wi-Fi Communication
Establishing a Wi-Fi Connection
Touch Finish right softkey to complete the process
Connecting to a Mobile WiMAX Network
Activating the Mobile WiMAX Hardware
Connection
Bluetooth Communication
Initiating a Mobile WiMAX Connection
Within the Title Bar top of screen indicates an active
Touch Menu right softkey Bluetooth Settings
Touch Menu right softkey to access the Bluetooth Settings
Adding a Bluetooth Device
Creating a Device Name
From the Today screen, touch Start Settings Connections tab
Touch the Connections tab and tap Bluetooth
Touch the System tab and tap About
Making Bluetooth Secure
Beaming
Computer Requirements
Installation of ActiveSync on Your Computer
Synchronization
Port USB port 1.0 or higher Optical drive DVD-ROM drive
Connection of ActiveSync
Configuring ActiveSync
From the initial Synchronization Setup Wizard, click Next
Click Next to continue
Setting Up Windows Media Player Sync Options
Click on the Sync tab to launch the partnership process
Synchronizing Music with Windows Media Player
For the purpose of this section, Genre has been selected
Touch Sync left softkey to begin the synch process
Connecting to the Device via ActiveSync
From the Today screen, touch Start Programs ActiveSync
From within the ActiveSync application, click Explore
Touch the System tab and tap Memory
Loading Files to Your microSD Card
Reviewing the microSD Card Information
Touch ok to return to the previous
Using the Device as External Storage
Formatting the microSD Card
Settings USB
Viewing files on microSD card via Mondi
From the Today screen, touch Start Programs File Explorer
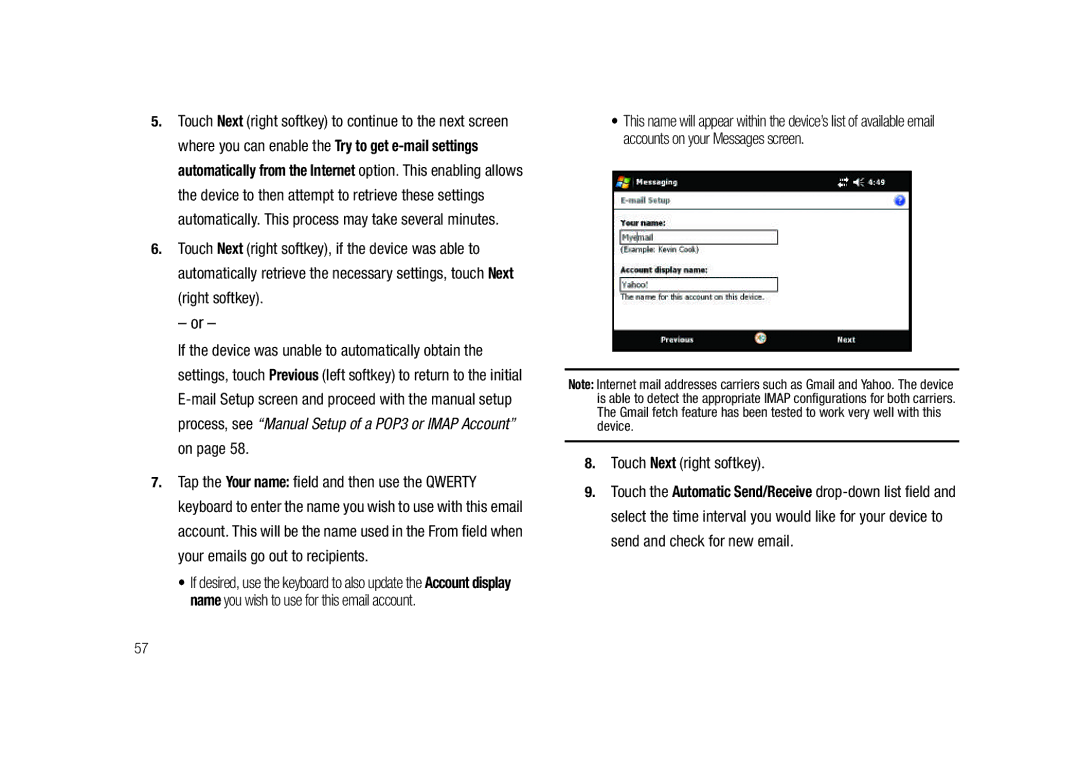
Email Setup
Setting Up an Imap or POP3 Account
Touch Next right softkey
Manual Setup of a POP3 or Imap Account
Touch Next right softkey
Editing an Email Account
Touch the Edit Account Setup link
Touch Finish right softkey to complete the setup process
Touch Menu right softkey Options and tap the Accounts tab
Touch the Send/Receive Schedule link
Changing the Send/Receive Schedule Settings
Touch the blue Advanced Settings link
Changing the Download Size Settings
Touch the Download Size Settings link
Touch Next right softkey to continue onto the Server Address
Checking Your Outlook Email from the Today Screen
Page
Adding an Event to Your Calendar
Calendar and Contacts
Calendar
From the Today screen, touch Start Calendar
Select a reminder time interval 1, 5, 10, 15, 30, or
Reviewing Calendar Events
Touch an event from the screen to open the event
Deleting a Calendar Event
Editing a Calendar Event
Locate the event and tap the entry
Beaming a Calendar Event
Navigating within Contacts
To access the communication features for a selected Contact
Contacts
Stored contacts
From the Today screen, touch Favorite Contacts shortcut
Default image
Adding a New Contact
Touch Menu right softkey New
Enter a category name and touch Save left softkey
Editing an Existing Contacts Entry
Deleting an Existing Contacts Entry
Slide a desired Contact entry card to the center location
Utilizing the Communication Bar
Beaming a Contacts Entry
Navigating the Web
Applications
Microsoft Mobile Applications Internet Explorer
Saving a Web Address as a Favorite Location
Creating a New Excel Workbook
Microsoft Mobile Applications Office Mobile
Excel Mobile Overview
Touch New left softkey to begin creation of a new Workbook
Creating a New Note
Beaming a Workbook
OneNote Mobile Overview
Word Mobile Overview
Touch ok to save your changes and return to the previous
Accessing Word Mobile’s Options
Touch an entry from the Word Mobile file access screen
Deleting a Pre-existing Document
Launching Media Player
Windows Media Player
Beaming a Word Document
Loading a Media File into the Player
Player Controls
Media Player Controls
Magnification
MultiMedia Player Compatibility
Calculator
Creating a New Alarm Event
Instant Messenger
Clocks
Applications
Tap the X adjacent to the alarm event you wish to delete
Activating/Deactivating an Alarm
Deleting an Alarm Event
Touch Done to complete the time assignment
Tap the Anniversary tab, then touch New left softkey
Creating a New Anniversary Event
From the Today screen, touch the Date/Time shortcut
Anniversary event
Delete Mode
Deleting an Anniversary Event
Tap the X delete
Using the World Clock
Using the StopWatch
Your device comes with a built-in stopwatch feature
World Clock Map
Editing an Existing Favorite Location
Tap the World Clock Map on the screen
Assigning a Favorite World Location
Using TaskSwitcher to Close Applications
Access to Multimedia Player Active Applications
Options are Horizontal List or Vertical Grid
Installing the Application and Maps
Route 66 Navigation
From the main Route 66 application screen, click Install
From the main Route 66 application screen, click Exit Exit
From the Today screen, touch Start Programs ROUTE66 WM8
Main menu Target
Navigating within Route66 Application
Target Area Map
Zoom
Address
Are
About the selected target location
Touch Back icon
Routes select a different route
Consumer Information on Wireless Devices
Health and Safety Information
Health and Safety Information
Samsung Mobile Products and Recycling
Do wireless devices pose a health hazard?
What is FDAs role concerning the safety of wireless devices?
National Telecommunications and Information Administration
What are the results of the research done already?
Health and Safety Information
What about children using wireless devices?
Page
Road Safety
Responsible Listening
100
American Academy of Audiology
101
102
Using Your Device Near Other Electronic Devices
Operating Environment
Hearing Aid Compatibility with Mobile Devices
HAC/Wi-Fi Language
Implantable Medical Devices
Other Medical Devices
FCC Notice and Cautions
Restricting Childrens access to your Device
Potentially Explosive Environments
Posted Facilities
Product Performance
Other Important Safety Information
Understanding the Power Save Feature
Maintaining Your Devices Peak Performance
Battery Precautions
Availability of Various Features/Ring Tones
Battery Standby and Talk Time
WiMAX Language
107
108
Window Mounted Accessory Precautions
Care and Maintenance
109
What is Covered and For How Long?
Warranty Information
Standard Limited Warranty
Device
What are the Limits on Samsungs WARRANTY/LIABILITY?
111
112
End User License Agreement for Software
113
114
115
Richardson, Texas Phone 1-800-SAMSUNG
Precautions for Transfer and Disposal
Customer Care Center Klein Rd Plano, TX
116
Phone 1-888-987-HELP
117
Index
TaskSwitcher 23
Rebooting
Sound Events Standard Limited Warranty
Viewing Files Visibility Volume
Wireless Manager
Warranty Information Widget Bar Widgets
Wi-Fi
Windows Media Player
Page
Page
GH68-23169ATWC 09-25-09 F3