B I L E P H O N E
USCSCH-R760UMEngFB14CB030612F5
Open Source Software
Samsung Telecommunications America STA, LLC
Polaris Office is a trademark of Infraware
Table of Contents
102
Connections
119
152
173
198
Getting Started
Special Text
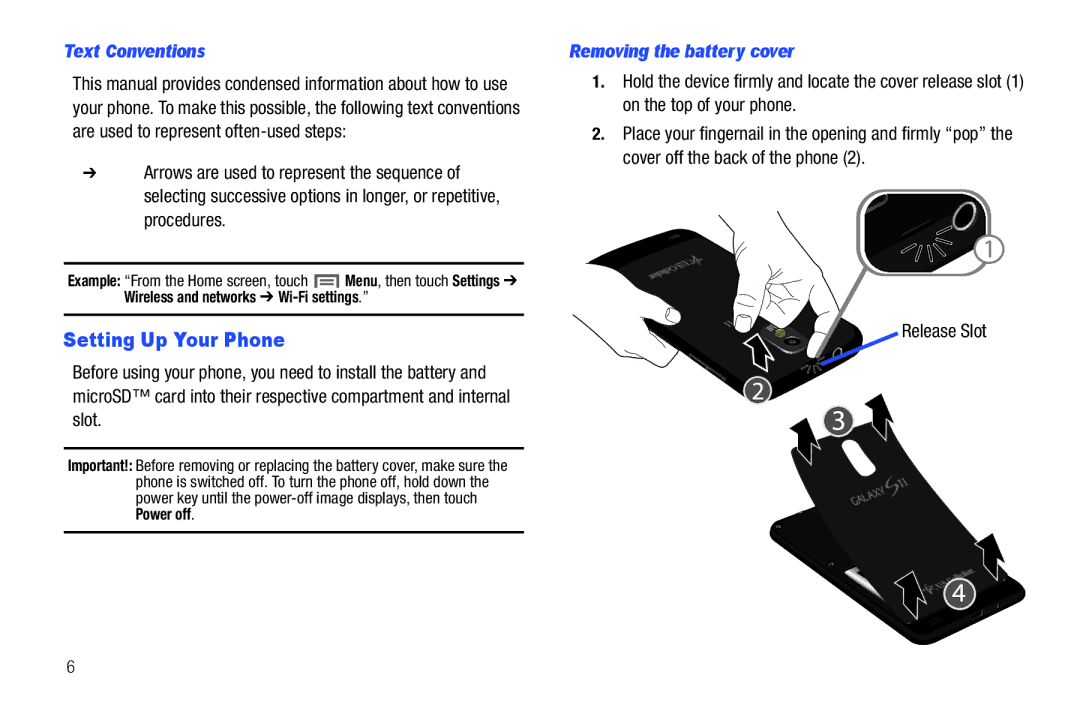
Removing the battery cover
Setting Up Your Phone
Text Conventions
Correct Incorrect
Installing the Memory Card
Remove the battery cover
Removing a Memory Card
Gently press down to secure the battery
Installing the Battery
Removing the Battery
Installing the battery cover
Charging the Battery
For more information, refer to Social Hub on
Battery
TTY Mode
For more information, refer to TTY mode on
Battery Indicator
Turning Your Phone Off
Press and hold the Power/Lock key for three seconds
Turning Your Phone On
Unlocking Your Phone
Voicemail
Setting up Voicemail
Resetting your Google Account Password
Your Google Account
Securing Your Phone
Press the Power/Lock key on the right side of the phone
Roaming
Locking the phone manually
System Tutorial
Unlocking with a Password
Unlocking with a Personal Screen Unlock Pattern
Understanding Your Phone
Features
Picture Gallery, supporting JPG, PNG, GIF, and BMP formats
Videos
Power
Front View
Charging or to sync music and files
Side Views
Lanyard, here
Or waken the display
Back Cover Protects the battery and Memory Card slot
Back View
Display settings
Touch Screen Display
Annunciator Line
No Signal Indicates there is no signal available
Changing the Screen Orientation
1X Connection Active Phone is active on a 1X system
3G Connection Active Phone is active on a 3G system
Bluetooth Active Bluetooth is turned on
TTY TTY Mode is active
New Text Message You have a new text or multimedia message
Navigation
Connection Buttons
Notification Panel
Clearing Notifications
Home Screen
Home screen is the starting point for using your phone
Extended Home Screen
Editing the Primary Shortcuts
Primary Shortcuts
Adding and removing Home screen panels
Adding Widgets to a Home Screen panel
Customizing the Home Screen Panels
Music files on Amazon.com
Customize the Home screen panels to suit your preferences
Power Saving Set network and power settings
Market Browse, download, and install Android applications
Picture frame Launch the Picture Frame application
Removing Widgets
Appears, then drag the Widget to the icon
Adding Shortcuts to a Home Screen panel
Touch and hold the Widget until the trash can icon
Removing Shortcuts
Appears, then drag the Shortcut to the icon
Adding Folders to a Home Screen panel
Touch and hold the Shortcut until the trash can icon
Wallpaper
Changing the Wallpaper on a Home Screen panel
Adding Applications to a Home Screen panel
Call Functions
Making Calls Using the Phone Keypad
Making Calls
Making Calls from Contacts
Making Calls using Speed Dials
Making Calls using Voice Talk
Contacts
Three-Way Calling
Making Calls using Favorites
Making Calls from Call Log
Dialing International Numbers
Sending Calls to Voicemail
Answering Calls
Silencing an Incoming Call Ringtone
Answering Call-Waiting Calls
Ending a Call
Accessing Call Logs
Sending Messages using Call Logs
Call Logs
Choose Create contact or Update existing
Creating or Updating Contacts Using Call Logs
Managing the Call Logs
For more information, refer to Voicemail on
Viewing call durations
Screen Keyboard Types
Entering Text
Screen Qwerty Keyboards
Screen keyboard, landscape Screen keyboard, portrait
Changing the Keyboard Type
Using the Samsung Keypad
Configuring the Samsung Keypad
Samsung keypad Swype
Changing the Text Input Mode Keypad
Using ABC Mode
Touch ABC To return to Abc mode
Using ?123 Mode
Using XT9 Predictive Text
Using the Swype Keyboard
Configuring Swype
Swype Help
Entering Symbols and Numbers
Using Swype Speech Recognition
Editing Keyboard
Accounts
Touch Home Menu, then touch Settings Accounts and sync
Accounts and Contacts
Adding a Google account
Adding a Microsoft Exchange account
Managing a Google account
Notification settings
General settings
Exchange ActiveSync settings
Server settings
Adding a Facebook account
Common settings
Touch Home Menu, then touch Settings
Adding a Twitter account
Contacts
Creating Contacts
Creating Contacts from Call log
Touch Home, then touch Phone
Updating Contacts
Creating Contacts from the Phone Dialer
Touch Sync now
Get Friends
Touch Menu, then touch More View friends
Contacts Display Options
Sending Namecards
Bluetooth For more information, refer to Bluetooth on
Touch a contact to separate it
Touch Menu, then touch Send namecard via
Creating Favorites
Favorites
My Profile
Viewing My Profile
Creating a New Group
Accessing Groups
Groups
Editing a Group
Removing Contacts from a Group
Logs
Adding Contacts to a Group
Sending a Message to Group Members
Assigning Speed Dials
Speed Dials
Removing or Reassigning a Speed Dial
Text and Multimedia Messaging
Messaging
Types of Messages
Creating and Sending Messages
To attach any of the following items to your message
Text message SMS settings
Settings Configure message settings
Storage settings
Managing Messages
Refreshing Your Gmail Account
Configuring Your Gmail Account
Gmail
Composing and Sending Gmail
Gmail account settings
Touch Menu, then touch More Settings General preferences
Google Talk
Setting up access to Email accounts
Setting up the first Email account
Chat with other Google Talk users
Applications Email
Touch Menu Add account. The Set up email screen appears
Setting up additional Email accounts
Account ID button
More
Composing and Sending Email
Touch Compose
Touch the email text field and compose your email message
Touch an account, or touch All Inboxes
Refresh your account to update your phone from the servers
Managing Emails
Combined Inbox
Email Account Settings
Signature Enter or change signature text
Browser
Browser Features
Web and Social Networking
Applications Browser
Entering a URL
Using Browser Windows
Using Bookmarks
Touch to load
Edit bookmark Modify the URL
Accessing bookmarks and history
Delete bookmark Remove the bookmark
Copying a hyperlink or URL
Copying Fields or Text
Save link Save the linked page to Download history
Forward Move forward to a previously-viewed
Browser Settings
Browser Menu
Add shortcut to home Create a shortcut to home
Security settings
Default storage Select where Browser stores files
Privacy settings
Advanced settings
Navigating the Map
Maps
Applications Maps
Maps Menu
Voice Search
Settings
YouTube
Applications YouTube
Web and Social Networking
Registration
Music
Music App
Playing music
Rotate your phone to the vertical or horizontal position
Changing Library View
Return to the Library screen from most other screens
Music
Available songs
Searching for and Playing Music in Your Library
From the Home screen, touch
Options for Songs and Albums
Touch to resume playback Touch to pause playback
Settings View and change Music app settings
Touch
Displaying the Now Playing Screen
Creating a Playlist
Changing Music Settings
Adding Songs to Playlists
Deleting a Playlist
Music Player
Playing a Playlist
Music Player
Music Player List Touch Menu Add to playlist
Setting a song as a ringtone
Music Player List
Camera
Pictures and Videos
Camera
Taking Pictures
Settings Launches the Settings menu
Camera Settings
Shooting mode Choose a camera shooting mode Single Shot
Anti-Shake Select to ensure picture clarity
Capturing Video
Camera, then touch and drag the Mode button from
Camcorder
Touch the Play arrow on the screen to review the video
White balance Choose a setting for the light source
Camcorder Settings
Flash Choose Off never flash or On always flash
For additional options, touch Menu
Video quality Choose a quality setting for videos
Videos
To play a video, touch it Size Progress Bar
Subtitles Display subtitles text included with the video
Media Hub
Applications Media Hub
To rent or buy media, you must have a Media Hub account
Video Maker
Video Maker
Gallery
Applications Gallery
Viewing Videos
To erase the picture from memory, touch Delete
Menu for options
Sharing pictures and video
Photo Editor
Setting a Picture as a Contact Icon
Setting a Picture as Wallpaper
Touch a category, then touch a picture to select it
Save saves your photo to your gallery
Turning Wi-Fi On or Off
Wi-Fi
Access your corporate network
Connections
Adding a Wi-Fi Network Manually
Enabling Wi-Fi Direct
Scanning and Connecting to a Wi-Fi Network
Configuring Wi-Fi Settings
Touch Disconnect Wi-Fi Direct to disconnect
Portable Wi-Fi Hotspot
Connecting to a Wi-Fi Direct device
Configuring Portable Wi-Fi Hotspot Settings
Connecting a Device via Portable Wi-Fi Hotspot
Turning On Portable Wi-Fi Hotspot
Portable Wi-Fi hotspot settings
Touch Portable Wi-Fi Hotspot to turn the service on
Pairing with a Bluetooth Device
Bluetooth
Turning Bluetooth On or Off
Configuring Bluetooth Settings
Tethering
Airplane mode
Tethering and portable hotspot screen appears
Mobile networks
Connecting to a VPN
Adding a VPN
Transferring Files to a Memory Card
Customizing the Applications Screens Choosing a view
Accessing Applications
Applications
Moving Application icons
AllShare
Setting Up AllShare
Connecting with Other Devices
Selecting Media to Play
Amazon MP3
Amazon
Amazon Kindle
Appstore
From the Applications screen, touch Calculator
Calculator
Calendar
Record events and appointments to manage your schedule
Customizing the Calendar
Sending Events via Bluetooth
Touch Menu, then touch Send via Bluetooth
Select time zone Choose a time zone
Daily Perks
City ID
Clock
Downloads
Appears in the display Following options are available
IMDb
Latitude
Latitude
Sharing your Location with Friends
Let’s Golf 2 HD
Additional Latitude Options
At the Send sharing requests prompt, touch Yes
Map Return to the map
Layers allows you to switch map views
Maps
Search allows you to search for a place of interest
Help Access on-line instructions on using Maps
From the Applications screen, touch Market
Market
Downloading a New Google Application
Read the application descriptions
Mobile TV
Play music files from an optional, installed memory card
Memo
Music
My files
Places
Social Hub
Settings
Polaris Office
Talk
Voice Recorder
Voice command
Tone Room Deluxe
Tone Room Deluxe
From the Applications menu, touch Your Navigator Deluxe
Voice Talk
Your Navigator Deluxe
From the Applications screen, touch Voice talk
From the Applications screen, touch YouTube
Zappos
118
Wireless and networks
Settings
Accessing Settings
Airplane mode
Wi-Fi settings
Set up and manage wireless access points
Wi-Fi Touch to enable your phone’s Wi-Fi service
Advanced Wi-Fi settings
Your phone supports Bluetooth 3.0 + EDR
Wi-Fi Direct settings
Bluetooth
Bluetooth profiles
Enter a new name Touch OK to complete the rename process
To change your Bluetooth name
Verify Bluetooth is active
To set visibility
USB utilities
To scan for Bluetooth devices
Tethering
Portable Wi-Fi Hotspot On or Off
Portable Wi-Fi Hotspot
124
VPN settings
Portable Wi-Fi Hotspot Settings
126
Data Roaming
Mobile networks
Use Packet Data
System selection
Set reject messages
Call settings
View call timer
North American dialing
Dtmf tones
TTY mode
Auto retry
Call Restrictions
Emergency Number
Sound settings
Silent mode
General
Incoming calls
Choose a default ringtone for all incoming calls
Notifications
Feedback
Touch OK to save your setting
Incoming call Notification Haptic feedback
Screen display
Display settings
Select the font used to display text in screens
Brightness
Screen mode
Auto-rotate screen
Animation
Screen timeout
Auto adjust screen power
Touch key light duration
Power saving on at
Power saving mode
Use Power saving mode
Power saving mode settings
My location
Use Wireless networks
Location and security
Use GPS satellites
Disable USB debugging mode
Screen unlock settings
Set unlock Password/Change unlock Password
Set unlock pattern/Change unlock pattern
Add or remove device administrators
Passwords
Device administration
Set or change a password to protect credentials
Unknown sources
Running services
Applications
Manage applications
Development
Battery usage
Storage usage
Set options for application development
Manage accounts
General sync settings
Accounts and sync
Background data
Adding an account
Motion Settings
Touch an account to display its settings
Removing an account
Storage
From the Settings menu, touch Storage
Privacy
Personal data
Language and keyboard
Language settings
Keyboard settings
USB storage
Preferences
From the Settings menu, touch Language and keyboard
About
Tutorial Learn about this keypad’s functions
Samsung powered by Vlingo
Voice input and output
Voice input
Voice output
Voice recognition settings
Text-to-speech settings
Language Set the language voice for spoken text
Accessibility
Build number Display your phone’s build number
Date and time
About phone
Model number Display your phone’s model number
Setup wizard
152
Health and Safety Information
Exposure to Radio Frequency RF Signals
Do cell phones pose a health hazard?
153
Health and Safety Information
Interphone Study
154
Reducing Exposure Hands-Free Kits and Other Accessories
Reduce the amount of time spent using your cell phone
Cell Phone Industry Actions
Children and Cell Phones
155
Hands-Free Kits
Specific Absorption Rate SAR Certification Information
156
FCC Part 15 Information to User
157
Reorient or relocate the receiving antenna
Smart Practices While Driving
158
On the Road Off the Phone
Battery Use and Safety
159
160
Drop It Off
Samsung Mobile Products and Recycling
161
Mail It
Display / Touch-Screen
UL Certified Travel Charger
162
Use of Agps in Emergency Calls
163
Your Location
Navigation
164
Care and Maintenance
Emergency Calls
To make an emergency call
Responsible Listening
165
166
American Academy of Audiology
167
National Institute for Occupational Safety Health Niosh
Operating Environment
Should not carry the mobile device in a breast pocket
168
169
HAC/Wi-Fi for Newer Technologies
Restricting Childrens Access to Your Mobile Device
170
171
Other Important Safety Information
FCC Notice and Cautions
FCC Notice
172
What is covered and for how long?
Warranty Information
Standard Limited Warranty
What is not covered?
What are SAMSUNG’s obligations?
What must you do to obtain warranty service?
174
What are the limits on SAMSUNG’s liability?
What is the procedure for resolving disputes?
175
176
Severability
End User License Agreement for Software
Precautions for Transfer and Disposal
177
178
Disclaimer of Warranty Regarding Third-Party Applications
179
180
181
Legal Terms and Privacy
182
Social Hub Terms and Conditions Acceptance of the Terms
Eligibility
Termination of Service
183
Your Information
Restrictions
Using the Service
184
Actions Required by Law
Subscription Information
Third Party Sites and Content
185
Availability
186
Intellectual Property
Limitation of Liability
187
Choice of Law
188
Indemnification
Miscellaneous
Personal Information
Social Hub Privacy Policy
189
Non-Personal Information
190
Our Services
Mail Communications
Aggregate Information
Service Providers
191
Third Party Advertisers
192
How can I update my profile?
Archived Information
Social Hub End User License Agreement
193
194
Ownership of Intellectual Property Rights
Warranty and Support
195
Courts in New York City will have non-exclusive
196
Disclaimer of Certain Damages. in no Event Shall
197
Compliance with Applicable LAW
Index
E911
Camcorder
Do cell phones pose a health hazard? Downloading
Emergency Calls 33 Entering Text
Gmail
Facebook
Get Friends Getting Started
Google
Messages
Maps Market Memory Card
Menu
MicroSDHC card Mobile networks 100 Music
Sound settings
Portable Wi-Fi Hotspot Settings Powering On and Off Privacy
Settings Sharing pictures and video 91 Silent mode
Symbol/Numeric mode
Voice Commands Voice Search Voice talk Voicemail
Synchronization settings
Text settings
Volume