STBY 00:00:00 [55Min]

grabación avanzada

MANEJO DE MENÚS Y DE MENÚS RÁPIDOS

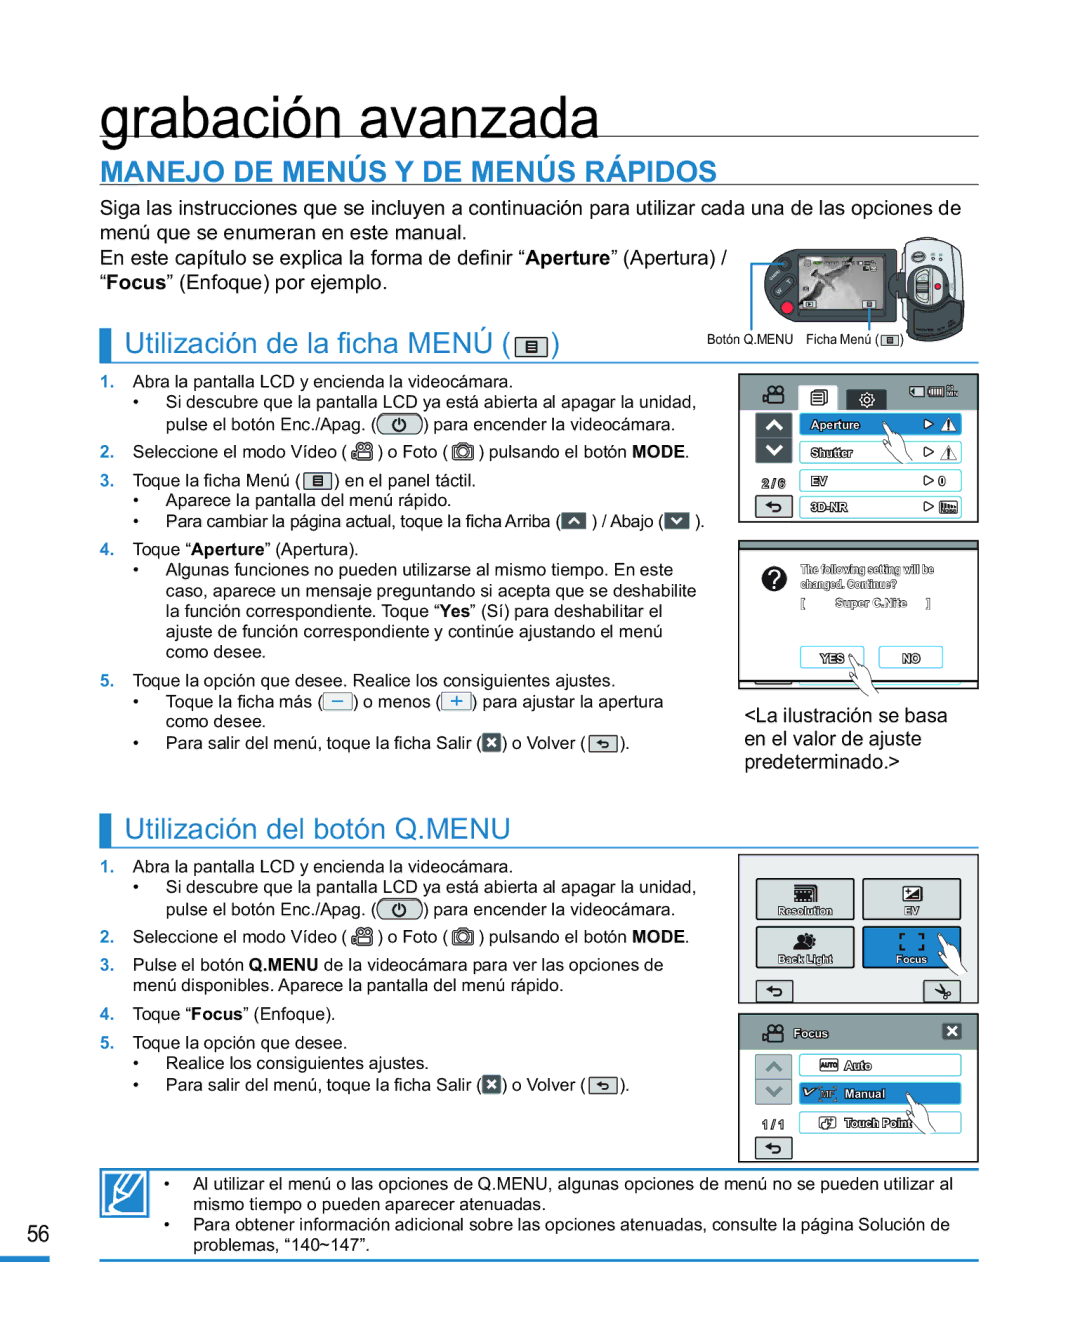
Siga las instrucciones que se incluyen a continuación para utilizar cada una de las opciones de menú que se enumeran en este manual.

En este capítulo se explica la forma de defi nir “Aperture” (Apertura) / “Focus” (Enfoque) por ejemplo.


Utilización de la fi cha MENÚ (

)


Botón Q.MENU


Ficha Menú (

)

DC


1.

Abra la pantalla LCD y encienda la videocámara.


90


• Si descubre que la pantalla LCD ya está abierta al apagar la unidad,


MIN


pulse el botón Enc./Apag. (

) para encender la videocámara.


Aperture


2.

Seleccione el modo Vídeo (

) o Foto (

) pulsando el botón MODE.


Shutter


3.

Toque la fi cha Menú (

) en el panel táctil.


2 / 6


EV


0


• Aparece la pantalla del menú rápido.


) / Abajo (

).


3D-NR


• Para cambiar la página actual, toque la ficha Arriba (


4.

Toque “Aperture” (Apertura).


MIN


• Algunas funciones no pueden utilizarse al mismo tiempo. En este


90


The following setting will be


caso, aparece un mensaje preguntando si acepta que se deshabilite

changed. Continue?


[

조리개


]


la función correspondiente. Toque “Yes” (Sí) para deshabilitar el


Super C.Nite


셔터


ajuste de función correspondiente y continúe ajustando el menú


0


como desee.


2 / 6


노출 보정

NO


YES


5.

Toque la opción que desee. Realice los consiguientes ajustes.


3D-NR


Toque la fi cha más (


) o menos ( ) para ajustar la apertura

<La ilustración se basa


como desee.


Para salir del menú, toque la fi cha Salir ( ) o Volver (

).

en el valor de ajuste


predeterminado.>

Utilización del botón Q.MENU

1.Abra la pantalla LCD y encienda la videocámara.

Si descubre que la pantalla LCD ya está abierta al apagar la unidad,

pulse el botón Enc./Apag. () para encender la videocámara.

2.Seleccione el modo Vídeo ( ) o Foto () pulsando el botón MODE.

3.Pulse el botón Q.MENU de la videocámara para ver las opciones de menú disponibles. Aparece la pantalla del menú rápido.

Resolution

EV

Back Light

Focus

4.Toque “Focus” (Enfoque).

5.Toque la opción que desee.

Realice los consiguientes ajustes.

Para salir del menú, toque la fi cha Salir () o Volver ().


Focus


Auto


Manual

1 / 1

Touch Point

• Al utilizar el menú o las opciones de Q.MENU, algunas opciones de menú no se pueden utilizar al mismo tiempo o pueden aparecer atenuadas.

56• Para obtener información adicional sobre las opciones atenuadas, consulte la página Solución de problemas, “140~147”.

Page 56
Image 56
Samsung HMX-R10BP/EDC, HMX-R10SP/EDC Grabación avanzada, Manejo DE Menús Y DE Menús Rápidos, Utilización de la fi cha Menú

HMX-R10SP/EDC, HMX-R10BP/EDC specifications

The Samsung HMX-R10BP/EDC and HMX-R10SP/EDC are compact camcorders designed to deliver high-quality video recording and user-friendly operation. These models emphasize portability and advanced technologies, making them suitable for both novice and experienced videographers.

One of the standout features of these camcorders is their 10x optical zoom lens, which allows users to capture sharp and clear images even at a distance. This zoom capability is complemented by a 2.7-inch LCD touchscreen that provides easy navigation through settings and playback of recorded videos.

The HMX-R10BP/EDC and HMX-R10SP/EDC utilize a 1/4-inch CCD sensor that ensures high-definition recording at 1920 x 1080 resolution. This allows for stunning image clarity and vibrant colors, making the camcorders ideal for both casual use and more serious filmmaking. The device supports various recording formats, including MP4, which is great for sharing videos online.

Another significant aspect of these camcorders is the built-in image stabilization technology. This feature helps reduce the effects of camera shake, resulting in smoother footage, especially when capturing action sequences or shooting while in motion.

Additionally, both models are equipped with advanced audio recording capabilities. Their integrated microphones capture clear audio, while also allowing users to connect external microphones for enhanced sound quality, which is particularly useful for interviews or events.

The HMX-R10BP/EDC and HMX-R10SP/EDC also support memory cards, allowing for flexible storage options. This feature is vital for videographers who may need to record lengthy sessions without worrying about running out of space.

When it comes to connectivity, these camcorders include HDMI and USB ports, making it easy to connect to other devices for playback or file transfers. They are also compatible with various editing software, facilitating a smooth post-production workflow.

Ultimately, the Samsung HMX-R10BP/EDC and HMX-R10SP/EDC are designed to provide users with a blend of compact design, advanced technology, and great performance. Whether for family events, travel vlogging, or budding filmmakers, these camcorders offer an array of features that cater to diverse recording needs while ensuring ease of use and high-quality output.