BN68-01234D-01
SAMSUNG7267864 € 0,15/min
Precautions When Displaying a Still Image
Contents
Installing the Stand
Installing the Wall Mount Kit
List of Parts
Aim the remote control towards this spot on the TV
Viewing the Control Panel
Press to turn the TV on and off
Viewing the Connection Panel
Service
Replace the cover
Viewing the Remote Control
Installing Batteries in the Remote Control
If the remote control doesn’t work, check the following
Mains lead is attached to the rear of your set
Switching On and Off
Placing Your Television in Standby Mode
Plug & Play
If you want to reset this feature
Storing Channels Manually
Storing Channels Automatically
Setting the Channel Manager
Activating the Child Lock
Sorting the Stored Channels
Line
Fine Tuning Channel Reception
Assigning Channels Names
Then
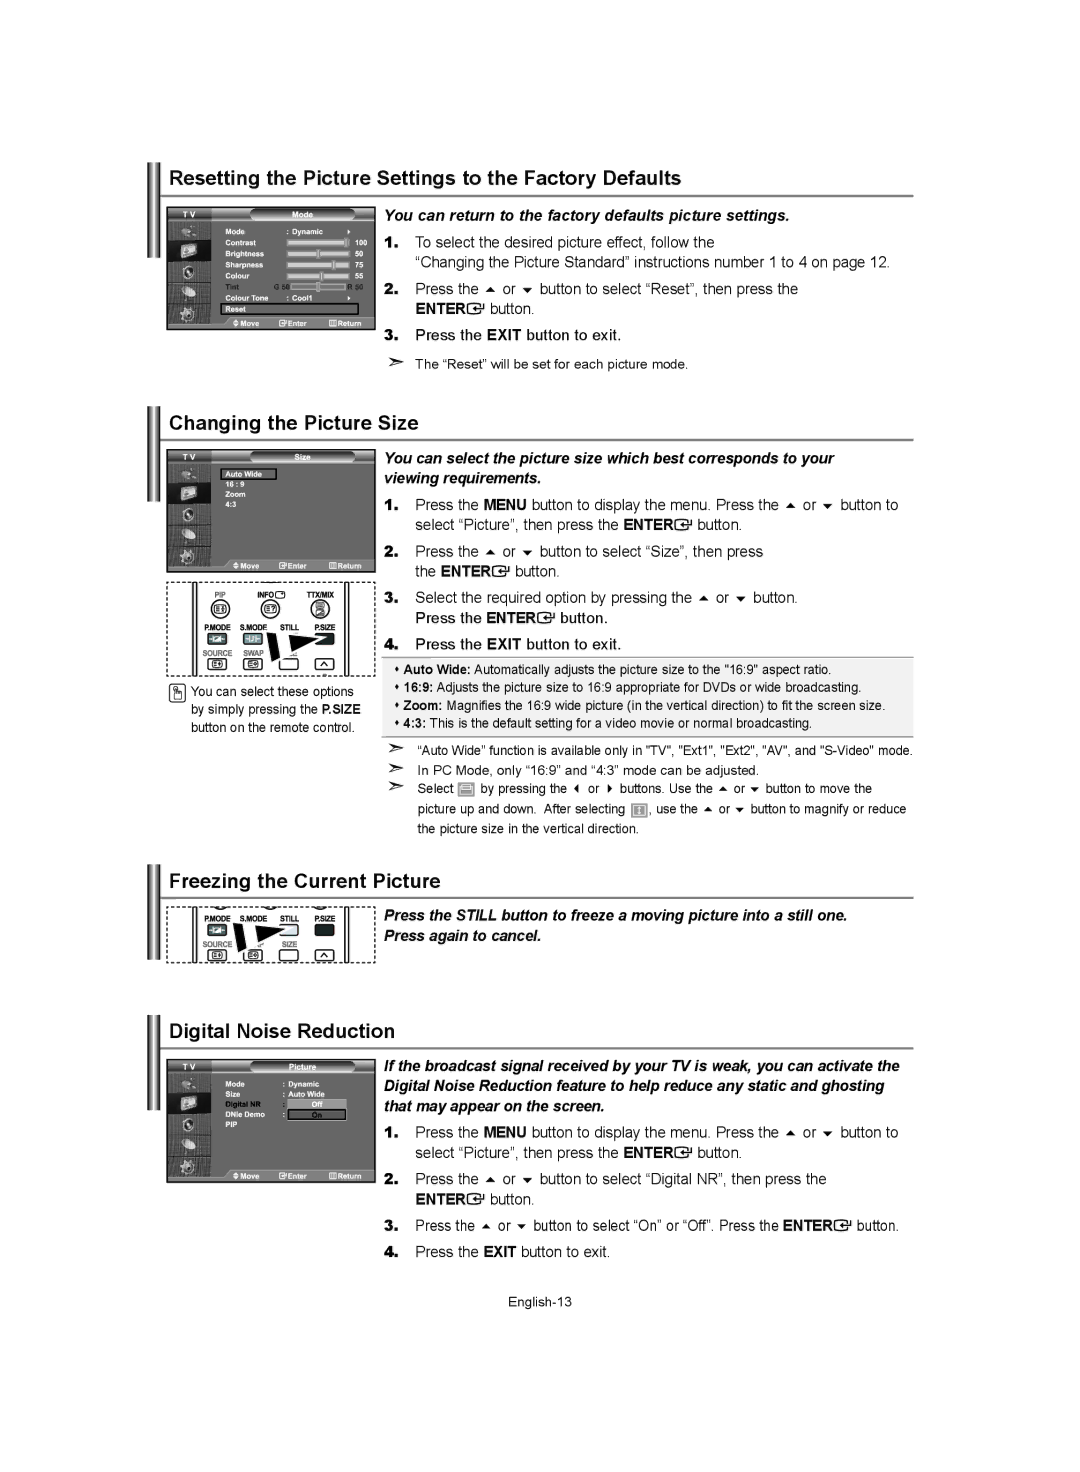
To select the desired picture effect, follow
Adjusting the Custom Picture
Changing the Picture Standard
Changing the Colour Tone
Freezing the Current Picture
Resetting the Picture Settings to the Factory Defaults
You can return to the factory defaults picture settings
Changing the Picture Size
DNIe Demo Digital Natural Image engine
Viewing the Picture In Picture PIP
Press the or button to select Source
Select Sound, then press the Enter button
Adjusting the Sound Settings
Press the Enter button again, to select Mode
Changing the Sound Standard
Selecting the Internal Mute
Setting the TruSurround XT SRS Tsxt
Adjusting the Volume Automatically
Playing 5.1 multichannel content over two speakers
Listening to the Sound of the Sub Picture
Resetting the Sound Settings to the Factory Defaults
Connecting Headphones
Setting and Displaying the Current Time
Setting the Sleep Timer
Switching the Television On and Off Automatically
Off, 30, 60, 90, 120, 150, 180. Press the Enter Button
Press the or button to select Language
Using Game Mode
Setting the Blue Screen Mode / Selecting the Melody
Choosing Your Language
Press the Enter button again, to select Source List
Using the Energy Saving Feature
Selecting the Source
Editing the Input Source Names
Press the TTX/MIX button again
Part Contents
Teletext Decoder
Displaying the Teletext Information
Using Fastext to Select a Teletext
Using the various display options
Selecting a Specific Teletext
Display Modes
Setting up Your PC Software Based on Windows XP
Setting the PC
Troubleshooting Before Contacting Service Personnel
Using the Anti-Theft Kensington Lock
Technical and Environmental Specifications
Table des matières
Symboles
Installation du support
Installation du kit de montage mural
Liste de pièces
Dirigez la télécommande vers ce point du téléviseur
Présentation du panneau de commande
Présentation du panneau de branchement
Maintenance
Replacez le couvercle
Présentation de la télécommande
Installation des piles dans la télécommande
Si la télécommande ne fonctionne pas, vérifiez ce qui suit
Mise en marche et arrêt
Mode de mise en veille de votre télévision
Mémorisation manuelle des chaînes
Mémorisation automatique des chaînes
Pour réinitialiser cette fonction…
Réglage de Gestionnaire de Chaînes
Activation de la sécurité enfant
Organisation des canaux mémorisés
Puis appuyez sur le bouton Enter
Pour Alors
Attribution de noms aux canaux
Réception nette des chaînes grâce au réglage fin
Régler
Modification de l’image standard
Réglage de l’image personnalisée
Changement de la nuance couleur
Réduction du bruit numérique
Rétablir les paramètres de réglage de l’image d’usine
Changement de la taille de l’image
Sélection du format de l’image
DNle Démo Digital Natural Image engine
Affichage de l’Image dans l’image PIP
Appuyez sur le bouton ou pour sélectionner Intervertir
Changement de la norme Son
Réglage des paramètres du son
Touche ou , puis sur la touche Enter
Réglage automatique du volume
Sélection du mode Silence Int
Paramétrage de la technologie TruSurround XT SRS Tsxt
Réglage et affichage de l’heure
Ecoute du son accompagnant l’image secondaire
Rétablir les paramètres de son par défaut
Connexion du casque
Marche et arrêt automatique du téléviseur
Réglage de la minuterie de mise en veille
Utilisation de Mode Jeu
Réglage du mode d’écran bleu / Sélection de mélodie
Choix de la langue
Utilisation de la fonction d’économie d’énergie
Sélection de la source
Modification du nom d’une source d’entrée
Appuyez sur le bouton TV pour quitter l’affichage de texte
Décodeur télétexte
Affichage des informations Télétexte
Appuyez de nouveau sur la touche TTX/MIX
Une page secondaire, en entrant son En saisissantles
Sélection d’une page télétexte spécifique
Le texte caché réponses de jeux par exemple
’écran normal
Paramétrage du logiciel PC Basé sur Windows XP
Modes d’affichage
Cliquez sur Control Panel dans le menu Démarrer de Windows
Verrouillage Image
Sélection du PC
Utilisation du verrouillage Kensington antivol
Spécifications techniques et environnementales
Inhalt
Garantiekarte
Lieferumfang
Montage des Ständers
Wandhalterung anbringen
Kanäle wechseln
Bedienfeld
Anschlussfeld
An der Antenne oder am Kabelfernsehnetz anschließen
Schieben Sie die Abdeckung wieder auf die Fernbedienung
Fernbedienung
Batterien in die Fernbedienung montieren
Legen Sie zwei AAA-Batterien ein
Drücken Sie auf der Vorderseite des Geräts die Taste
Drücken Sie auf der Fernbedienung die Taste Power
Ein-und Ausschalten
Schalten des Fernsehgeräts in den Standby-Modus
Kanäle manuell speichern
Kanäle automatisch speichern
So setzen Sie diese Funktion zurück
Abbrechen möchten
Programmverwaltung
oder und anschließend die Taste Enter
Auszuwählen
Gespeicherte Kanäle sortieren
Aktivieren der Kindersicherung
Drücken Sie die Taste MENU, um das Menü anzuzeigen
Kanalnamen zuweisen
Kanäle mit Feinabstimmung einstellen
Möchten, direkt auszuwählen
Bis 4 unter Bildstandard ändern
Bildstandard ändern
Benutzereinstellung Bild anpassen
Farbwert ändern
Bis 4 unter Bildstandard ändern auf Seite
Bildgröße wählen
Aktuelles Bild einfrieren
Rauschminderung
Bild-in-Bild-Funktion verwenden PIP
Toneinstellungen anpassen
Tonwiedergabestandard ändern
Drücken Sie dann die Taste Enter
Einstellen von TruSurround XT SRS Tsxt
Lautstärke automatisch einstellen
Auswählen der internen Stummschaltung
Uhrzeit einstellen und anzeigen
Drücken Sie die Taste oder , um Reset auszuwählen
Ton des Nebenbildes wiedergeben
Anschließen eines Kopfhörers
Stellen der Einschlafschaltuhr
Fernseher automatisch ein- und ausschalten
Die Taste Enter
Sprache der Bedienerführung wählen
Spielemodus verwenden
Anzeigen eines blauen Bildschirms / Melodie wählen
Signalquelle auswählen
Signalquellennamen bearbeiten
Verwenden der Energiesparfunktion
Drücken Sie die Taste TV , um die Textanzeige zu beenden
Videotextdecoder
Anzeigen von Videotextinformationen
Drücken Sie erneut die Taste TTX/MIX
Auswählen einer bestimmten Videotextseite
Auswählen einer Videotextseite mit Fastext
Anzeigeoptionen verwenden
Anzeigemodi PC
Installation der PC-Software Unter Windows XP
PC auswählen
Fehlerbehebung Vor der Kontaktaufnahme mit dem Kundendienst
Kensington-Schloss als Diebstahlsicherung
Technische Daten und Umgebungsbedingungen
Inhoud
Symbolen
De standaard installeren
De muurbevestigingsbeugel installeren
Lijst met onderdelen
Overzicht van het bedieningspaneel
Richt de afstandsbediening op dit punt op de TV
Druk op de toets om de televisie aan en uit te zetten
Overzicht van het aansluitpaneel
Onderhoud
Teletekstfuncties
Overzicht van de afstandsbediening
Batterijen in de afstandsbediening plaatsen
Plaats het klepje weer terug
En uitschakelen
Televisie in standby-modus zetten
Het netsnoer is bevestigd aan de achterzijde van de TV
Kanalen handmatig opslaan
Kanalen automatisch opslaan
Als u deze functie wilt herstellen
Te selecteren
De Kanaalbeheer instellen
Druk vervolgens op Enter
Het kinderslot activeren
Opgeslagen kanalen sorteren
Druk op of om Aan of Uit te selecteren. Druk op Enter
Als U
Kanaalnamen vastleggen
Kanalen nauwkeurig instellen
Afstellen
De beeldstandaard aanpassen
Aangepast beeld instellen
De kleurtint wijzigen
Op pagina 12 van De beeldstandaard aanpassen
Het beeldformaat selecteren
Het beeld stilzetten
Digitale geluidsonderdrukking
DNIe-demo Digital Natural Image engine
Beeld-in-Beeld PIP
Druk op of om Beeld/PIP te selecteren
De geluidsinstellingen aanpassen
De geluidsstandaard wijzigen
Het volume automatisch aanpassen
De TruSurround XT SRS Tsxt instellen
De Interne mute selecteren
Druk op de of om Subtuner te selecteren. Druk op Enter
Het geluid van het subbeeld weergeven
Koptelefoon aansluiten
De huidige tijd instellen en weergeven
De televisie automatisch aan uitschakelen
Standby-klok instellen
Druk op de of toets om Spelmodus te selecteren en druk
Taal kiezen
De Spelmodus gebruiken
Blauwe schermmodus instellen / Melodie selecteren
Druk op de toets Menu voor weergave van het menu
De functie spaarstand gebruiken
De bron selecteren
De namen van de ingangsbron bewerken
Druk op de toets TV om de teletekstmodus te verlaten
Teletekstdecoder
Teletekstinformatie weergeven
Druk nogmaals op de toets TTX/MIX
Fastext gebruiken om een teletekstpagina te selecteren
Specifieke teletekstpagina selecteren
Weergavemodus PC
Uw software installeren gebaseerd op Windows XP
De PC selecteren
De anti-diefstal vergrendeling gebruiken
Technische specificaties en milieu
Símbolos
Indice
Manual de Tarjeta de garantía
Lista de componentes
Instalación del soporte
Instalación del equipo de montaje en la pared
Púlselo para encender o apagar el televisor
Visualización del Panel de control
Púlselos para cambiar de canal
Dirija el mando a distancia hacia este punto del televisor
Visualización del Panel de conexión
Service servicio
Funciones de Teletexto
Visualización del mando a distancia
Instalación de las pilas en el mando a distancia
Vuelva a colocar la tapa
Cómo poner el televisor en modo de espera
Encendido y apagado
Memorización manual de canales
Memorización automática de canales
Si quiere volver a ajustar esta característica
Configuración del Gestor de Canales
Activación del bloqueo para niños
Orden de los canales memorizados
Bloquear y pulse el botón Enter
Seleccionar Canal y pulse el botón Enter
Asignación de nombres de canales
Sintonía fina de la recepción de canales
Desee ajustar con precisión
4 de Cambio de la imagen estándar
Cambio del formato de la imagen
Ajuste de imagen personal
Cambio del tono del color
4 de Cambio de la imagen estándar de la página
Selección del Tamaño de la imagen
Congelación de la imagen actual
Reducción de ruido digital
Visualización de Imagen en imagen PIP
DNIe Demo motor digital de imágenes naturales
Pulse de nuevo el botón Enter para seleccionar Modo
Cambio del estándar de sonido
Ajuste de los parámetros de sonido
Seleccionar Sonido y pulse el botón Enter
Configuración de TruSurround XT SRS Tsxt
Ajuste del volumen automáticamente
Selección del silencio interno
El botón Enter
Configuración y visualización de hora actual
Cómo escuchar el sonido de la imagen secundaria
Conexión de los auriculares
Encendido y apagado de la televisión automáticamente
Ajuste del temporizador de desconexión
Pulse el botón Menu para ver el menú en pantalla
Selección del idioma
Uso del Modo Juego
Ajuste del modo Pantalla Azul / Selección de Melodía
Uso de la función de ahorro de energía
Selección de la fuente
Edición de los nombres de fuentes de entrada
Para salir de la visualización de texto, pulse el botón TV
Decodificador de teletexto
Visualización de informaciones del teletexto
Pulse de nuevo el botón TTX/MIX
Selección de una página de teletexto específica
Uso de Fastext para seleccionar una página del teletexto
Uso de varias opciones de pantalla
Modo de visualización PC
Configuración del software del PC basado en Windows XP
Selección del PC
Especificaciones técnicas y medioambientales
PC Resolución
Nombre del modelo LE32S62
Fuente de alimentación
Consumo de energía
Índice
Cartão de garantia Cartão da rede de
Lista de acessórios
Instalar a Base
Instalar o kit de montagem na parede
Funções do painel de controlo
Aponte o telecomando para este ponto no televisor
Carregue para ligar e desligar o televisor
Apresentar o painel de ligação
Serviço
Funções de Teletexto
Funções do telecomando
Colocar as pilhas no telecomando
Volte a colocar a tampa
Colocar o televisor no modo de espera
Ligar/desligar o aparelho
Memorizar canais manualmente
Memorizar canais automaticamente
Se desejar repor esta função
Definir Gestor Canais
Repita o passo 7 para cada canal a bloquear ou desbloquear
Activar Bloqueio crianças
Ordenar os canais memorizados
Bloquear e depois carregue no botão Enter
Carregue no botão Menu para ver o menu
Atribuir nomes a canais
Sintonia fina da recepção de canais
Pretende fazer uma sintonização fina
Pode seleccionar o tom de cor mais confortável para si
Escolher o tipo de imagem
Seleccionar a imagem padrão
Seleccionar a tonalidade
Redução de ruído DNR
Repor os valores de fábrica das definições de imagem
Seleccionar o tamanho da imagem
Parar a imagem
Demonstração DNIe Digital Natural Image Engine
Apresentar a imagem na imagem PIP
Botão Enter
Carregue novamente no botão Enter , para seleccionar Modo
Escolher o som Padrão
Regulação das programações de som
Para seleccionar Som e depois carregue no botão Enter
Ajustar Automaticamente o Volume
Definir TruSurround XT SRS Tsxt
Seleccionar a opção Internal Mute Sil. externo
Acertar e ver a hora actual
Ouvir o som da imagem secundária
Repor os valores de fábrica das definições de som
Ligar os auscultadores
Ligar e desligar o televisor automaticamente
Programar o temporizador
Seleccionar o idioma
Opção Modo de Jogos
Programar o modo de Ecrã azul / Seleccionar a Melodia
Depois carregue no botãoe Enter
Utilizar a função Poupar energia
Seleccionar fontes externas
Editar os nomes das fontes de entrada
Carregue no botão TV para sair da página de teletexto
Descodificador de teletexto
Exibição das informações de teletexto
Volte a carregar no botão TTX/MIX
Respostas, por exemplo Ecrã normal novamente
Seleccionar uma página de teletexto específica
Utilizar Fastext para seleccionar uma página de teletexto
Texto oculto respostas a jogos de perguntas e
Polaridade de
Configurar o software do PC Baseado no Windows XP
Modo de visualização
Modo Resolução Frequência
Seleccionar o PC
Figura
Utilizar o sistema de bloqueio Kensington anti-roubo
Características técnicas e ambientais
Simboli
Sommario
Assistenza
Installazione del supporto
Installazione del Kit di montaggio a parete
Elenco dei componenti
Vista del pannello di controllo
Puntare il telecomando verso questo punto del televisore
Premere per accendere e spegnere il televisore
Vista del pannello dei collegamenti
Assistenza
Funzioni del Televideo
Illustrazione del telecomando
Inserimento delle batterie nel telecomando
Rimettere il coperchio
Impostare il televisore in modalità standby
Accensione e spegnimento
Memorizzazione manuale dei canali
Memorizzazione automatica dei canali
Per reimpostare questa funzione…
Impostazione del Gestore Canale
Premere il tasto
Premere il tasto Exit per uscire
Attivazione di Blocco canali
Ordinamento dei canali memorizzati
Quindi premere il tasto Enter
Assegnazione dei nomi ai canali
Ottimizzazione della sintonia dei canali
Per...Quindi
Modifica dello standard dell’immagine
Regolazione dell’immagine personalizzata
Modifica della tonalità di colore
Selezione delle dimensioni dell’immagine
Fermo immagine corrente
Uso della funzione Digital NR
Premere il tasto o per selezionare Scambia
Visualizzazione dell’immagine nell’immagine PIP
Premere il pulsante o per selezionare Sorgente
Premere Enter . Selezionare una sorgente dell’immagine
Regolazione delle impostazioni dell’audio
Modifica dello standard audio
Premere il pulsante o per selezionare Mute interno
Regolazione automatica del volume
Impostazione di TruSurround XT SRS Tsxt
Selezione di Internal Mute Mute interno
Premere il pulsante o per selezionare Selezione audio
Configurazione e visualizzazione dell’ora attuale
Ascolto dell’audio dell’immagine secondaria
Collegamento delle cuffie di ascolto
Impostazione del timer
Spegnimento e accensione automatica della televisione
Off, 30, 60, 90, 120, 150, 180. Premere il tasto Enter
Premere il pulsante o per selezionare Modalità gioco
Scelta della lingua
Uso di Modalità gioco
o per selezionare Impostazione e premere Enter
Utilizzo della funzione Risparmio energia
Selezione della sorgente
Modifica dei nomi delle sorgenti di ingresso
Part Sommario
Visualizzazione delle informazioni del Televideo
Premere nuovamente il pulsante TTX/MIX
Premere il tasto TV per uscire dalla schermata Testo
Selezione di una pagina Teletext specifica
Modalità di visualizzazione
Configurazione del software per PC basato su Windows XP
Regolazione della qualità dell’immagine Blocco immagine
Selezione del PC
Specifiche tecniche e ambientali
Risoluzione dei problemi Prima di contattare l’assistenza
PC Risoluzione
Nome del modello LE32S62
Alimentazione
Consumo di energia
Diagrammi a blocchi
Intenzionalmente vuota
Korrekte Entsorgung dieses Produkts Elektromüll

 You can return to the factory defaults picture settings.