Ridgefield Park, NJ
Samsung Electronics America, Inc
Precautions When Displaying a Still Image
Précautions à prendre lors de laffichage dune image fixe
Precauciones al mostrar en la pantalla una imagen fija
Contents
3903-000085
General Information List of Features
Accessories
Owner’s Instructions
Viewing the Control Panel
Power
DVI
Viewing the Connection Panel
UP / Down / Left / Right / Enter
Viewing the Remote Control
VOL / VOL
Mute
Installing Batteries in the Remote Control
Connecting VHF and UHF Antennas
Connections
Connecting Cable TV
Cable without a Cable Box
Connect this cable to a two-way splitter
Connecting an S-VHS VCR
Connecting a VCR
Connecting a DVD Player
Connecting a DVD Player/Set-Top Box via DVI
DVD Player Rear Panel TV Rear Panel
DVI jacks do not support PC connection
Connecting a PC
Plug and Play Feature
Operation
Turning the TV On and Off
Viewing the Display
Adjusting the Volume
Selecting the Video Signal-source
Changing Channels
Press Button to select Column, then press the Enter
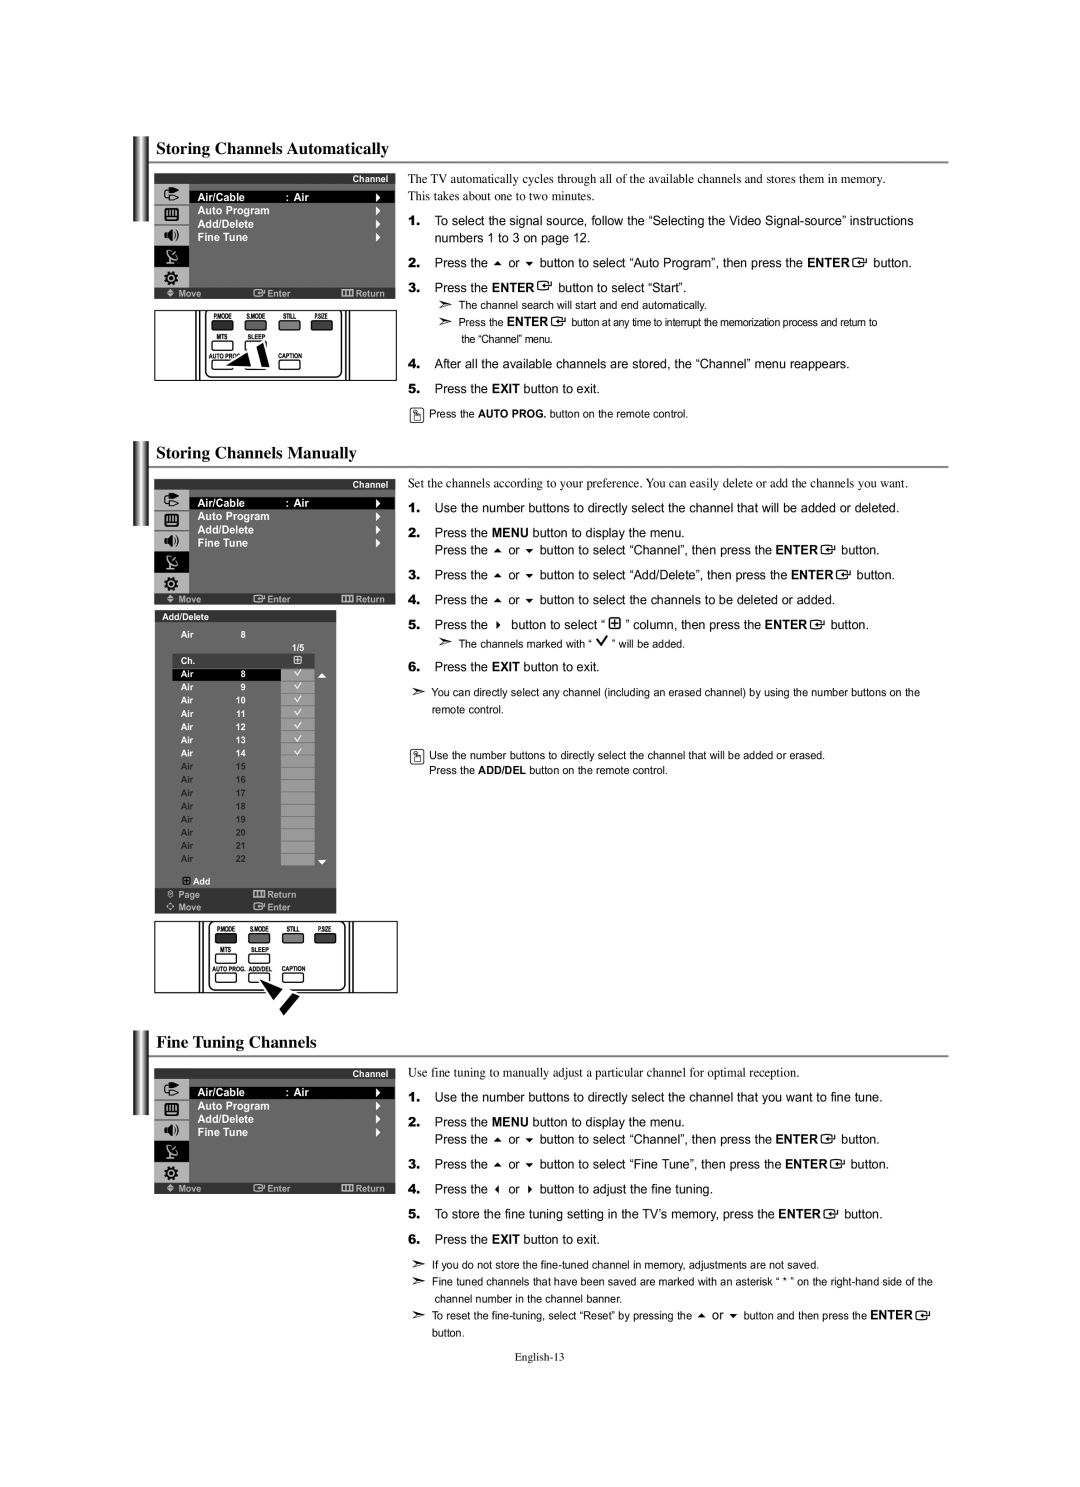
Fine Tuning Channels
Storing Channels Automatically
Storing Channels Manually
Customizing the Picture
Using Automatic Picture Settings
Adjusting the Color Tone
Picture Control
Changing the Picture Size
Adjusting the Color Control
Using Automatic Sound Settings
Sound Control
Choosing a Multi-Channel Sound MTS Soundtrack
Time Setting
Using the Auto Volume
Customizing the Sound
Setting the Clock
Press Button to select Sleep Timer, then press the Enter
Press Button to adjust Hour, then press
How to Set up Restrictions Using the ‘TV guidelines’
Using the V-Chip
Setting Up Your Personal ID Number PIN
How to Enable/Disable the V-Chip
Press Button to select a category Press the Enter
How to Set up Restrictions Using Canadian English
Caption Off / On Channel 1
How to Set up Restrictions Using Canadian French
Viewing Closed Captions
Selecting a Menu Language
Setting the Blue Screen Mode
Selecting the Source
Editing the Input Source Name
Frequency MHz
Setting Up Your PC Software Based on Windows XP
PC Display
Display Modes
PC Image Lock
Setting up the TV with your PC
Image Reset
Auto Adjustment
Appendix
Specifications
Identifying Problems
This page is intentionally Left blank
Table des matières
Symbole Appuyer Important Remarque Bouton daccès rapide
Cordon D’alimentation
Accessories
Informations Generales
Liste des fonctions
De la
Manière que les boutons et De la télécommande
Dirigez la télécommande vers de point de la télévision
Affichage du panneau de contrôle
Raccordez le composant vidéo/audio
Affichage du panneau de branchement
Connectez à la sortie vidéo de votre PC
Connecter à une antenne ou à un téléviseur par câble
Boutons numériques
Présentation de la télécommande
Insertion des piles dans la télécommande
Connexions
Connexion d’antennes VHF et UHF
Connexion du câble TV
Câble sans boîte de jonction
Branchez ce câble à un séparateur bidirectionnel
Branchement d’un magnétoscope
Branchement d’un magnétoscope S-VHS
AV in Video de la télévision
Branchement d’un lecteur DVD
Connecter un boîtier décodeur/lecteur de DVD via DVI
Câble composante non fourni
Les prises DVI ne prennent pas en charge la connexion PC
Branchement d’un PC
Fonctionnement
Mise en marche et arrêt de la télévision
Fonction Prêt à l’emploi
Visualisation de l’affichage
Réglage du volume
Sélection de la source du signal vidéo
Changement des canal
Mise en mémoire automatique des chaînes
Mise en mémoire manuelle des chaînes
Syntonisation fine des canal
Personnalisation de l’image
Mode PC
Controle de limage
Utilisation des paramètres automatiques d’image
Gel de l’image
Controle du son
Modification de la taille de limage
Réglage du contrôle de la couleur
Personnalisation du son
Utilisation du volume automatique
Pour sélectionner Volume auto, puis appuyez sur le
Reglage de lhorloge
Appuyez sur
Régler l’horloge
Appuyez sur le bouton Menu pour afficher le menu à l’écran
Off, 30, 60, 90, 120, 150, 180. Appuyez sur le bouton Enter
Comment activer/désactiver la fonction puce
Description des fonctions
Utilisation de la fonction puce
Réglage de votre numéro d’identification personnel NIP
Comment régler les évaluations secondaires FV, D, L, S et
Appuyez sur le bouton ou Pour sélectionner une catégorie
Appuyez sur le bouton Exit quitter
Appuyez sur le bouton Pour sélectionner Langue
Visualisation des sous-titres codés
Sélection d’une langue de menu
Appuyez sur le bouton Enter pour sélectionner Sous-titres
Réglage du mode Écran Bleu
Sélection de la source
Modification du nom dune source dentrée
Modes d’affichage
Configuration de votre logiciel PC basée sur Windows XP
Mode Résolution Fréquence Polarité
Affichage PC
Réglage Auto
Configurer votre téléviseur avec votre PC
Verrouiller limage
Rétablir limage
Annexe
Spécifications
Identification des problèmes
Cette page est laissée Intentionnellement en blanc
Símbolo Pulse Importante Nota
Índice
Listado de características
Accesorios
Cable de alimentación
Aspecto general del panel de control
Pulse para encender o apagar el TV
Dirija el mando a distancia hacia este punto del TV
Conecte el cable de alimentación suministrado
Aspecto general del panel de conexiones
Se conecta a la toma de salida de audio y vídeo del PC
Conecte el componente de vídeo/audio
Botones numéricos
Visualización del mando a distancia
Conexiones
Instalación de las pilas en el mando a distancia
Conexión de antenas de VHF y UHF
Conecte este cable al divisor de dos vías
Conexión de TV por cable
Conexión a un decodificador que decodifica algunos canales
TV por cable sin decodificador
Cable de vídeo No incluido Cable RF No incluido
Conexión de un reproductor de vídeo
Conexión de un reproductor de vídeo S-VHS
Panel posterior del TV Panel posterior del VCR
Conexión de un reproductor de DVD
Conexión de un DVD o un Decodificador digital mediante DVI
Cable de Audio No incluido Cable DVI-D No incluido
Conexión a un PC
Conexión y del cable
Las tomas DVI no admiten la conexión del PC
Correlativa Están disponibles los ajustes siguientes
Funcionamiento
Encendido o apagado del TV
Función Plug & Play
Selección del origen de la señal de vídeo
Ajuste del volumen
Cambio de canales
Visualización de la pantalla
Memorización automática de canales
Memorización manual de canales
Ajuste preciso de los canales
Ajuste del Color del fondo
Control de la Imagen
Uso de los parámetros de imagen automáticos
Personalización de la imagen
Uso de los parámetros de sonido automáticos
Congelación de la imagen
Cambio del tamaño de la imagen
Ajuste del control del color
Elección de una pista sonora multicanal MTS
Utilización del volumen automático
Ajuste de la Hora
Personalización del sonido
Configuración del reloj
Cómo activar/desactivar V-Chip
Descripción de las Funciones
Uso de V-Chip
Ajuste del número de identificación personal código PIN
Pulse el botón Para seleccionar la restricción apropiada
Cómo establecer las subclasificaciones FV, D, L, S y
Se pasará por las distintas categorías Mpaa
Pulse el botón o
Pulse el botón Para seleccionar el idioma apropiado
Visualización de los subtítulos
Selección del idioma de menú
Pulse el botón Para seleccionar Idioma
Ajuste del modo pantalla azul
Para seleccionar la fuente
Edición del nombre de la fuente de entrada
Pantalla de PC
Instalación del software en el equipo según Windows XP
Modos de visualización
Reiniciar imagen
Ajuste del televisor con el ordenador
Fijar la Imagen
Posición
Apéndice
Especificaciones
Identificación de problemas
Esta página se ha dejado en Blanco expresamente