CD
CD RIPPING Function
![]() You can rip a compact disc as a MP3 file on the USB
You can rip a compact disc as a MP3 file on the USB
This feature enables you to ripping with the start of the disc or track of your choice.
Timer Function | ENG |
• The timer enables you to switch the system on or off at specific times. |
|
• If you no longer want the system to be switched on or off automatically, you must cancel the timer. |
|
• Before setting the timer, check that the current time is correct. |
|
For each step, you have a few seconds to set the required options. |
|
• If you exceed this time, you must start again. |
|
1 Switch the system
Connect the |
Load a compact |
Example: You wish to wake up to music every morning.
on by pressing
POWER.
Press CD
4 RIPPING button on remote control to starting ripping.
¡If the system is playing state, turn the CD |
RIPPING dial down or press CD RIPPING button |
2 USB. |
To stop ripping, press
5 STOP(![]() )button.and then automatically create and save as the MP3 file.
)button.and then automatically create and save as the MP3 file.
3 |
| disc(Digital |
| Audio). |
![]() Press the OPEN/CLOSE button to open the CD door.
Press the OPEN/CLOSE button to open the CD door.
![]() Insert a CD and press the OPEN/CLOSE button to close the CD door.
Insert a CD and press the OPEN/CLOSE button to close the CD door.
![]() Use the CD selection (
Use the CD selection ( ![]()
![]()
![]()
![]() ) buttons to select the desired song.
) buttons to select the desired song.
Switch the system |
| 2 | Press TIMER/ |
| CLOCK until | ||
on by pressing |
| TIMER is | |
1 POWER. |
| displayed. | |
|
|
|
|
3 Press the ENTER button.
•ON TIME is displayed for a few seconds, followed by any switch- on time already set; you can set the timer
on the remote control to start the ripping for the |
current track. |
¡Turn CD RIPPING dial up or press and hold CD |
RIPPING button on the remote control to start |
ripping the all tracks of Disc. |
¡Press this button, “TRACK RIPPING” is |
displayed and CD RIPPING starts. |
¡Press and hold this button, “FULL CD RIPPING” |
is displayed and CD RIPPING starts. |
¡During CD ripping, do not disconnect USB |
device. |
After
4 Set the timer
a. Set the hour by pressing ![]() or
or ![]() button.
button.
b. Press ENTER .
5 Set the timer switch-off time.
a. Set the hour by pressing![]() or
or ![]() button.
button.
b. Press ENTER.
Press ![]() or
or ![]() button
button
6 to adjust the volume level and press
ENTER.
•The source to be selected is displayed.
Note
◆Don’t disconnected USB and AC Cord during |
the file damage.If you want to stop |
press stop Key first and after the CD Stopped,then you can remove the USB |
device. |
◆If you disconnected USB device when CD Ripping, the main unit will be |
power off and you may not delete the ripped file, In this case, please connect |
the USB on the PC and backup the USB data on the PC first and then |
formate the USB device . |
When the USB memory is not enough, it will be displayed “RIPPING |
•The minutes flash.
c.Set the minutes by pressing ![]() or
or ![]() button.
button.
d.Press ENTER.
•OFF TIME is displayed for a few seconds, followed by any switch- off time already set; you can now set the timer
•The minutes flash.
c.Set the minutes by pressing ![]() or
or ![]() button.
button.
d.Press ENTER.
•VOL 10 is displayed, where 10 corresponds to the volume already set.
◆ |
ERROR”. |
◆With external HDD,FAT format the USB can be CD Ripping,but not NTFS. |
The CD Ripping function of this product does not support all USB devices. |
◆When you use CD high speed search function or in the Pause or Stop mode, |
the CD Ripping can’t work. |
◆During CD Ripping, do not deal impact.If is shocked while CD Ripping, CD |
Ripping maybe disengage. |
◆Sometimes, some of USB devices, CD Ripping time is long. |
◆In program mode, you can't use CD RIPPING function. |
◆When CD Ripping completes or Stops, the CD will reload. |
Press or button | 8 | Press ENTER to | |
to select the source to | |||
confirm the timer. | |||
be played when the | |||
| |||
7 system switches on. |
|
• TUNER (radio) : a Press ENTER.
b Select a preset station by pressing or .
• DVD/CD (compact disc) : Load on or more compact disc.
• USB :Insert a USB.
• TAPE (cassette) : Insert a cassettetape.
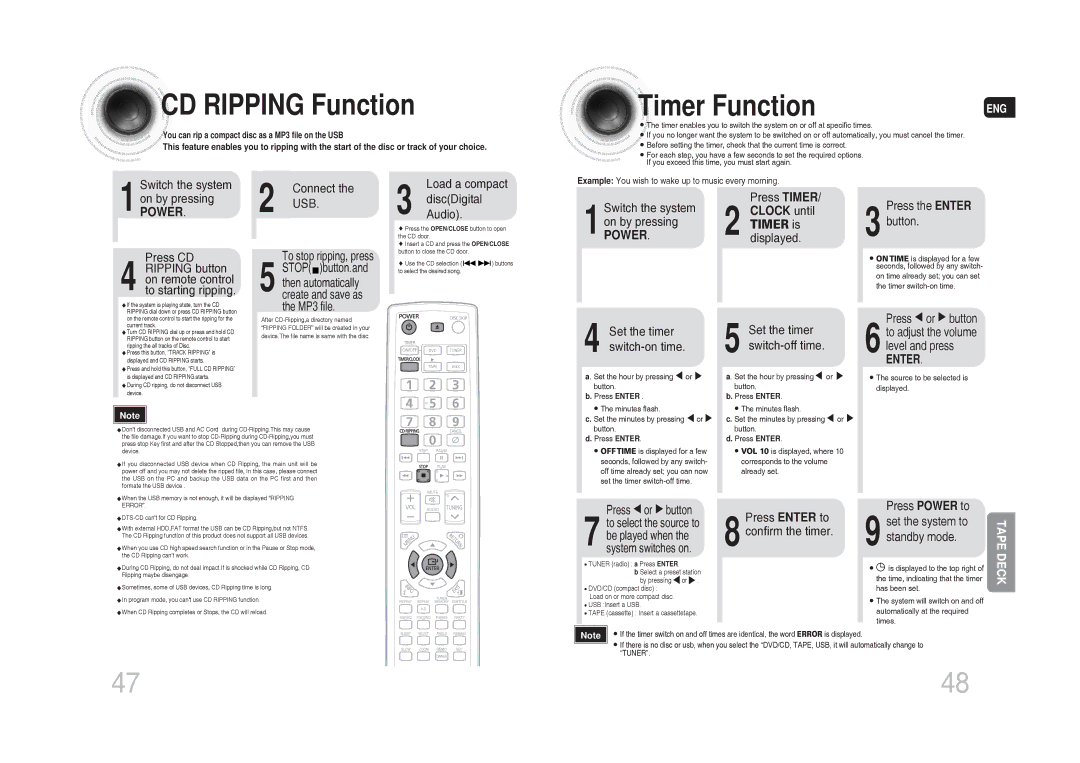
Press POWER to
9 set the system to standby mode.
•![]() is displayed to the top right of the time, indicating that the timer has been set.
is displayed to the top right of the time, indicating that the timer has been set.
•The system will switch on and off automatically at the required times.
TAPE DECK
| • If the timer switch on and off times are identical, the word ERROR is displayed. | |
Note | ||
| • | If there is no disc or usb, when you select the “DVD/CD, TAPE, USB, it will automatically change to |
| ||
| “TUNER”. | |
47 | 48 |