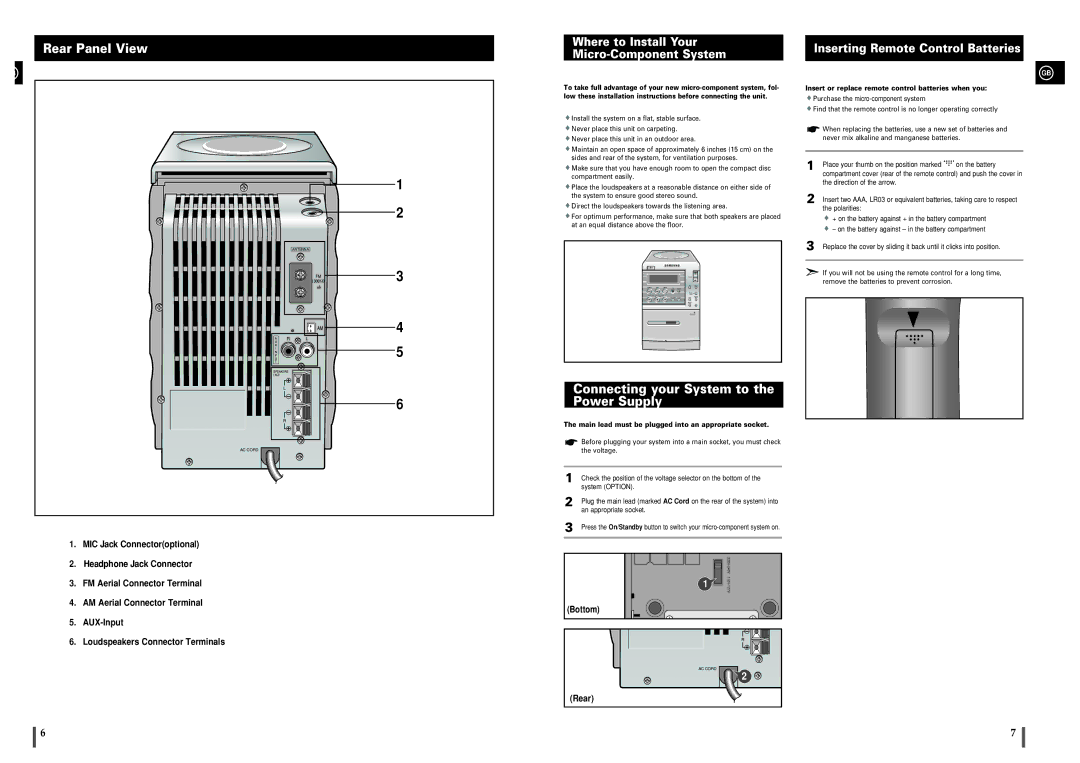
Rear Panel View
![]() B
B
1
2
ANTENNA
3
4
5
6
AC CORD
1.MIC Jack Connector(optional)
2.Headphone Jack Connector
3.FM Aerial Connector Terminal
4.AM Aerial Connector Terminal
5.
6.Loudspeakers Connector Terminals
Where to Install Your
Micro-Component System
To take full advantage of your new
![]() Install the system on a flat, stable surface.
Install the system on a flat, stable surface.
![]() Never place this unit on carpeting.
Never place this unit on carpeting.
![]() Never place this unit in an outdoor area.
Never place this unit in an outdoor area.
![]() Maintain an open space of approximately 6 inches (15 cm) on the sides and rear of the system, for ventilation purposes.
Maintain an open space of approximately 6 inches (15 cm) on the sides and rear of the system, for ventilation purposes.
![]() Make sure that you have enough room to open the compact disc compartment easily.
Make sure that you have enough room to open the compact disc compartment easily.
![]() Place the loudspeakers at a reasonable distance on either side of the system to ensure good stereo sound.
Place the loudspeakers at a reasonable distance on either side of the system to ensure good stereo sound.
![]() Direct the loudspeakers towards the listening area.
Direct the loudspeakers towards the listening area.
![]() For optimum performance, make sure that both speakers are placed at an equal distance above the floor.
For optimum performance, make sure that both speakers are placed at an equal distance above the floor.
CD | TAPE |
| AUX |
Connecting your System to the Power Supply
The main lead must be plugged into an appropriate socket.
Before plugging your system into a main socket, you must check the voltage.
1 | Check the position of the voltage selector on the bottom of the |
| system (OPTION). |
2 | Plug the main lead (marked AC Cord on the rear of the system) into |
| an appropriate socket. |
3 | Press the On/Standby button to switch your |
|
|
| |
1 | |
| |
(Bottom) |
|
AC CORD | 2 |
| |
(Rear) |
|
Inserting Remote Control Batteries
GB
Insert or replace remote control batteries when you:
![]() Purchase the
Purchase the
![]() Find that the remote control is no longer operating correctly
Find that the remote control is no longer operating correctly
![]() When replacing the batteries, use a new set of batteries and never mix alkaline and manganese batteries.
When replacing the batteries, use a new set of batteries and never mix alkaline and manganese batteries.
1 | Place your thumb on the position marked | on the battery |
| compartment cover (rear of the remote control) and push the cover in | |
| the direction of the arrow. |
|
2 | Insert two AAA, LR03 or equivalent batteries, taking care to respect | |
| the polarities: |
|
| + on the battery against + in the battery compartment | |
| – on the battery against – in the battery compartment | |
3 | Replace the cover by sliding it back until it clicks into position. | |
|
|
|
If you will not be using the remote control for a long time, remove the batteries to prevent corrosion.
6 | 7 |