Digital Color Camera
Safety information
English
Important Safety Instructions
Contents
Introduction
Product & Accessories Main Product Camera
Part Names and Functions
Rear Panel AC24/DC12V SCC-B1331P AC220V~240VSCC-B1031P
Grounding Port
Installation
Installation
How to use OSD Menu
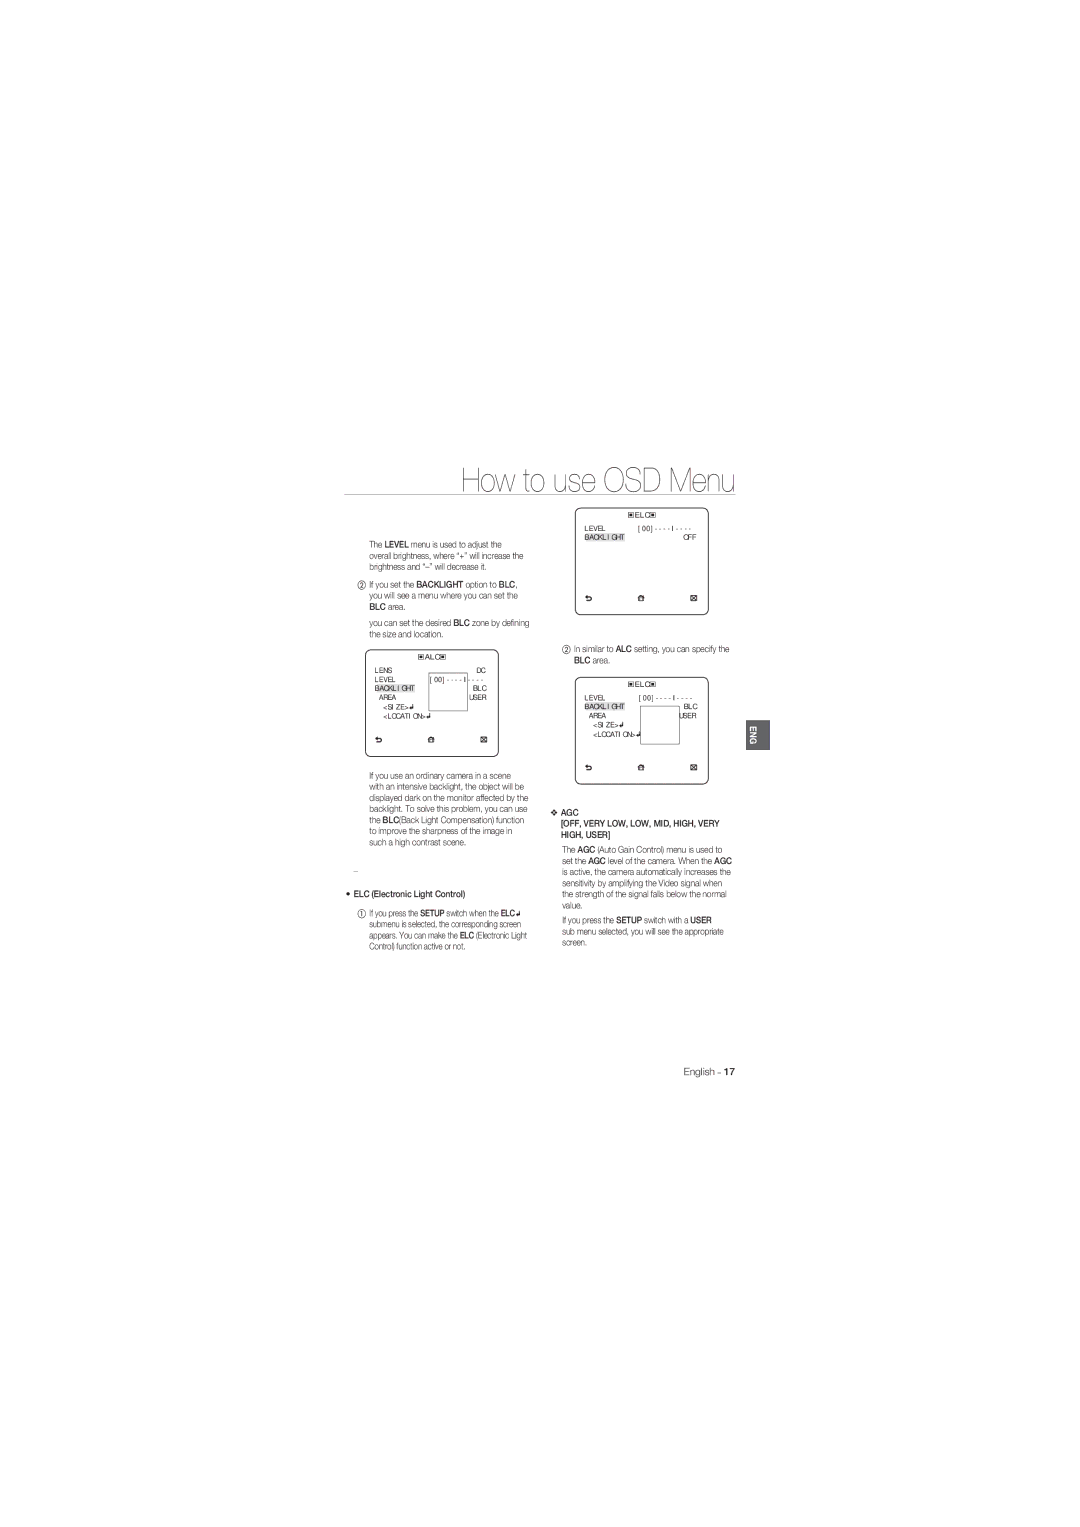
How to use OSD Menu
ITS
Camera Setup
How to use OSD Menu
DNR
White BAL
AGC Color SUP
Intelligence
Privacy Zone Setup
Other SET
Camera Configuration
Specifications
Conditions
Specifications
Items Sub-items SCC-B1331P / SCC-B1031P
Page
Caméra Numérique Couleur
Caméra Numérique Couleur
Directives de sécurité
Avertissement
Notification de conformité d’IC
Directives de sécurité
Consignes de sécurité importantes
Contenu
Caractéristiques
Produit ET Accessoires
Introduction
Montage Automatique
Connecteur de l’objectif à iris automatique
Noms ET Fonctions DES Pièces
Vue de côté
Panneau arrière AC24/DC12V SCC-B1331P AC220V~240VSCC-B1031P
Port de mise à la terre
Montage DE L’OBJECTIF
Installation
Lors de l’utilisation de l’objectif CS
Objectif CS Lors de l’utilisation de l’objectif C
Câble BNC Borne de sortie vidéo Remarque
Branchement DES Câbles ET Vérification DU Fonctionnement
GND câble avec la ligne blanche
Menu Principal
Profil
Comment utiliser le menu des écrans
JEU
ITS
Retroecl
Iris
Configuration DE LA Caméra
ID DE CAMERAOFF, on
AGC OFF, Tres BAS, BAS, MOYEN, HAUT, Tres HAUT, Util
ELC Contrôle électronique de la lumière
Connectez chaque borne à GND
DNR
Obturateur
Jour
JOUR/NUIT
Nuit
Auto
Zoom NUM
BAL Blancs
BA2 la température de couleur va de 2 000 K à 10 000 K
POSI/NEGA
Inverse
Intelligence
De chacun des quatre points et appuyez
Sur le sélecteur Setup pour terminer le
Langue
Autre Réglage
Renseignements SUR LE Système
Reinit Reglage Usine
ID DE Camera OFF Iris ALC AGC
Table de configuration initiale
Caractéristiques Techniques
Caractéristiques techniques
Caractéristiques techniques
Articles Sous-articles SCC-B1331P / SCC-B1031P
Emballage 173W x 99H x 115D mm
Page
Cámara Digital a Color
Cámara Digital a Color
Información de Seguridad
Advertencia
Español
Precaución
Aviso de Conformidade com a IC
Instrucciones importantes de seguridad
Índice general
Características
Introducción
Producto Y Accesorios Producto principal Camara
Producto Y Accesorios
Sostén de la cámara Base de sujeción Manual de usuario
Base
Conector de la óptica de diafragma automático Auto Iris
Nombre DE LOS Componentes Y Funciones
Vista lateral
Panel trasero AC24/DC12V SCC-B1331P AC220V~240VSCC-B1031P
10 Cámara Digital a Color
Botón de configuración Setup
Al menos 2 segundos, aparece el Menu PRI
Lente CS
Uso de la lente CS
Tipo de
Uso de la lente C
Conexión DE Cables Y Comprobaciones DE Funcionamiento
Instalación
GND cable con la línea blanca
Cable BNC Terminal de salida de video Nota
Menú Principal
Utilización DE LOS Iconos DEL Menú
14 Cámara Digital a Color
Cómo utilizar el menú OSD
Perfil
Juegos
LUZ Fondo
16 Cámara Digital a Color
ID Camara Iris
El menú Lent se utiliza si selecciona un tipo de lente AI
AGC NO, MUY BAJA, BJ, INT, ALTO, MUY ALTA, USU
Cómo utilizar el menú OSD
Reduce el ruido en la pantalla
DNR
OBT
Conecte cada uno de los terminales a GND
BAL. BL
SIN Parp
DIA
Noche Zoom Digital
AGC SUP Color
DET Controla la distinción horizontal o vertical Sync
Ajusta el esquema de colores de acuerdo con el valor de AGC
Retro
Inteligencia
22 Cámara Digital a Color
Configuración DE LA Zona Privada
Utilice el interruptor cdef para seleccionar entre Priv a
Idioma
Otros Ajustes
Disp EXT
ESTAND. Fabrica
DNR INT OBT AMP Sens
ID Camara Iris ALC AGC
SIN Parp XDR
Zoom Digital DET AGC SUP Color
Especificaciones
Especificaciones
26 Cámara Digital a Color
Opciones Subopciones SCC-B1331N
Especificaciones
28 Cámara Digital a Color
Opciones Subopciones SCC-B1331P / SCC-B1031P
Page
から製品登録を行ってください。
デジタルカラーカメラ
10.お手入れの際、製品のパーツに直接水を噴霧しないで下さい。火災や感電の原因になります。 デジタルカラーカメラ
この記号は、この器具には感電する恐れのある 高電流が存在することを示しています。
器を湿度や埃、すすのある場所に設置しないで下さい。火災や感電の原因になります。
メインプラグは切断装置として使用され、いつでも利用可能になります。
直射日光や放熱源に近づけないで下さい。火災の原因になります。 通気性のいい場所に設置して下さい。
FCC 声明
IC遵守のお知らせ
11.メーカーが指定する付属品のみを使用してください。
重要な安全ガイド
オートアイリスレンズ・アダプターの接続
はじめに
メニューのアイコンの使用法
仕様27
インテリジェントモーション検知およびトレース
高解像度
XDR(ダイナミックレンジ拡張)
高感度 最新のSONY Super-HADプログレッシブCCDを使用して、高感度の画像を実現します。 低照明
ウント
製品および付属品 主な製品 カメラ
カメラホルダー マ Cマウント・アダプター ユーザーマニュアル
オートアイリスレ
側面図
ンズ・コネクター
自動絞りレンズ調 整ケーブル オートアイリスレンズ・コネクター
AC24/DC12V SCC-B1331P AC220V~240VSCC-B1031P
リヤパネル
入力/出力コネクタ このコネクタにはデイ/ナイト切替、およびアラーム出力信号のための入出力ポートがあります。
Setup スイッチ
出来ます。 Cd上/下 このスイッチの上または下を押すと、メニューを上下に移行出来ます
接地ポートです。 電源接続ポート 電源ケーブルに接続されています。 10 デジタルカラーカメラ
Cレンズを使用する場合
CSレンズを使用する場合 図のように右回りに回してCSレンズを取付けます。
CS レンズ
② BNCケーブルのもう一方の終端をモニターの
① BNCケーブルの一方の終端をカメラ背面にあ る映像出力ポートに接続します。
映像入力ポートに接続します。
ビデオアウト端子
前のメニューに戻ります。 メインメニューに戻ります。 変更保存
メニュー設定を終了します。
プロフイ-ル
カメラ設定
14 デジタルカラーカメラ
プロフイ-ルメニューで、次のカメラ設定を一度に選択できます。
バックライト ミング
アイリス
カメラID
ALC 自動光量調整
16 デジタルカラーカメラ
ELC 電子光量調整
DNRデジタルノイズリダクション 関連の設定を 行うことができます。
オフ, 最低, 低, 中, 高, 最高, ユ-ザ, FIX
シャッタ
背面のSHUTTERS0、SHUTTERS1および
フリッカレス オフ, オン
赤の強さを調整します。 青の強さを調整します。
ホワイトバランス
デジタルズ-ム オン/オフ
有効画面のはっきりしない部分を確認できます。 注
固定され、変更できなくなります。
LLフェ-ズを調整できます。 注
オフ, 水平, 垂直, 水平/垂直
デジタル手ブレ補正 オフ, オン
マスクエリア 1~4
動く被写体を検知しトレースします。 動く被写体を検知します。
ディスプレイ
モーション検知の感度を設定します。
できます。
プライバシーゾーン設定プライバシーゾーン設定
位置の設定方法
点の設定方法 それぞれの位置を4つの点で設定できます。
工場初期値 すべての設定が工場出荷時の初期設定に戻され
ます。カラ-白黒, R/G/B
カメラIDオフ
初期設定テーブル
ション最高速
シャッタ-オフ フリッカレスオフ
26 デジタルカラーカメラ
サブ項目
外形仕様
SCC-B1331N
28 デジタルカラーカメラ
SCC-B1331P / SCC-B1031P
サブ項目
Page
Câmera Digital Colorida
Câmera Digital Colorida
Informações de segurança
Aviso
Português
Atenção
Declaração FCC
Instruções importantes de segurança
Introdução Características
Conteúdo
Instalação
Como usar o Menu OSD Usando ícones no menu
Produtos E Acessórios
Introdução
Montagem
Produto principal Câmera Suporte da câmera
Manual do usuário
Lentes Auto Iris
Funções E Nomes DAS Peças
Conector das
Painel traseiro AC24/DC12V SCC-B1331P AC220V~240VSCC-B1031P
10 Câmera Digital Colorida
Conector de entrada/saída
Function Description
Ligando O Conector DAS Montando AS Lentes Lentes Auto Iris
12 Câmera Digital Colorida
Instalação
Cabo BNC Terminal da saída de vídeo Nota
Inicial
Usando Ícones no Menu
AJ Câmera
Inteligência
14 Câmera Digital Colorida
Como usar o Menu OSD
Jogo
LUZ Fundo
DIA/NOITE
16 Câmera Digital Colorida
Configuração DA Câmera
ID Câmera Íris
Preferência
ELC Controle de luz eletrônico
18 Câmera Digital Colorida
SEM Trem
Aproximadamente 2,5 milhões a 9,3 milhões
Intermitência da iluminação
BAL. BR
20 Câmera Digital Colorida
SUP COR AGC
Ajusta o esquema de cores de acordo com o valor AGC
Inteligência SENS.1~7
22 Câmera Digital Colorida
Use a opção cdef para selecionar uma das Priv de 1 até
Padrões Fábrica
Outra Definição Informações do Sistema
Padrão de fábrica de todas as configurações será restaurado
COR OSD
Tabela de Configuração Inicial
Configuração da Câmera
Especificações
Especificações
Alimentação
26 Câmera Digital Colorida
Especificações
28 Câmera Digital Colorida
Itens Subitens SCC-B1331P / SCC-B1031P
AB68-00842D