ST50
Instructions
Getting to Know your camera
Page
Contents
Drive mode 047 Quick view
041 Image Adjust
045 Volume
039 Frame Guide
047 Display Save
049 Setting up the Date / Time / Date type
052 Setting the USB
048 Formatting a memory
Smart Mode
Package Contents
System chart
Sold Separately
Front & Top
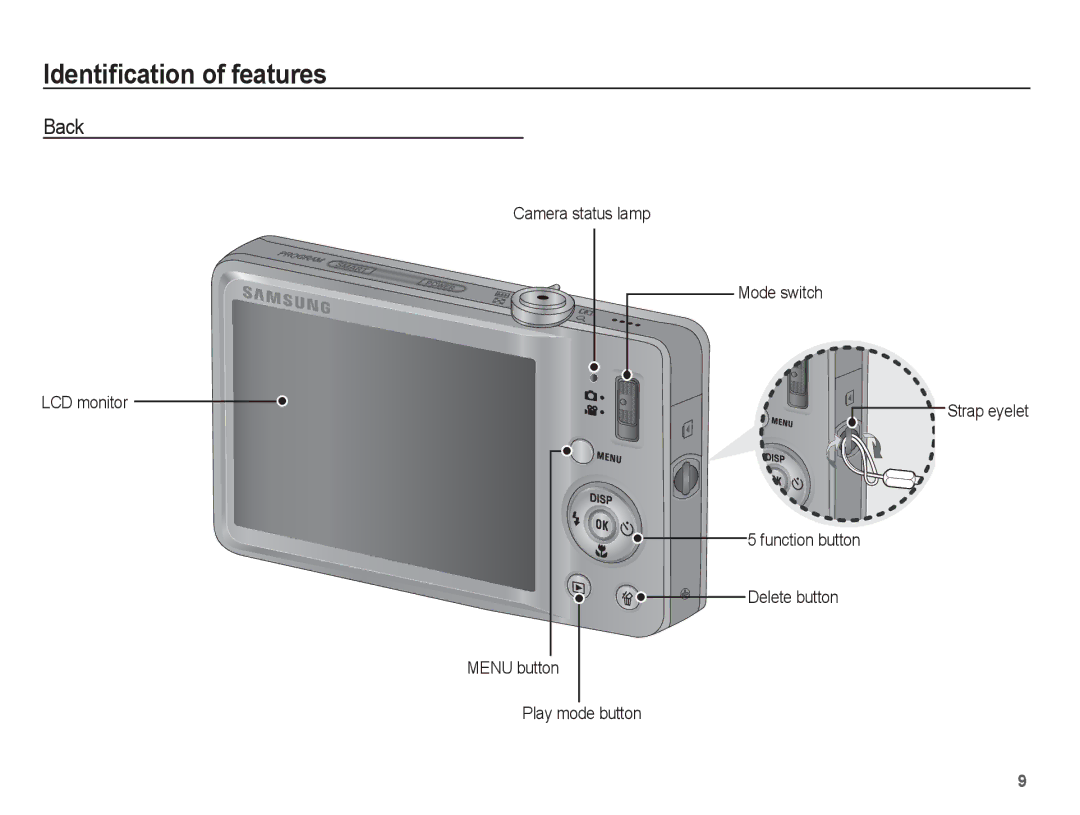
Identification of features
Microphone
Function button Delete button Menu button Play mode button
Camera status lamp Mode switch LCD monitor
Back
Bottom Function button
Battery chamber Information / Up button
Button
Self-timer lamp
Mode icon
SLB-07A rechargeable battery Specification
Connecting to a Power Source
Number of images and battery life Using the SLB-07A
Charging LED of the AC Adapter
How to charge the rechargeable battery
Charging LED
Inserting the memory card
Battery
Insert the memory card as shown
Instructions on how to use the memory card
When the memory card is used incorrectly
Clip 3343
Digital Zoom rate
LCD monitor indicator
Description Icons
00001
Use the up or down buttons to navigate through the menus
How to use the menu
Use the left or right buttons to select a sub menu
Program mode
Starting the recording mode
How to use the Program mode
Selecting modes
Movie clip file type AVI MPEG-4
How to use the Movie clip mode
Recording the movie clip without sound
Frame Rate
Pausing while recording a movie clip Successive Recording
Pressing the shutter button down half way
Power button
Shutter button
Mode switch
Normal mode
Smart button
Wide Zoom
Zoom W/T Lever
Digital zoom Wide
Info Disp / Up button
Down button to take macro pictures
Available focusing method, by recording mode
Macro / Down button
Macro
Flash range
Focus lock
Flash / Left button
Normal Macro Auto macro
Flash mode indicator
Smart Auto flash icon will appear in Smart Auto mode
Selecting the self-timer
Self-timer / Right button
Available flash mode, by recording mode Selectable
Use a tripod to prevent the camera from shaking
Starting
Motion Timer
Do not move Taking an image after 2 sec
OK button
Available mode
Menu button
Functions
How to Enable Functions Using the Menu Button
Exposure compensation
For taking images outside
White balance
Icon Description
For taking images under a cloudy
Or subject brightness
Face Detection
Press the shutter button fully to take a picture
When the person being taken does not look at the camera
Digital zoom is not activated in this mode
This function can detect up to 10 persons
Smile Shot
Image Size
Blink Detection
ACB Sub menus Off, On
Mode Still Image mode
Quality / Frame rate
Fine
Drive mode
Metering
Frame Guide Auto Focus type
Set Frame Guide mode when you want
From the 9 AF points
Photo Style Selector
Up/Down button Selects R, G, B
Left/Right button
Image Adjust
Up/Down button
Image
Movie clip frame stabiliser
Digital Image Stabilization DIS
Available recording time Max hour
Voice Memo
Voice Recording
Allows
Recording the movie clip without voice
Sound
Volume Shutter sound
Sound menu
Beep Sound
Language
Setup menu
Display
Function Description
Display Bright
Start up image
Quick view
Display Save
Formatting a memory
Settings
No* Settings will not be restored to their defaults
Initialisation
File name
Setting up the Date / Time / Date type
Time Zone
There is an option to include Date / Time on still images
Auto power off
Imprinting the recording date
Date Only the Date will be
On* The AF lamp will light up in low light conditions
Connecting to an external monitor
Auto Focus lamp Selecting Video out type
Off The AF lamp will not light up in low light conditions
With a USB cable
Setting the USB
USB sub menus Auto Automatically enables an
Automatically
Playing back a movie clip
Starting play mode
Playing back a still image
It back, press the OK button again
Movie clip capture function
Playing back a recorded voice
Playing back a voice memo
To resume playback of the voice memo, press the OK button
Thumbnail º / Enlargement í Lever
Play mode button
Press the Play mode button once to
Smart Album
Description File Format
Searching or Deleting Files
Details of Each Category
Recorded dates
Message will be displayed
Image enlargement
Button. Press the OK button and a
Select a desired sub menu by
Temporarily stops playback
Play & Pause / OK button
Voice file, or a movie clip
Resumes playback
Left / Right / Down / Menu button
Delete Õ button
Setting up the play back function using the LCD monitor
Layout
4X6 Size
Menus are subject to change without prior notice
Edit
Resize
Selector
Rotating an image
You can rotate the stored images by various degrees
Changed image is saved as a new file name
New file name
Custom colour
Button and press the OK button
Face Retouch
Change the saturation by pressing the Left/Right button
Change the brightness by pressing the Left/Right button
Button and press the OK button. Then
By pressing the Left/Right
Starting the Multi Slide Show �
Repeat The Slide show is repeated until cancelled
View
Start the Multi Slide Show
Configure Multi Slide show effects
Selecting Images
File Options
Setting play interval
Setting Background Music
Deleting images
You can add your voice to a stored still image
Protecting images
OK button Protect / release the image
When the wide angle image is printed as a wide angle print
Reset Cancel the print setup
Dpof Size secondary menu Cancel, 3X5, 4X6, 5X7
Press the OK button to confirm the setting Display
Zoom W/T Lever Change the print size
Copy To Card
Press the Right button
ÄWhen you press the Smart button, it will turn blue
Smart mode
Smart mode display
Smart Auto mode
Starting Smart mode
000000
How to use Smart Auto mode
Use the Smart button to select Smart Auto mode
How to use Smart Movie Clip mode
Setting up the Smart menu
Use the Smart button to select Smart Movie Clip mode
15 FPS
30 FPS
Main Menu Sub Menu
Setting up the Smart Play menu
Smart Play mode display
Setting up the Smart Play menu
100-0010
PictBridge
PictBridge Print Setting
PictBridge Picture Selection
Weather
PictBridge Reset Important notes
Areas exposed to dust and dirt
Sand can be particularly troublesome to cameras
Do not attempt to disassemble or modify the camera
Extremes in temperature may cause problems
Samsung cannot be held responsible for camera malfunctions
There is low battery capacity Insert fresh batteries
Memory card is locked
Please check the following
Before contacting a service centre
Refer to Card Locked error message The cameras power is off
Insert fresh batteries. p.14
Turn the camera on
Check the connection The camera is off
Specifications
DC power input connector 4.2
SD card Up to 4GB guaranteed
Interface Digital output connector USB Audio Mono
Movie Clip ·With Audio or without Audio
Weight
Power Source
Dimensions WxHxD
720mAh
Software Notes
System Requirements
About the software
Setting up the application software
You can visit the Samsung web-site through the internet
Setting up the application software
Starting PC mode
Will open and the computer will recognise the camera
Refer to page 97 Removing the removable disk
Cut
Pop-up menu will open. Click the Cut or Copy menu
Removing the removable disk
Unplug the USB cable
Downloaded images will be displayed
Samsung Master
Click Next button
Click the Start button to download the images
Adjust
Help menu
Windows media asf file types
Edit Clip
Saturation
Add Media
Setting up the USB Driver for MAC
Using the USB Driver for MAC
Case 5 Are other USB cables connected to the PC?
Right-click on the entry with the question ? or exclamation
Installing codec for Mac OS
Insert the CD provided with the camera
Correct Disposal of This Product
Correct disposal of batteries in this product