AA68-03194A (C18A_DEU)

11/17/03 1:54 PM Page 51

Videorekorder für Aufnahmen vorprogrammieren

Mit dieser Funktion können Sie den Videorekorder zum Aufzeichnen einer Sendung bis zu einem Monat im Voraus programmieren. Es können bis zu sechs Programme voreingestellt werden. Die folgenden Angaben zur Sendung, die Sie aufzeichnen möchten, sind erforderlich:

Programmnummer

Aufnahmegeschwindigkeit (Longplay-Option)

Startzeit

Endzeit

Datum

Aufnahmemodus (einmalig, täglich, wöchentlich)

Optionale Verwendung eines Decoders

Bevor Sie den Videorekorder einstellen:

Stellen Sie sicher, dass Sprache, Datum und Uhrzeit richtig eingestellt sind

(wenn die Uhr nicht gestellt wurde, wird die Funktion “Datum und Uhrzeit einstellen” automatisch aktiviert).

Legen Sie die Kassette ein, auf der das Programm aufgezeichnet werden soll

(mit abgedeckter Sicherung).

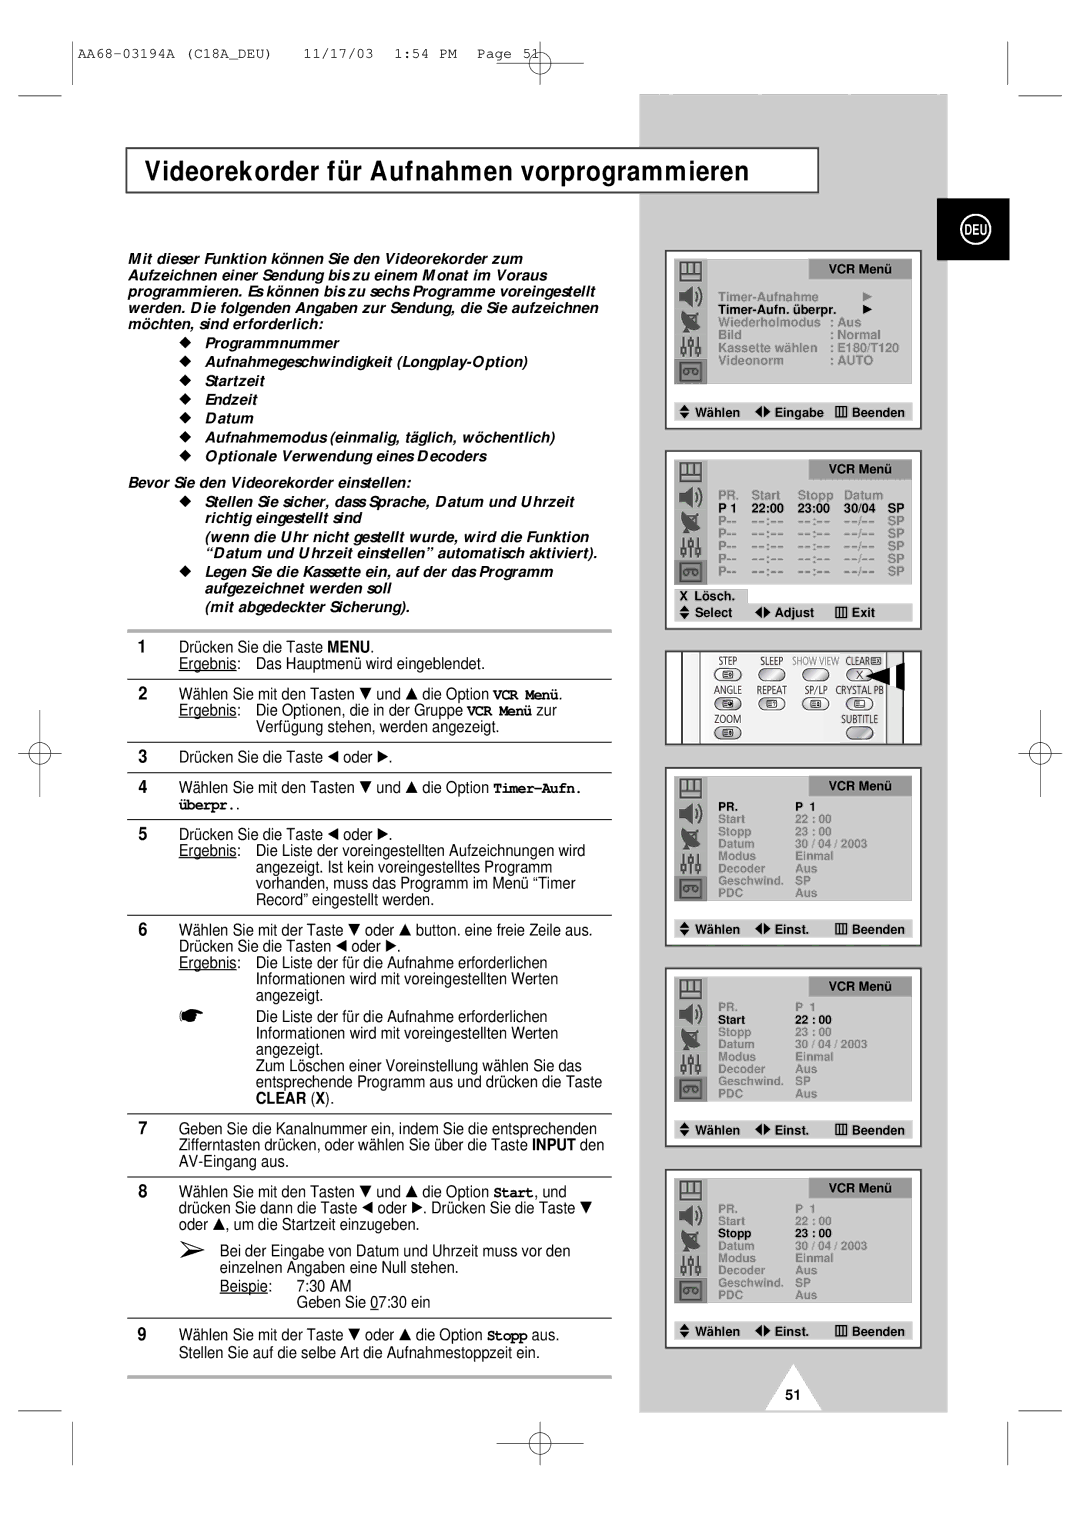
1Drücken Sie die Taste MENU.

Ergebnis: Das Hauptmenü wird eingeblendet.

2Wählen Sie mit den Tastenund die Option VCR Menü. Ergebnis: Die Optionen, die in der Gruppe VCR Menü zur Verfügung stehen, werden angezeigt.

3Drücken Sie die Taste œ oder .

4Wählen Sie mit den Tastenund die Option Timer-Aufn. überpr..

5Drücken Sie die Taste œ oder .

Ergebnis: Die Liste der voreingestellten Aufzeichnungen wird angezeigt. Ist kein voreingestelltes Programm vorhanden, muss das Programm im Menü “Timer Record” eingestellt werden.

6Wählen Sie mit der Tasteoder button. eine freie Zeile aus. Drücken Sie die Tasten œ oder .

Ergebnis: Die Liste der für die Aufnahme erforderlichen Informationen wird mit voreingestellten Werten angezeigt.

Die Liste der für die Aufnahme erforderlichen Informationen wird mit voreingestellten Werten angezeigt.

Zum Löschen einer Voreinstellung wählen Sie das entsprechende Programm aus und drücken die Taste CLEAR (X).

7Geben Sie die Kanalnummer ein, indem Sie die entsprechenden Zifferntasten drücken, oder wählen Sie über die Taste INPUT den AV-Eingang aus.

8Wählen Sie mit den Tastenund die Option Start, und drücken Sie dann die Taste œ oder . Drücken Sie die Taste oder , um die Startzeit einzugeben.

Bei der Eingabe von Datum und Uhrzeit muss vor den einzelnen Angaben eine Null stehen.

Beispie: 7:30 AM

Geben Sie 07:30 ein

9Wählen Sie mit der Tasteoder die Option Stopp aus. Stellen Sie auf die selbe Art die Aufnahmestoppzeit ein.

DEU


VCR Menü


Timer-Aufnahme


Timer-Aufn. überpr.


Wiederholmodus

: Aus


Bild


: Normal


Kassette wählen

: E180/T120


Videonorm


: AUTO


Wählen


Eingabe


Beenden


VCR Menü


PR.

Start


Stopp

Datum


P 1

22:00

23:00

30/04

SP


P--

--:--

--:--

--/--

SP


P--

--:--

--:--

--/--

SP


P--

--:--

--:--

--/--

SP


P--

--:--

--:--

--/--

SP


P--

--:--

--:--

--/--

SP


X Lösch.


Select


Adjust


Exit


VCR Menü


PR.


P 1


Start


22

: 00


Stopp


23

: 00


Datum


30

/ 04 / 2003


Modus


Einmal


Decoder


Aus


Geschwind.

SP


PDC


Aus


Wählen

Einst.

Beenden


VCR Menü


PR.


P 1


Start


22

: 00


Stopp


23

: 00


Datum


30

/ 04 / 2003


Modus


Einmal


Decoder


Aus


Geschwind.

SP


PDC


Aus


Wählen

Einst.

Beenden


VCR Menü


PR.


P 1


Start


22

: 00


Stopp


23

: 00


Datum


30

/ 04 / 2003


Modus


Einmal


Decoder


Aus


Geschwind.

SP


PDC


Aus


Wählen

Einst.

Beenden


51

Page 51
Image 51
Samsung UW17J11VD5XXEU, UW17J11VD5XXEG, UW17J11VD5XXEC, UW17J11VD5XXEF manual Videorekorder für Aufnahmen vorprogrammieren

UW17J11VD5XXEF, UW17J11VD5XXEG, UW17J11VD5XXEU, UW17J11VD5XXEC specifications

Samsung has long been a leader in the electronics industry, and its line of premium displays exemplifies this commitment to innovation and quality. Among the most notable products are the Samsung UW17J11VD5XXEU, UW17J11VD5XXEC, UW17J11VD5XXEG, and UW17J11VD5XXEF models. These displays cater to a variety of professional and commercial environments, offering features that enhance productivity, usability, and visual performance.

One of the standout characteristics of these models is their stunning Ultra-Wide display technology. With an aspect ratio that significantly expands the screen real estate, users can enjoy a seamless viewing experience that facilitates multitasking. This is especially beneficial for professionals working with detailed graphics or large datasets, as the extra space allows for multiple windows to be open side by side without the need for cumbersome toggling.

The displays boast high-resolution capabilities, ensuring that images and text are sharp, vibrant, and easy to read. This high pixel density is particularly useful for design work, video editing, and other visually intensive tasks where clarity is paramount. Coupled with advanced Color Accuracy technology, users can expect true-to-life colors, ensuring that what they see on screen is faithfully represented in print or during presentations.

Connectivity is another area where these models shine. Equipped with multiple input options including HDMI, DisplayPort, and USB-C, the Samsung UW17J11 series offers great flexibility for connecting a variety of devices. This makes it easy for users to switch between laptops, desktop workstations, and even gaming consoles, ensuring that the display serves multiple purposes in a modern workspace.

Additionally, Samsung’s Commitment to sustainability shines through with energy-efficient features. These models are designed to consume less power while still delivering high performance, aligning with current eco-conscious trends and helping businesses to reduce their environmental footprint.

In terms of ergonomics, these displays come with adjustable stands, allowing users to find their optimal viewing angles. This personalized comfort is crucial during long working hours, reducing strain and improving overall productivity.

Overall, the Samsung UW17J11VD5XXEU, UW17J11VD5XXEC, UW17J11VD5XXEG, and UW17J11VD5XXEF models encapsulate cutting-edge display technology, ergonomic design, and versatility, making them exemplary choices for any workspace that prioritizes performance and user comfort. These features collectively make them a valuable asset for professionals in various fields, ensuring that they can meet the demands of their work with efficiency and style.