SDE-120N/SDE-3000N/SDE-3001N SDE-3170P/SDE-3002/SDE-3002P
Overview
Features
Overview
Important Safety Instructions
Risk of Electric Shock Do not Open
English
Before Start
Battery
Standards Approvals
Package Contents
Contents
Setup
Backup
Using the iPhone
Camera Specification
Menu
Part Names and Functions Front
LED
Part Names and Functions Rear
DVR
Remote Control
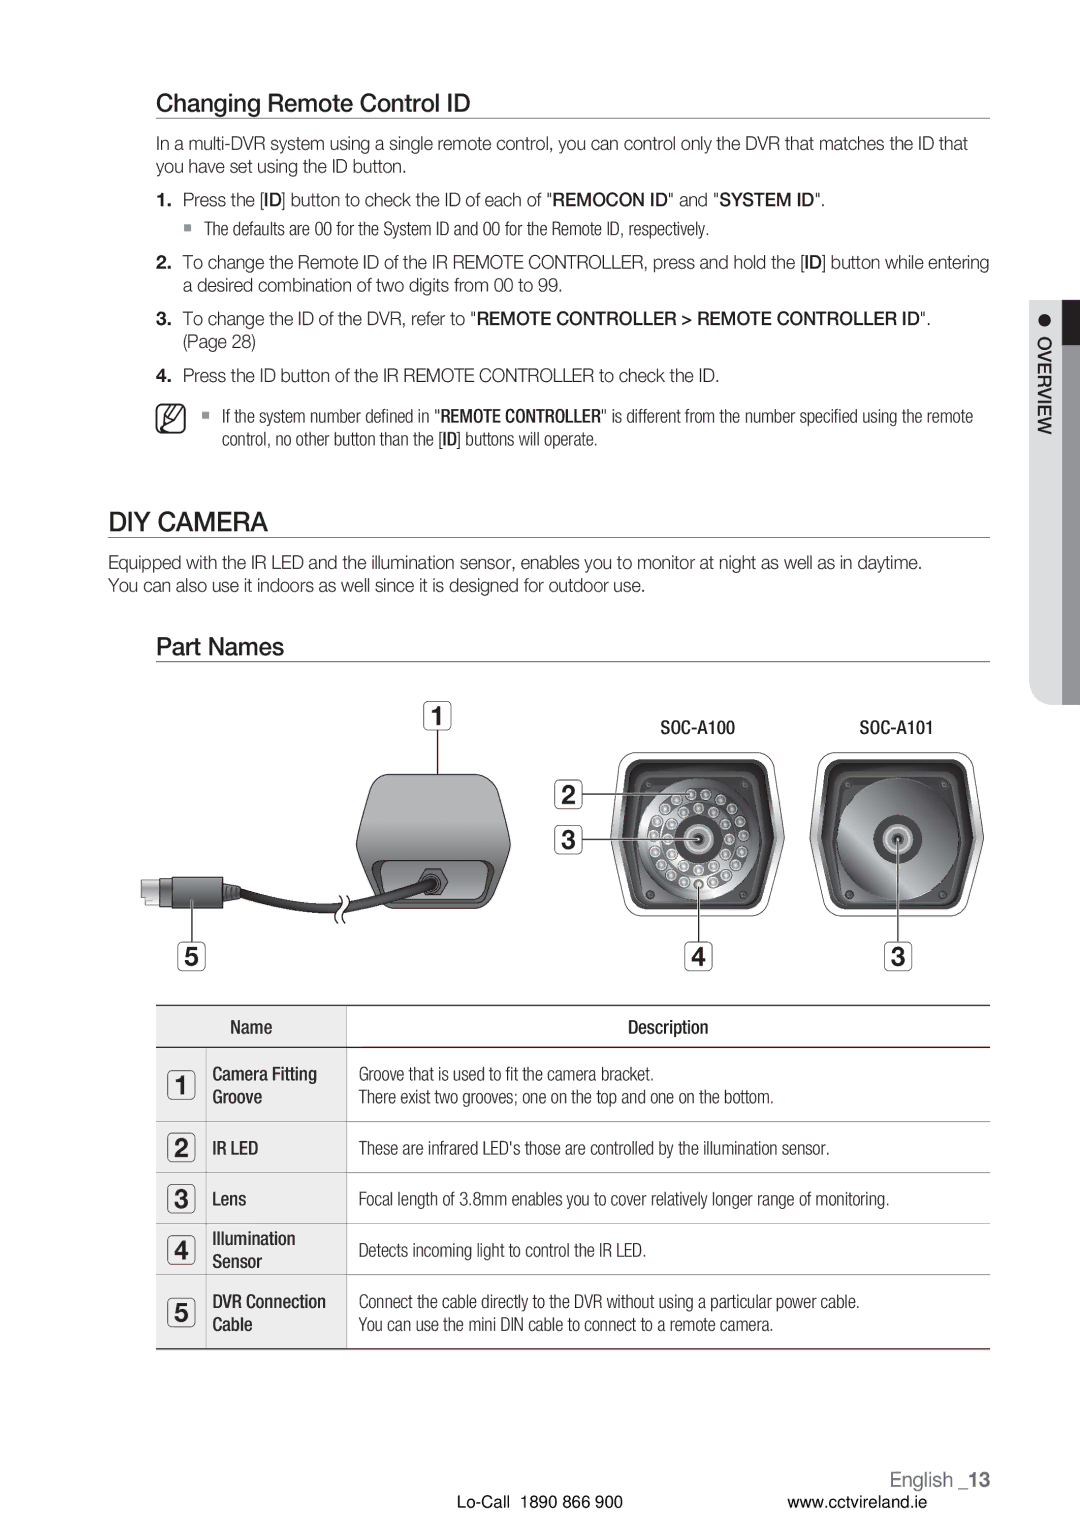
DIY Camera
Changing Remote Control ID
Part Names
IR LED
Camera Bracket
Installing the camera
Mini Din Cable
Camera Bracket Specification
Adjusting the Camera Bracket
Connecting the Alarm I/O
Connecting with other device
Connecting the alarm Input signal
Connecting the alarm output signal
Network Connection
Connecting with Other Device
Local System Configuration
Internet
Total System Configuration
Starting the System
Getting started
LOG on
Getting Started
LOG
Power OFF
LOG OFF
Live
Live Screen Configuration
Icons on the Live Screen
View the Launcher Menu
Display
Switching the screen mode
Record
Auto Sequence
Playback Screen
Playback
To playback by time option
To playback by time selection
Before Starting Setting UP
DVR setup
System Setup
How to use remote control and mouse
DATE/TIME
System
YYYY/MM/DD, DD/MM/YYYY, MM/DD/YYYY
System Management
To update the firmware
Remote Controller
To update the network
File in the network
Camera
Using the Virtual Keyboard
Camera
To change the camera title
Covert
Color
Audio Connection
Motion Sensor
Setup
To select a motion area
To deselect the motion area
Monitor
OSD
Use the direction buttons to move to Monitor
Adding Sequence
Sequence
Select a list to edit Edit window appears
When the ADD Sequence window appears, press the ADD button
Sound
You can use the remote control to activate the buzzer
Audio
Buzzer
User Management
User
To add a user account
To change the user information
User Authority
Network
IP Setup
To view the Help
Ddns
Mail
Network Connection and Settings
Security
DVR
If using a router
If not using a router for network connection
Static IP Setup Mode
Dynamic IP Dhcp Setup Mode
HDD Event
Event / Sensor
DVR Connection
Router Port Forwarding
Event / Sensor
Alarm Input
Mode Set the output mode of the alarm
Alarm Output
Buzzer OUT
Mail Notification
Disk Management
It will be disabled if Overwrite is set to OFF
Overwrite
If set to ON, recording will proceed by overwriting
To start the Record Setup
Record Setup
Recording Operation
CONTINUOUS/MOTION Recording
To set the record mode
To specify the recording size/FPS/quality
Use the direction buttons to move to Alarm
Alarm Recording
Adjust the size
From the Time bar, select a cell that you want to
From the Alarm Recording menu screen, select Activation
To specify the alarm recording time
You can specify the recording size in manual recording mode
Instant Recording
Backup
Backup
NEW Backup
Release
Reserved Data Management
Search
Search & play
Search by Time
Playback
Right Moves to the rightmost of the log list
Search by Event
Web viewer
What is web viewer?
Introduction
System Requirements
Web viewer
To connect to the Web Viewer
English
Live Viewer At a Glance
Live Viewer
Select a channel to display on the screen
To record video
Switching between split modes
To print the screen
Single Split
Screen Capture
ActiveX Setting
To view the status
To view the log
Search Viewer At a Glance
Search Viewer
Set the recording properties as necessary
Timeline
Search by Event
Search by Time
Setup Viewer At a Glance
Setup
Camera Setting
Click the Setup tab to display the DVR remote setup screen
Motion setting
Color setting
OSD setting
Audio/Buzzer setting
Monitor setting
Date/Time setting
Management setting
Recording Operation Setting
Control Device Setting
Continuous/Motion Recording Setting
Alarm Recording Setting
User Management Setting
Instant Recording Setting
User Authority Setting
Mail Setting
IP Setup Setting
HDD Event Setting
Alarm Input Setting
Buzzer out setting
Alarm output setting
Mail notification setting
Information
Using the iPhone
Appendix
Camera Specification
DNR
Appendix
Ntsc / PAL
Product Specification SDE-120N/SDE-3000N/SDE-3001N
1EA
4CH
AVI
DHCP, DNS, DDNS, NTP
2EA 4EA
2EA
Details Model SDE-3170P
Product Specification SDE-3170P/SDE-3002P/SDE-3002
PAL
1EA BNC 1 Chcvbs
2EA 1EA
4EA 2EA 1EA
GNU General Public License
Open Source License Report on the Product
Preamble
Version 2, June
Lo-Call 1890 866
END of Terms and Conditions
No Warranty
Some devices are designed to deny users access to
How to Apply These Terms to Your New Programs
GNU Lesser General Public License instead of this License
Source Code
Terms and Conditions
Conveying Verbatim Copies
Additional Terms
Automatic Licensing of Downstream Recipients
Acceptance Not Required for Having Copies
Use with the GNU Affero General Public License
Patents
Revised Versions of this License
Limitation of Liability
GNU Lesser General Public License
Interpretation of Sections 15
END of Terms and Conditions
Lo-Call 1890 866
Modified work must itself be a software library
Lo-Call 1890 866
How to Apply These Terms to Your New Libraries
Original SSLeay License
OpenSSL License
Lo-Call 1890 866
Correct disposal of batteries in this product
Channel DVR
TEL +44-1932-45-5300 FAX +44-1932-45-5325
Chertsey, Surrey, United Kingdom KT16 OPS