Odkurzacz automatyczny
Oznacza zagrożenie śmiercią lub poważnymi obrażeniami ciała
Symbole UWAGA/OSTRZEŻENIE
Inne Symbole
Informacje O Bezpieczeństwie
Stacja Ładująca
Ważne Informacje O Bezpieczeństwie
Informacje Ogólne
Odkurzacz Automatyczny
Obsługa Odkurzacza
Spis treści
Sprawdź, czy na wtyczce nie ma kurzu lub wody
Zasilanie
Może to spowodować pożar lub porażenie prądem
Przed Użyciem
Odkurzacz może najechać na dzieci i je przewrócić
Planowanego odkurzania
Się znajdować żadne przeszkody ani nierówności
Dla odkurzacza
Przedmioty umieszczone przed stacją ładującą mogą
Naładowanie
Obsługi klienta
Podczas Pracy
Nie wolno używać odkurzacza automatycznego na grubych
Nie umieszczaj na odkurzaczu automatycznym żadnych
Nie wolno siłowo przyciskać odbijaka na odkurzaczu
Czyszczenie I Konserwacja
Przestrzeń między kanapą i ścianą
Rozpuszczalnik lub alkohol
Szczotki boczne
Różne Tryby Odkurzania
Funkcje odkurzacza
Delikatne Odkurzanie Każdego Rogu
System Antyzderzeniowy
Automatyczne Ładowanie
Boczna Szczotka Obrotowa
Czyszczenie Progów
Stacja ładująca Inne składniki
Elementy odkurzacza
Elementy
Odkurzacz
Dół
Nazwa Każdej Części
Stacja ładująca
Instalacja baterii w pilocie
Pilot opcja
Ekran
Elementy NA Ekranie
Część Z Przyciskami
Włączanie i wyłączanie zasilania
Obsługa odkurzacza
Instalacja Odkurzacza Automatycznego
Kolejność przygotowywania
Ustaw stację ładującą na płaskiej powierzchni
Podłączanie stacji ładującej
Włącz zasilanie na dole urządzenia
Ładowanie
Ok min jego pracy
Informacje o akumulatorze
Rozpoczynanie i kończenie odkurzania
Obsługa Odkurzacza Automatycznego
Rozpoczynanie i kończenie odkurzania
Włączanie i wyłączanie zasilania
Naciśnij przycisk Recharging Ponowne ładowanie Opcja
Ponowne ładowanie
Informacje o funkcji wznawiania odkurzania
Automatyczne odkurzanie
Przycisk na
Odkurzaczu
Ilością kurzu, okruszków itd
Punktowe odkurzanie
Odkurzacz umożliwia odkurzenie określonego miejsca z dużą
Odkurzaczu Opcja
Maksymalnie dokładne odkurzanie
Odkurzanie ręczne nie jest możliwe, gdy odkurzacz jest
Odkurzanie ręczne opcja
Przycisk na pilocie opcja Kolejność konfiguracji
Ustawienie trybu
Czyszczenie kamery i wizjera czujnika
Konserwacja narzędzi i fi ltrów
Czyszczenie Odkurzacza Automatycznego
Informacje o sposobach czyszczenia i konserwacji
Przed wyczyszczeniem pojemnika należy go opróżnić
Czyszczenie pojemnika na kurz i filtrów
Czyszczenie szczotki elektrycznej
Konserwacja Narzędzi I Filtrów
Następnie obróć szczotkę i powtórz czynności z kroku
Czyszczenie bocznej szczotki obrotowej
Czyszczenie koła napędowego
Objaw Sprawdź Czynności do wykonania
Rozwiązywanie problemów
Sprawdź Przed Rozmową Z Serwisem
Do gniazdka
Zatrzymaj odkurzacz i opróżnij
Słabą siłą zasysania
Może zlokalizować
Kod błędu
Kody Błędów Rozwiązywanie Problemów
Elektryczna
Odkurzacz
Stacja ładująca
Page
Robotporszívó
Egyéb Jelzések
Biztonsági tudnivalók
Biztonsági Tudnivalók
Figyelmeztető Jelzések
Akkumulátortöltő
Fontos Biztonsági Előírások
Általános
Robotporszívó
Porszívó Használata
Tartalom
Ez tüzet vagy áramütést okozhat
Áramellátás
Ez tüzet vagy áramütést okozhat
Egyetlen aljzathoz ne csatlakoztasson több csatlakozót
Használat Előtt
Feltétlenül kapcsolja ki a robotporszívót
Takarítás előtt pakolja el a padlón heverő tárgyakat
Üljenek rá a porszívóra
Ha a gyermekeket vagy háziállatokat egyedül hagyja
Ne használja a töltőt a rendeltetésétől eltérő célokra
Elérheti azt
Feltöltését
Azokon
Használat Közben
Tisztítás ÉS Karbantartás
Sérült tápkábelt cseréltesse ki a szakszerviz munkatársaival
Különböző Takarítási Módok
Készülék jellemzői
Alapos Takarítás a Sarkokban is
Ütközésbiztos
Automatikus Töltés
Oldalsó Peremtisztító Forgókefe
KÜSZÖB-ÁTHALADÁS
Opció Használati útmutató Tisztítókefe
Porszívó összeszerelése
Alkatrészek
Készülékház Töltő állomás Egyéb alkatrészek
Készülékház
AZ Alkatrészek Megnevezése
Tápellátás-jelző Töltésjelző Szellőzők Töltőtüske
Az elemek behelyezése a távirányítóba
Távirányító opció
Kijelző
Kijelző
Gombok
Be- és kikapcsolás
Porszívó használata
Robotporszívó Üzembe Helyezése
Az üzembe helyezés menete
Töltőt egyenes felületen helyezze el
Töltő elhelyezése
Kapcsolja be a készülék alján levő tápkapcsolót
Töltés
Termék megvásárlásának időpontjában az akkumulátor
Fel kell töltenie azt
Azt követően a porszívó kb percig fut
Az akkumulátor
Takarítás kezdete és vége
Robotporszívó Használata
Takarítás kezdete vagy vége
Be- és kikapcsolás
Feltöltés
Mód törlése
Automatikus takarítás
Beállítási sorrend
Mód beállítása
Mód beállítása
Takarítás egy helyben
Maximális takarítás
Ha a robotporszívó a töltőállomásra csatlakozik, a manuális
Manuális takarításopció
Mód törlése
Az érzékelőablak és a kamera tisztítása
Robotporszívó Tisztítása
Tisztítás és karbantartás irányelvei
Tisztítás előtt ürítse ki a porgyűjtőt
Porgyűjtő és a szűrők tisztítása
Kefe tisztítása
Tartozékok ÉS a Szűrők Karbantartása
Az oldalsó peremtisztító forgókefe tisztítása
Hajtókerék tisztítása
Hiba Ellenőrzőlista Teendő
Hibaelhárítás
Mielőtt a Szervizhez Fordulna Ellenőrzőlista
Kendővel
Ellenőrizze, hogy a töltő
Találja a töltőt
Idegen tárgy zsineg, ruha
Hibaelhárítás a Hibakódok Alapján
Tárgyat a keféről
Ablakon Le az idegen tárgyat az ütközőérzékelő Ablakról
Kb ,6 l
Készülékház
Töltő állomás
Osztályozás Elem Részletek
Page
Robotický vysavač
Bezpečnostní Informace
Symboly Použité K Upozornění Nebo Výstraze
Další Použité Symboly
Bezpečnostní informace
Dobíjecí Stanice
Důležité Bezpečnostní Pokyny
Obecné Pokyny
Robotický Vysavač
Bezpečnostní Informace Funkce Výrobku Sestavení Vysavače
Obsah
Informace Týkající SE Kontaktu S Elektřinou
Před Použitím
Zabraňte dětem ve šlapání nebo sedání na robotický vysavač
Uklízeného prostoru nejprve odstraňte malé nebo křehké
Před úklidem odstraňte předměty rozptýlené po podlaze
Aby byli opatrní
Neinstalujte dobíjecí stanici na tmavou podlahu
Šroubováky apod
Ujistěte se, že v dobíjecí stanici není žádná tekutina
Nepoužívejte dobíjecí stanici k žádným jiným účelům
Na robotický vysavač nepokládejte žádné předměty
Provozu
Robotický vysavač nelze používat na hustých kobercích
Apod
Odstraňujte nahromaděné nečistoty
Čištění a Údržba
Alkohol
Nikdy netlačte silou na nárazník robotického vysavače
Středisko péče o zákazníky
Nabízíme různé režimy úklidu odpovídající všem potřebám
Funkce výrobku
Opatrný Úklid Každého Koutu
Různé Režimy Úklidu
Systém Proti Nárazu
Automatické Nabíjení
Postranní Otáčivý Kartáč NA Úklid Rohů a Lišt
Přejíždění Přes Práh
Dobíjecí stanice Další součásti
Sestavení vysavače
Součásti
Vysavač
Čelo vysavače
Názvy Částí
Dobíjecí stanice
Instalace baterií do dálkového ovladače
Dálkový ovladač volitelný
Režim úklidu
Displej
Tlačítka
Panel s displejem
Zapnutí a vypnutí vypínače
Obsluha vysavače
Instalace Robotického Vysavače
Pořadí při instalaci
Přívodní kabel dobíjecí stanice ponechte zapojený do
Instalace dobíjecí stanice
Dobíjecí stanici instalujte na rovný povrch
Nabíjení
Asi 90 minut
Baterii
Zahájení/ukončení úklidu
Používání Robotického Vysavače
Zahájení/ukončení úklidu
Zapnutí a vypnutí
Dobíjení
Zruší režim
Automatický úklid
Tlačítko vysavače
Nastaví režim
Ovladače volitelné
Intenzivní úklid
Drobků ze sušenek, prachem apod
Tlačítko vysavače Tlačítko dálkového Pořadí konfigurace
Tlačítko vysavače Tlačítko dálkového
Velký úklid
Nastaví režim Zruší režim
Manuální režim volitelný
Volitelné
Čištění okénka čidla a kamery
Nástavce a fi ltry
Čištění Robotického Vysavače
Zapamatujte si způsoby čištění a údržby
Před čištěním odpadní nádobku vyprázdněte
Čištění odpadní nádobky a filtrů
32 nástavce a filtry
Čištění kartáče
04 Nástavce a Filtry
Čištění postranních otáčivých kartáčů na úklid rohů a lišt
Čištění hnacího kolečka
Opatření
Odstraňování závad
NEŽ Zavoláte Servisního Technika
Příznak
Dobíjecí stanice zapojená správně
Příznak Kontrolní seznam Opatření
Zkontrolujte, zda je zástrčka
Nenašel dobíjecí
Atd Okénka čidla proti pádu
Odstraňování Závad Podle Chybových Kódů
Místo
Způsob úklidu
Vysavač
Dobíjecí stanice
Page
Robotický vysávač
Bezpečnostné Informácie
Použité Symboly UPOZORNENIE/VÝSTRAHA
INÉ Použité Symboly
Bezpečnostné informácie
Nabíjačka Batérie
Dôležité Bezpečnostné Pokyny
Všeobecne
Robotický Vysávač
Nástroje NA Údržbu a
Do jednej zásuvky nezapájajte viacero zástrčiek
Informácie Súvisiace S Elektrickou Energiou
Zo sieťovej zástrčky vždy odstráňte všetok prach alebo vodu
Zásah elektrickým prúdom
Pred Použitím
Robotický vysávač môže naraziť do detí a tie môžu spadnúť
Ste vypli spínač Power Napájanie robotického vysávača
Pred vysávaním odstráňte všetky predmety roztrúsené na
Osoby, aby boli opatrní
Strany sa nesmú nachádzať žiadne prekážky
Nabíjačku namontujte na miesto s ľahkým prístupom pre
Robotický vysávač
Robotického vysávača
Na robotický vysávač nepokladajte žiadne predmety
Používanie
Robotický vysávač nemôžete používať na hrubých kobercoch
Nábytku a pod
Čistenie a Údržba
Nepoužívanie originálnych batérií spôsobí poruchu výrobku
Rôzne Režimy Vysávania
Funkcie výrobku
Jemné Vysávanie Každého Rohu
Predchádzanie Nárazom
Automatické Nabíjanie
Bočná Rotačná Kefa NA Čistenie Okrajov
Prechod CEZ Prah
Nabíjačka stanica Iné diely
Zloženie vysávača
Diely
Hlavná jednotka
Spodná časť
Názvy Jednotlivých Častí
Nabíjačka stanica
Manuálne
Diaľkové ovládanie voliteľné
Panel displeja
Časť S Displejom
Časť S Tlačidlami
Poradie montáže
Zapnutie alebo vypnutie spínača Power Napájanie
Prevádzka vysávača
Montáž Robotického Vysávača
Sieťový kábel nabíjačky vždy ponechajte zapojený do
Montáž nabíjačky
Nabíjačku namontujte na rovný povrch
Blikanie Keď počas vysávania zobrazenie miery nabitia
Nabíjanie
90 minút
Informácie o batérii
Spustenie alebo zastavenie vysávania
Používanie Robotického Vysávača
Spustenie/ukončenie vysávania
Zapnutie alebo vypnutie napájania
Opätovné nabíjanie
Zrušenie režimu
Automatické vysávanie
Diaľkovom ovládaní Postup konfigurácie
Nastavenie režimu
Nastavenie režimu
Vysávanie bodov
Tlačidlo na hlavnej
Postup konfigurácie
Maximálne vysávanie
Manuálne vysávanie nie je podporované, keď je robotický
Manuálne vysávanie voliteľné
Ovládaní voliteľné
Nastavenie režimu Zrušenie režimu
Čistenie okienka snímača a kamery
Nástroje na údržbu a fi ltre
Čistenie Robotického Vysávača
Používajte správne spôsoby čistenia a údržby
Nádobu na prach pred čistením najprv vyprázdnite
Čistenie nádoby na prach a filtrov
32 nástroje na údržbu a filtre
Čistenie elektrickej kefy
04 Nástroje NA Údržbu a Filtre
Čistenie bočnej rotačnej kefy na čistenie okrajov
Čistenie hnacieho kolesa
Kontrolný Zoznam Pred Zavolaním do Servisu
Riešenie problémov
Nabíjačku
Príznak Kontrolný zoznam Opatrenie, ktoré je potrebné
Nedokáže nájsť
Riešenie Problémov Podľa Chybových Kódov
Priemer 355 mm
Hlavná jednotka
Nabíjačka stanica
Klasifikácia Položka Podrobnosti
Page
Vacuum Cleaning Robot
Other Symbols Used
Safety information
Safety Information
General
Important Safety Instructions
Battery Charger
Vacuum Cleaning Robot
Contents
This may result in fi re or electric shock
Power Related
Do not use a damaged power cord, plug, or a loose power
Material such as
Open all doors to clean all rooms
Before USE
Burning cigarettes, etc
Always keep the power cord of the charger plugged into
Remove objects scattered on the floor before cleaning
Make sure that there is no trace of liquids on the charger
Make sure the vacuum cleaning robot does not vacuum or
Clear the area
This will result in critical damage to the charger
This may result in damage to carpets
You cannot use the vacuum cleaning robot on thick carpets
This may result in damage when the unit accidentally drops
USE
Cleaning and Maintenance
Edge-cleaning side
What is ceiling shape recognition Visionary mapping plus?
Product features
Delicate Cleaning of Every Corner
Various Cleaning Modes
Doorsill Crossing
EDGE-CLEANING Side Rotating Brush
Safety Device
Auto Charging
Main Body Charger Station Others Components
Assembling the cleaner
Option Cleaning Brush
Components
Main unit
Name of Each Part
Power Lamp Charge Lamp Vents Charge Pin
Installing the Remote Control Batterise
Remote Control Option
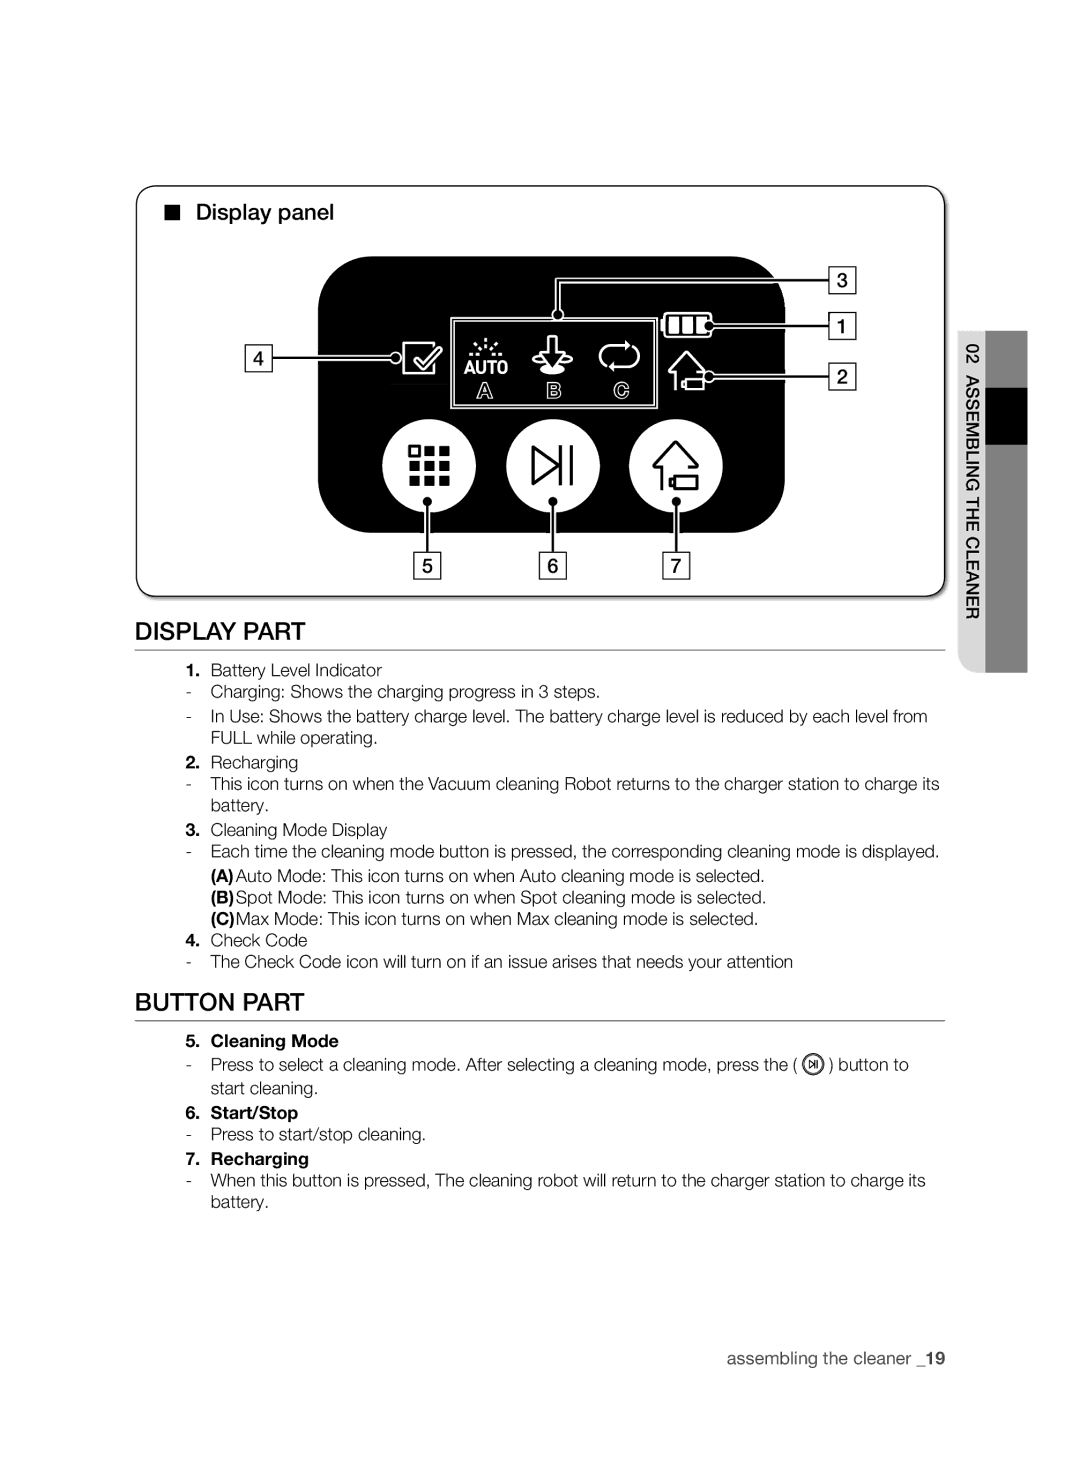
Display panel
Cleaning Mode
Display Part
Button Part
Turning the Power Switch on or off
Operating the cleaner
Installing the Vacuum Cleaning Robot
Installation order
Install the charger on a fl at surface
Installing the charger
Robot manually
Until you hear a Recharging power sound from
Charging
Battery and will run for about 90 minutes
About the Battery
Starting or stopping cleaning
Using the Vacuum Cleaning Robot
Starting/Stopping Cleaning
Turning the power on or off
Recharging
Button Option
Auto Cleaning
Main unit button Remote control
About the Resume Cleaning function
Spot Cleaning
Max Cleaning
Configuration Sequence
Manual Cleaning Option
Set the mode Cancel the mode
Charger station, manual cleaning is not supported
Maintain tools and fi lters
Cleaning the Vacuum Cleaning Robot
Please keep the cleaning and maintenance methods in mind
Cleaning the Sensor Window and the Camera
First, empty the dust bin before cleaning it
Cleaning the Dust Bin and the Filters
Cleaning the Power Brush
Maintain Tools and Filters
Cleaning the Edge-Cleaning Side rotating Brush
Cleaning the Driving Wheel
Symptom Checklist Measure to Take
Troubleshooting
Checklist Before SVC Calls
Charger
Check whether the power plug
Robot cannot find
Charger is plugged correctly
Troubleshooting for Error Codes
Specifications
Main Body
Charger Station
GNU General Public License
Open Source Announcement
Page
No Warranty
GNU Lesser General Public License
Page
Page
No Warranty
Jpeg
Code No. DA68-00682D REV0.0