 OPERATION WITH THE REMOTE CONTROL UNIT
1.Automatic Operation
(only for COOL/DRY/HEAT Model)
•Single use
This unit automatically switches between cooling operation and heating operation according to the difference between the room temperature and the temperature setting.
•Multiple use
The air conditioner calculates the difference between the thermostat setting and room temperature, and automatically determines the mode to operate under cooling or heating. Then, the air conditioner continuously operates under the mode selected at initial operation.
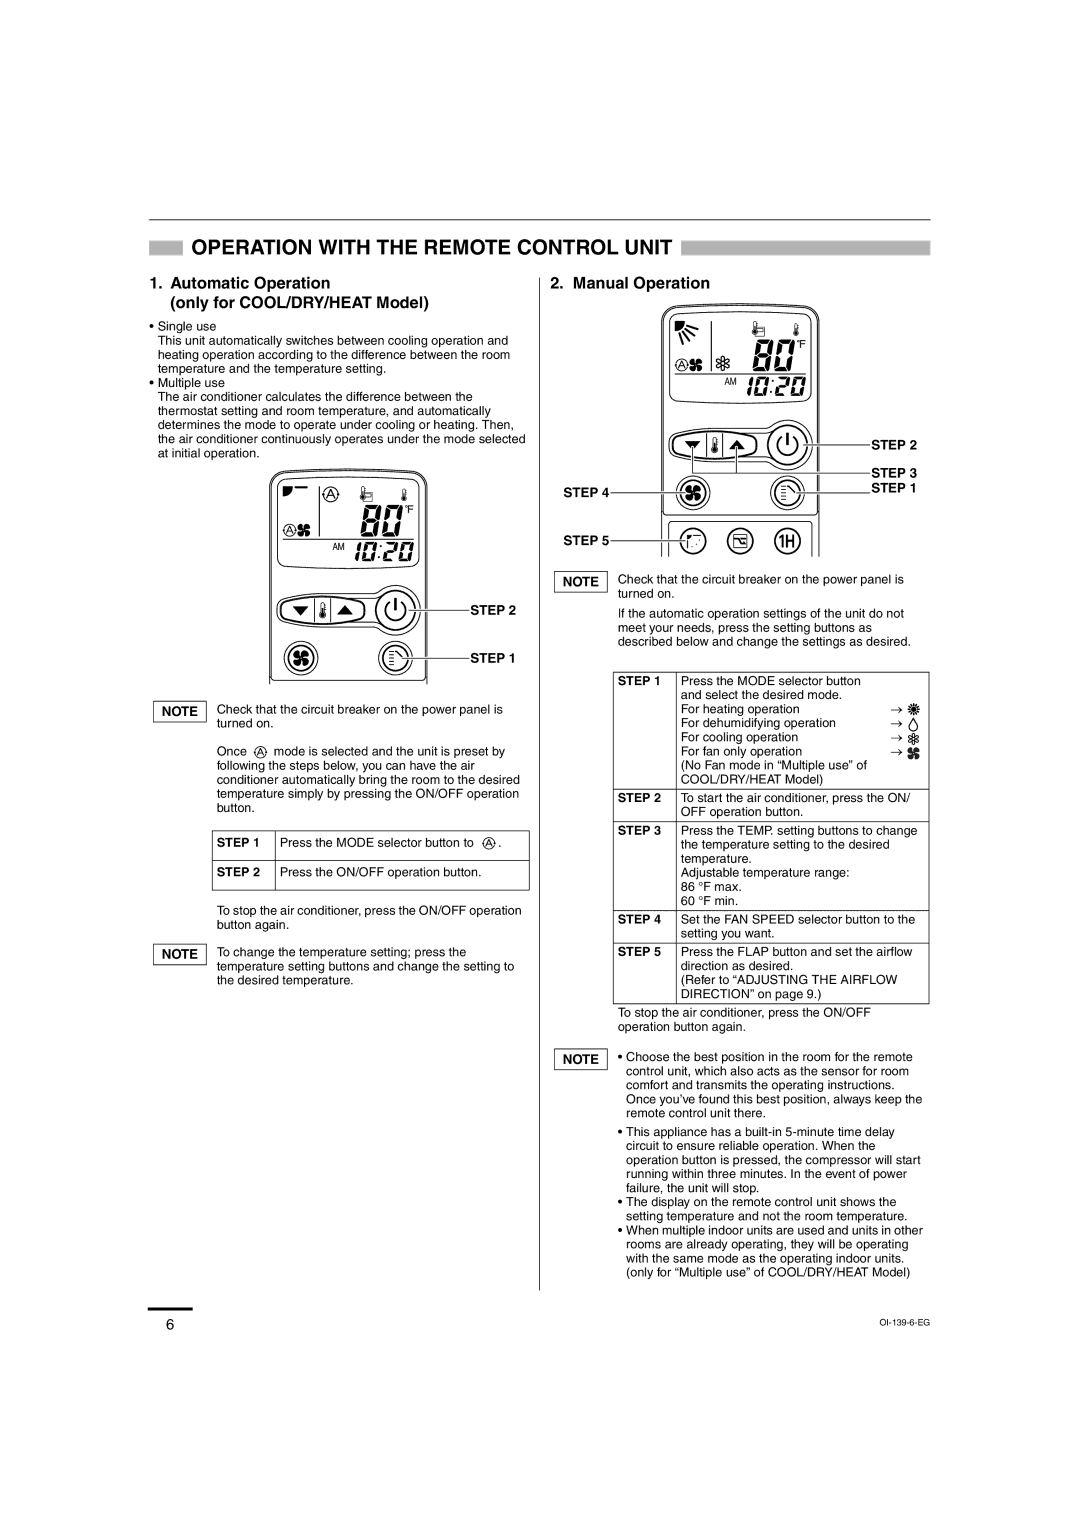
STEP 2
STEP 1
NOTE Check that the circuit breaker on the power panel is turned on.
Once ![]() mode is selected and the unit is preset by following the steps below, you can have the air conditioner automatically bring the room to the desired temperature simply by pressing the ON/OFF operation button.
mode is selected and the unit is preset by following the steps below, you can have the air conditioner automatically bring the room to the desired temperature simply by pressing the ON/OFF operation button.
STEP 1 Press the MODE selector button to ![]() .
.
STEP 2 Press the ON/OFF operation button.
To stop the air conditioner, press the ON/OFF operation button again.
NOTE To change the temperature setting; press the temperature setting buttons and change the setting to the desired temperature.
2. Manual Operation
|
|
|
|
|
|
|
|
|
|
| STEP 2 | ||
|
|
|
|
|
|
|
|
|
|
| |||
|
|
|
|
|
|
|
|
|
|
| STEP 3 | ||
|
|
|
|
|
|
|
|
|
|
| |||
STEP 4 |
|
|
|
|
|
|
|
|
| STEP 1 | |||
|
|
|
|
|
|
|
|
|
|
|
| ||
STEP 5 |
|
|
|
|
|
|
|
|
|
|
|
| |
| Check that the circuit breaker on the power panel is | ||||||||||||
| |||||||||||||
NOTE |
|
| |||||||||||
|
|
| turned on. |
|
|
| |||||||
|
|
|
|
|
| ||||||||
|
|
| If the automatic operation settings of the unit do not | ||||||||||
|
|
| meet your needs, press the setting buttons as | ||||||||||
|
|
| described below and change the settings as desired. | ||||||||||
|
|
|
|
|
|
|
|
|
|
|
|
|
|
|
|
| STEP 1 | Press the MODE selector button |
|
|
| ||||||
|
|
|
| and select the desired mode. | → | ||||||||
|
|
|
| For heating operation | |||||||||
|
|
|
| For dehumidifying operation | → |
|
| ||||||
|
|
|
| For cooling operation | → |
|
| ||||||
|
|
|
|
| |||||||||
|
|
|
| For fan only operation | → | ||||||||
|
|
|
| (No Fan mode in “Multiple use” of |
|
|
| ||||||
|
|
|
| COOL/DRY/HEAT Model) |
|
|
| ||||||
|
|
|
|
|
|
|
|
|
|
|
|
| |
|
|
| STEP 2 | To start the air conditioner, press the ON/ | |||||||||
|
|
|
| OFF operation button. |
|
|
| ||||||
|
|
|
|
|
|
|
|
|
|
|
|
| |
|
|
| STEP 3 | Press the TEMP. setting buttons to change | |||||||||
|
|
|
| the temperature setting to the desired | |||||||||
|
|
|
| temperature. |
|
|
| ||||||
|
|
|
| Adjustable temperature range: |
|
|
| ||||||
|
|
|
| 86 °F max. |
|
|
| ||||||
|
|
|
| 60 °F min. |
|
|
| ||||||
|
|
|
|
|
|
|
|
|
|
|
|
| |
|
|
| STEP 4 | Set the FAN SPEED selector button to the | |||||||||
|
|
|
| setting you want. |
|
|
| ||||||
|
|
|
|
|
|
|
|
|
|
|
|
| |
|
|
| STEP 5 | Press the FLAP button and set the airflow | |||||||||
|
|
|
| direction as desired. |
|
|
| ||||||
|
|
|
| (Refer to “ADJUSTING THE AIRFLOW | |||||||||
|
|
|
| DIRECTION” on page 9.) |
|
|
| ||||||
|
|
|
|
|
|
|
|
|
|
|
|
|
|
|
|
| To stop the air conditioner, press the ON/OFF |
|
|
| |||||||
|
|
| operation button again. |
|
|
| |||||||
| • Choose the best position in the room for the remote | ||||||||||||
NOTE |
|
| |||||||||||
|
|
| control unit, which also acts as the sensor for room | ||||||||||
|
|
| |||||||||||
|
|
| comfort and transmits the operating instructions. | ||||||||||
|
|
| Once you’ve found this best position, always keep the | ||||||||||
|
|
| remote control unit there. |
|
|
| |||||||
•This appliance has a
•The display on the remote control unit shows the setting temperature and not the room temperature.
•When multiple indoor units are used and units in other rooms are already operating, they will be operating with the same mode as the operating indoor units. (only for “Multiple use” of COOL/DRY/HEAT Model)
6 | |
|
