Copy Reference
UE USA B064-6607
Page
Means Power ON. c means Stand by
What You Can Do With This Machine
Types of Duplex Copies
Copying Book Originals
Series Copies
Copying Originals Such as Books
Sided
Table of Contents
Programs
Copying Book Originals
Combination Chart 109 Supplementary Specifications 111
125
Preparation
How to Read this Manual
Symbols
Limitation
Machine Types
Functions that Require Options
Control Panel
Start key
Common Key Operations
Sample Copy key
Clear/Stop key
Page
Metric version
Sizes and Weights of Recommended Originals
Originals
Inch version
Sizes Detectable by Auto Paper Select
Exposure glass
Document feeder Sizes difficult to detect
Mm 3.5 mm, 0.02
Missing Image Area
Mm or more, 0.04 or more Mm, 0.08
Direction-fixed paper or 2-sided paper
Document feeder Exposure glass
Placing Originals
Original Orientation
Press the Special Original key
When placing custom size originals
When placing originals one by one
When copying originals of various sizes
When placing originals consisting of more than 100 pages
Batch mode
Select the Batch key, and then press the OK key
Mixed Size mode
Sadf mode
Press the Mixed size key, and then press the OK key
Placing Custom Size Originals
Start key Press the Custm Size Origi. key
To confirm settings
Basic Procedure
When clearing entered values
Initial copy display
Auto Start
When the machine keeps copying
When the originals stop scanning
Interrupt Copy
Copy Face Up
Job Preset
Editing Job Preset
Press Face Up key Place originals, and then press
To delete a job after checking its contents
To check job contents
To change job contents after checking
Deleting a Preset Job
Originals
Copying from the Bypass Tray
When copying onto custom size paper
When copying onto standard size paper
Select the type and size of the pa- per
When copying onto special paper
Manual image density
Copy Functions
Auto image density
Combined auto and manual image density
Selecting Original Type Setting
Auto Paper Select
Selecting Copy Paper
Manual Paper Select
Manual Paper Select
When the paper type keys are not displayed
Auto Paper Select
Press the Auto Paper Select key
Rotated copy
Base Point
Preset Reduce/Enlarge
Press the Enlarge or Reduce key
Press the Reduce/Enlarge key
Zoom
To select a ratio with the n Keys
Enter the ratio
To enter a ratio with the number keys
Auto Reduce/Enlarge
Press the Auto Reduce/Enlarge key
Directional Magnification %
Size Magnification
Press the Reduce/Enlarge key Press the Specifd. Ratio key
Directional Size Magnification mm
To specify a ratio with the n and o keys
Sort
Sort
Rotate Sort
Shift Sort
When a finisher is not installed
When the Booklet Finisher is installed
Press the Sort or Rotate Sort key
Stack
Staple
Finisher 3000B100-sheet staples
Staples
Finisher 3000B100-sheet
Staples, Finisher 3000M50-sheet
Booklet Finisher
Changing the Number of Sets
Sample Copy
Press the Change Quantity key
Punch
Holes
Punch hole positions
Sided → 2 Sided
Duplex
Originals and Copy Direction
Press the Dup./Combine/Series
Sided, 2 Pages → Combine 1 Side
Sided Combine
Sided, 1 Page → Combine 1 Side
Sided, 4 Pages → Combine 1 Side
Press the Dup./Combine/Series key
Orientation of the Original and Image Position of Combine
Placing Originals Originals Placed in the Document Feeder
Sided, 8 Pages → Combine 2 Side
Sided, 16 Pages → Combine 2 Side
Sided, 4 Pages → Combine 2 Side
Sided, 4 Pages → Combine 2 Side
Book → 1 Sided
Series Copies
Sided, 16 Pages → Combine 2 Side
Front & Back → 2 Sided
Book → 2 Sided
Press the Series/Book key
Copying Book Originals
Sided→1 Sided
Sided → Booklet
Sided → Magazine
Open to Right
Open to Left
How to fold copies to make a booklet
How to fold and stack copies to make a magazine
Open to Right
Original A5K/Copy paper A4L
Image Repeat
Original A5K/Copy paper A4K Or Original A5L/Copy paper A4L
Or Original A5L/Copy paper A4K
Double Copies
Centering
Point where the machine starts scanning
Scanning Position
Border
Erase
Press the Scan Position key
Outside
Center
Center/Border
Border Erase
Center Erase
Selecting Same Width
Selecting Diff. Width
Set the border to be erased from of the back
Set the border to be erased
Center/Border Erase
Press the Diff. Width key Press the Erase key
Set the center or border to be erased from the back
Press the Erase Inside 1 or Erase Inside 2 key
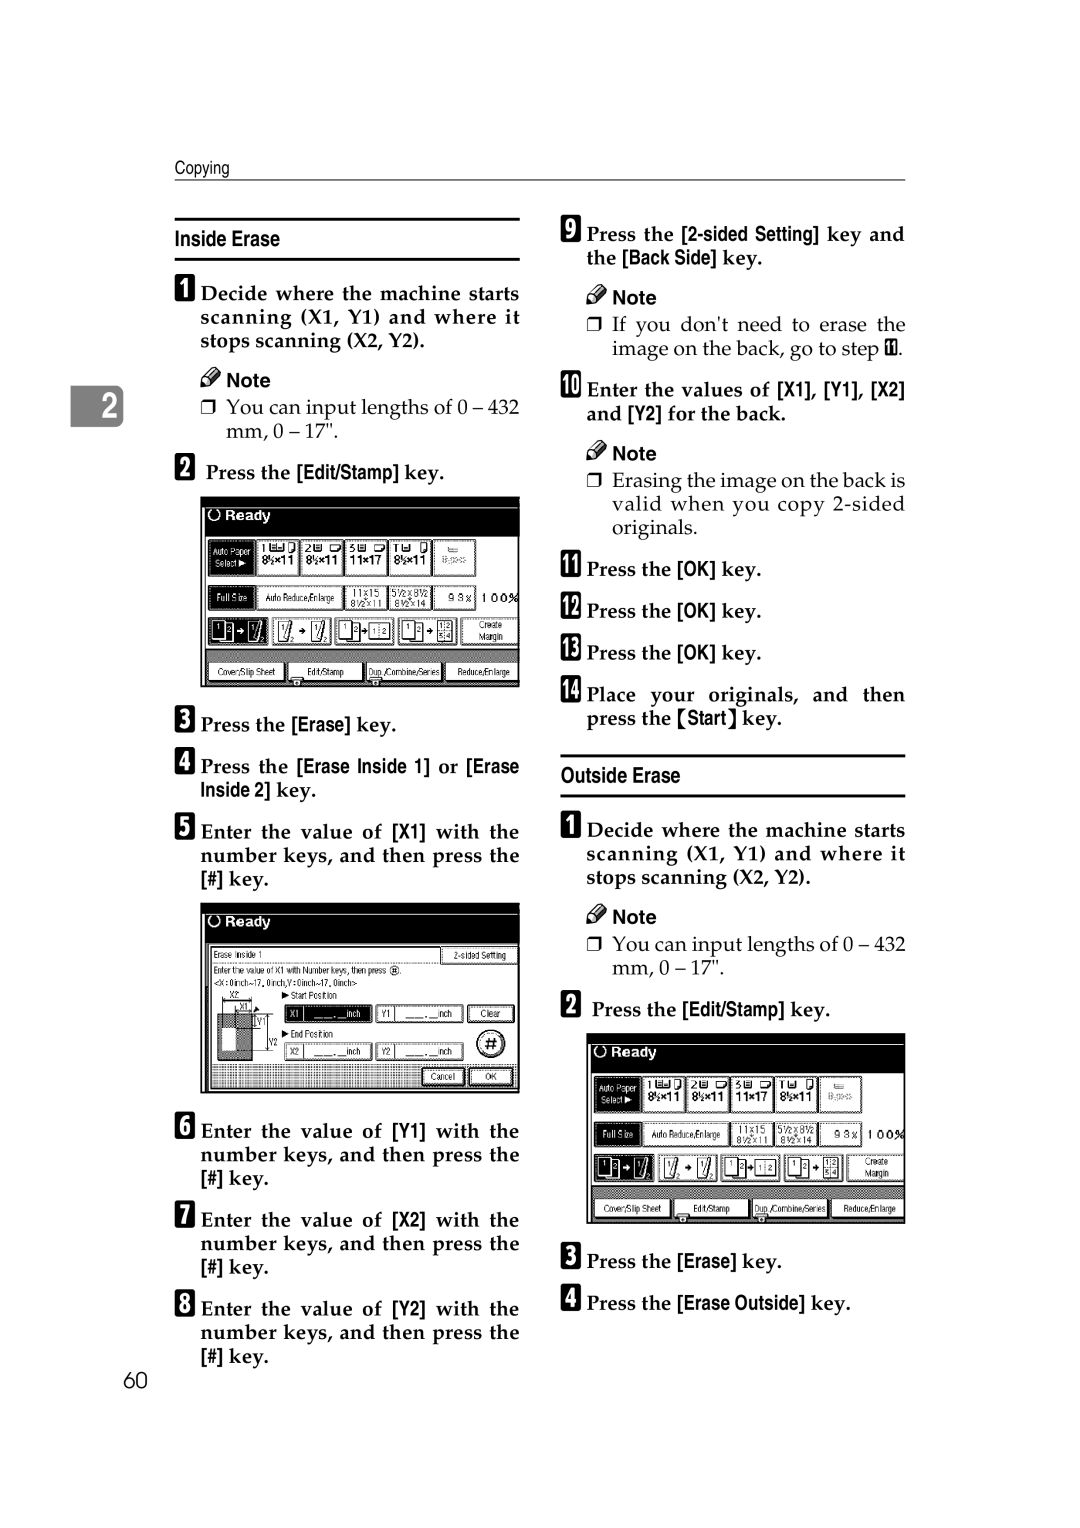
Inside Erase
Outside Erase
Press the Erase Outside key
Edges Full Bleed
Press the 3 Edges Full Bleed key
Margin Adjustment
Press the Edit/Stamp key Press the Stamp key
Preset Stamp
Background Numbering
Press the Background Numbering
Changing stamp position, size and density
Stamp Position and Original Direction
User Stamp
Stamp position and original orientation Reference
To program the user stamp
Features key
To change the stamp position
Press the Program/Delete Stamp
To delete the user stamp
Press the Exit key
Date Stamp
Stamp position and original orientation
Press the All Pages or 1st
Numbering
To change the date format
Press the Change Format key
Stamp position and orientation of originals
If you selected P1,P2…, -1-,-2-…, P.1, P.2…, 1, 2…
Changing the stamp position
Specify the first printing page and start number
Press the Print Inquiry List or
Press the right bottom Change key
If you selected 1/5, 2/5…
If you selected 1-1, 1-2,…
Enter the original sheet number to start numbering from
Front Cover
Covers
Front/Back Covers
Press the Cover/Slip Sheet key Press the Desig./Chapter key
Designate
Press the Cover/Slip Sheet key
Press the Next Chapter key
Chapter
Press the key to select the chapter number
Blank Slip Sheets
Press the Insert Sheet key
When using OHP transparencies set on the bypass tray
Slip Sheets
Storing Originals in the Document Server
Make scanning settings for the original Press the Start key
Press the Stored File key