E.OPERATING INSTRUCTION: CHARGING BATTERY IN VEHICLE

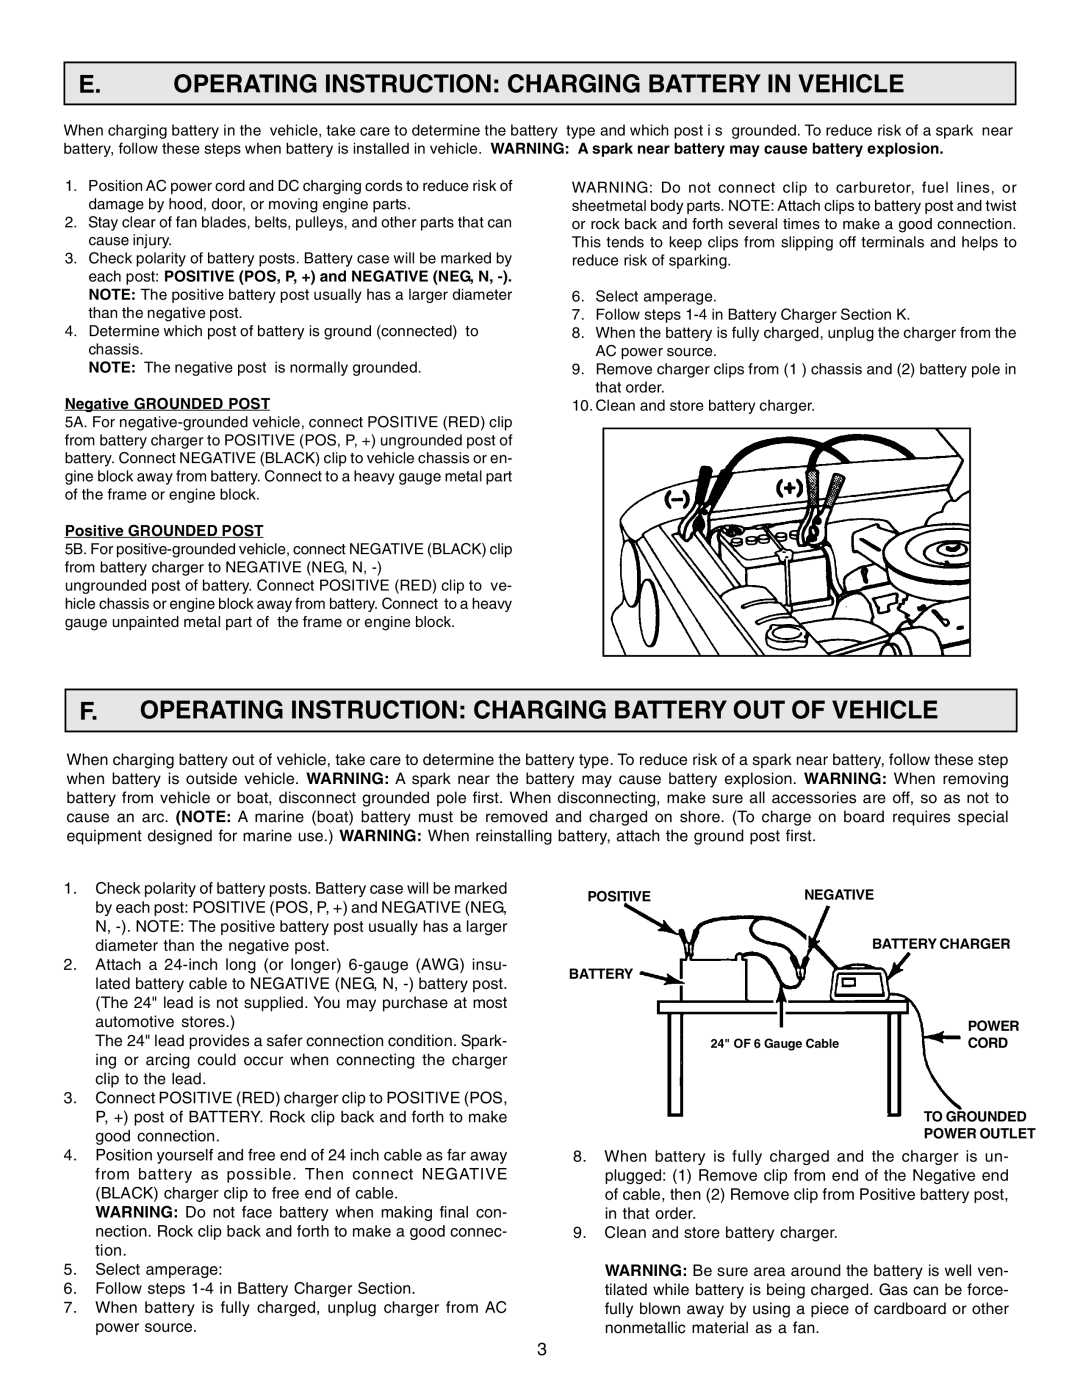
When charging battery in the vehicle, take care to determine the battery type and which post i s grounded. To reduce risk of a spark near battery, follow these steps when battery is installed in vehicle. WARNING: A spark near battery may cause battery explosion.

1.Position AC power cord and DC charging cords to reduce risk of damage by hood, door, or moving engine parts.

2.Stay clear of fan blades, belts, pulleys, and other parts that can cause injury.

3.Check polarity of battery posts. Battery case will be marked by each post: POSITIVE (POS, P, +) and NEGATIVE (NEG, N, -). NOTE: The positive battery post usually has a larger diameter than the negative post.

4.Determine which post of battery is ground (connected) to chassis.

NOTE: The negative post is normally grounded.

Negative GROUNDED POST

5A. For negative-grounded vehicle, connect POSITIVE (RED) clip from battery charger to POSITIVE (POS, P, +) ungrounded post of battery. Connect NEGATIVE (BLACK) clip to vehicle chassis or en- gine block away from battery. Connect to a heavy gauge metal part of the frame or engine block.

Positive GROUNDED POST

5B. For positive-grounded vehicle, connect NEGATIVE (BLACK) clip from battery charger to NEGATIVE (NEG, N, -)

ungrounded post of battery. Connect POSITIVE (RED) clip to ve- hicle chassis or engine block away from battery. Connect to a heavy gauge unpainted metal part of the frame or engine block.

WARNING: Do not connect clip to carburetor, fuel lines, or

sheetmetal body parts. NOTE: Attach clips to battery post and twist or rock back and forth several times to make a good connection. This tends to keep clips from slipping off terminals and helps to reduce risk of sparking.

6.Select amperage.

7.Follow steps 1-4 in Battery Charger Section K.

8.When the battery is fully charged, unplug the charger from the AC power source.

9.Remove charger clips from (1 ) chassis and (2) battery pole in that order.

10.Clean and store battery charger.

F.OPERATING INSTRUCTION: CHARGING BATTERY OUT OF VEHICLE

When charging battery out of vehicle, take care to determine the battery type. To reduce risk of a spark near battery, follow these step when battery is outside vehicle. WARNING: A spark near the battery may cause battery explosion. WARNING: When removing battery from vehicle or boat, disconnect grounded pole first. When disconnecting, make sure all accessories are off, so as not to cause an arc. (NOTE: A marine (boat) battery must be removed and charged on shore. (To charge on board requires special equipment designed for marine use.) WARNING: When reinstalling battery, attach the ground post first.

1.Check polarity of battery posts. Battery case will be marked by each post: POSITIVE (POS, P, +) and NEGATIVE (NEG, N, -). NOTE: The positive battery post usually has a larger diameter than the negative post.

2.Attach a 24-inch long (or longer) 6-gauge (AWG) insu- lated battery cable to NEGATIVE (NEG, N, -) battery post. (The 24" lead is not supplied. You may purchase at most automotive stores.)

The 24" lead provides a safer connection condition. Spark- ing or arcing could occur when connecting the charger clip to the lead.

3.Connect POSITIVE (RED) charger clip to POSITIVE (POS, P, +) post of BATTERY. Rock clip back and forth to make good connection.

4.Position yourself and free end of 24 inch cable as far away from battery as possible. Then connect NEGATIVE (BLACK) charger clip to free end of cable.

WARNING: Do not face battery when making final con- nection. Rock clip back and forth to make a good connec- tion.

5.Select amperage:

6.Follow steps 1-4 in Battery Charger Section.

7.When battery is fully charged, unplug charger from AC power source.

POSITIVENEGATIVE

BATTERY CHARGER

BATTERY


POWER

24" OF 6 Gauge Cable

CORD

TO GROUNDED

POWER OUTLET

8.When battery is fully charged and the charger is un- plugged: (1) Remove clip from end of the Negative end of cable, then (2) Remove clip from Positive battery post, in that order.

9.Clean and store battery charger.

WARNING: Be sure area around the battery is well ven- tilated while battery is being charged. Gas can be force- fully blown away by using a piece of cardboard or other nonmetallic material as a fan.

3

Page 3
Image 3
Schumacher SE-1010-2 Operating Instruction Charging Battery in Vehicle, Negative Grounded Post, Positive Grounded Post

SE-1010-2, SE-1250, SE-1010-2, SE-1012D, SE-1052, SE-1250 specifications

Schumacher has long been recognized for its innovative battery chargers and no line exemplifies this tradition better than the SE series. The SE-1250, SE-1010-2, SE-1012D, and SE-1052 models showcase a blend of technology, efficiency, and user-friendly features that cater to both professional and personal use.

Starting with the SE-1250, this charger offers a powerful 12V output, making it ideal for charging various batteries, including automotive and marine. One of its standout features is the automatic shut-off function, which prevents overcharging and extends battery life. The robust construction and clear LED indicators ensure users remain informed of the charging status.

The SE-1010-2 is another noteworthy model, known for its dual 6V/12V capability. This flexibility allows users to cater to a wider range of battery types. The multi-stage charging process enhances battery health and lifespan, optimizing the charging cycle. Additionally, the compact design facilitates easy transport, making it a suitable option for both home use and on-the-go applications.

The SE-1012D introduces a smart microprocessor-controlled system, which monitors the charging process and adapts the necessary charge according to battery needs. This ensures efficient battery maintenance, reducing the risk of damage. The built-in safety features, such as reverse polarity protection and short circuit prevention, enhance its usability in a diverse range of settings.

The SE-1052 model emphasizes versatility and adaptability with its advanced charging algorithms. This model supports not only standard lead-acid batteries but also AGM (Absorbent Glass Mat) and gel batteries, proving its efficacy across multiple applications. The digital display offers real-time information on voltage, charging time, and battery status, amplifying user experience.

Each model in the Schumacher SE line bears the hallmark of reliability and quality. Their rugged build and intelligent features make them invaluable tools for maintaining battery health, ensuring that users can always count on their devices when needed. Emphasizing safety, efficiency, and versatility, the SE series represents Schumacher's commitment to excellence in battery management technology. Whether for personal or professional use, these chargers offer the technological advancements and robust characteristics necessary for modern battery care.