E.OPERATING INSTRUCTION: CHARGING BATTERY IN VEHICLE

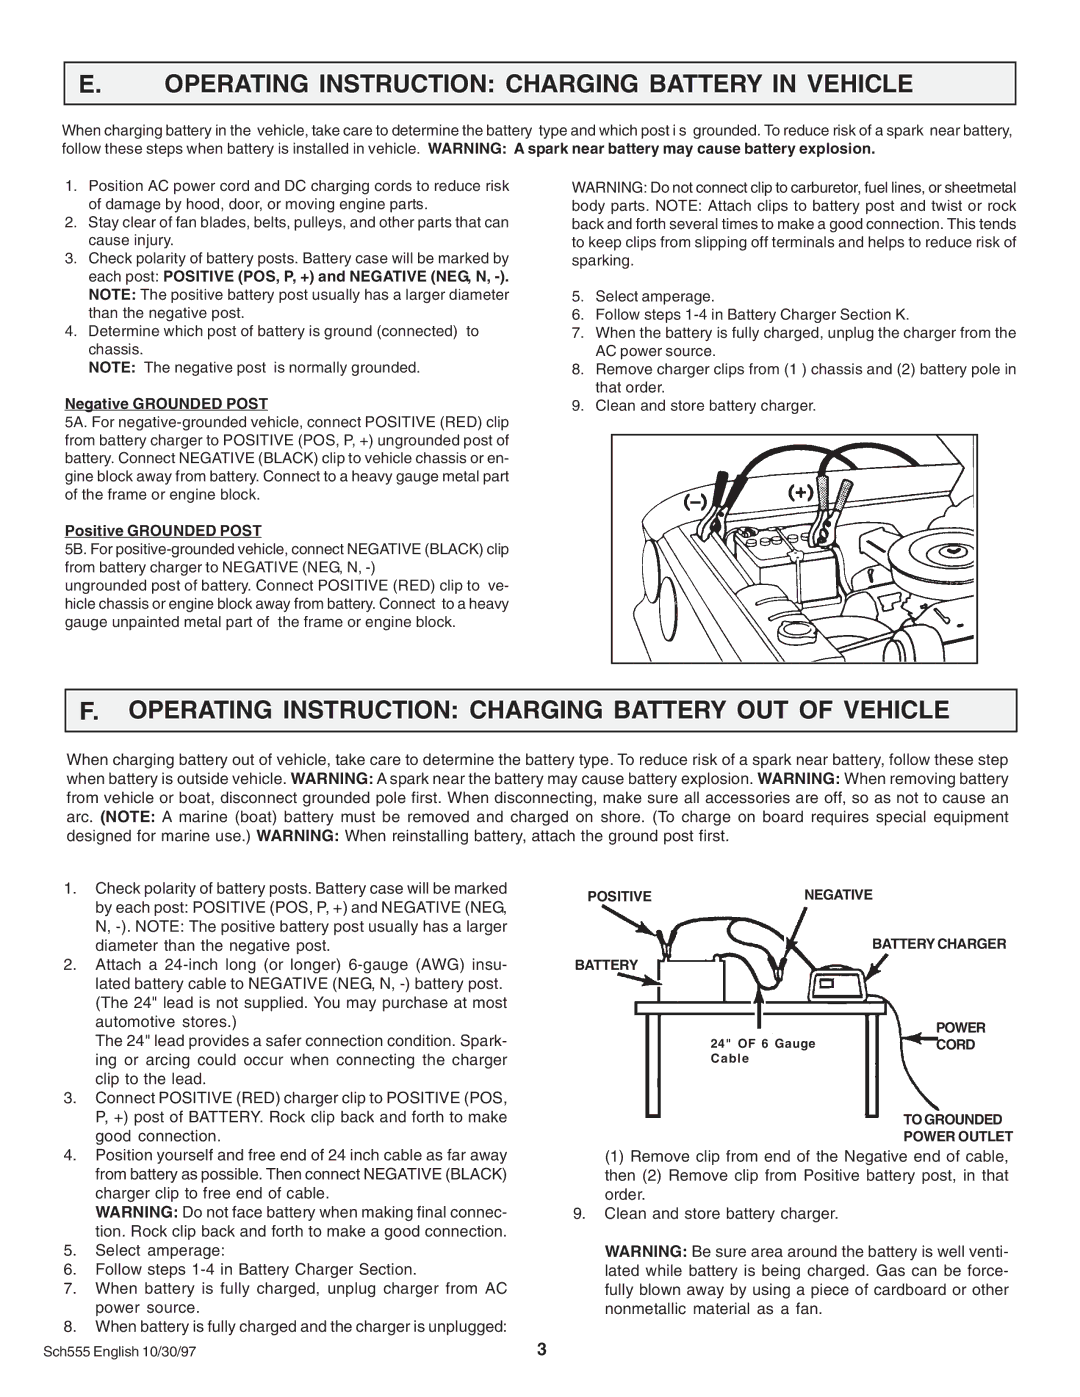
When charging battery in the vehicle, take care to determine the battery type and which post i s grounded. To reduce risk of a spark near battery, follow these steps when battery is installed in vehicle. WARNING: A spark near battery may cause battery explosion.

1.Position AC power cord and DC charging cords to reduce risk of damage by hood, door, or moving engine parts.

2.Stay clear of fan blades, belts, pulleys, and other parts that can cause injury.

3.Check polarity of battery posts. Battery case will be marked by each post: POSITIVE (POS, P, +) and NEGATIVE (NEG, N, -). NOTE: The positive battery post usually has a larger diameter than the negative post.

4.Determine which post of battery is ground (connected) to chassis.

NOTE: The negative post is normally grounded.

Negative GROUNDED POST

5A. For negative-grounded vehicle, connect POSITIVE (RED) clip from battery charger to POSITIVE (POS, P, +) ungrounded post of battery. Connect NEGATIVE (BLACK) clip to vehicle chassis or en- gine block away from battery. Connect to a heavy gauge metal part of the frame or engine block.

Positive GROUNDED POST

5B. For positive-grounded vehicle, connect NEGATIVE (BLACK) clip from battery charger to NEGATIVE (NEG, N, -)

ungrounded post of battery. Connect POSITIVE (RED) clip to ve- hicle chassis or engine block away from battery. Connect to a heavy gauge unpainted metal part of the frame or engine block.

WARNING: Do not connect clip to carburetor, fuel lines, or sheetmetal

body parts. NOTE: Attach clips to battery post and twist or rock back and forth several times to make a good connection. This tends to keep clips from slipping off terminals and helps to reduce risk of sparking.

5.Select amperage.

6.Follow steps 1-4 in Battery Charger Section K.

7.When the battery is fully charged, unplug the charger from the AC power source.

8.Remove charger clips from (1 ) chassis and (2) battery pole in that order.

9.Clean and store battery charger.

F.OPERATING INSTRUCTION: CHARGING BATTERY OUT OF VEHICLE

When charging battery out of vehicle, take care to determine the battery type. To reduce risk of a spark near battery, follow these step when battery is outside vehicle. WARNING: A spark near the battery may cause battery explosion. WARNING: When removing battery from vehicle or boat, disconnect grounded pole first. When disconnecting, make sure all accessories are off, so as not to cause an arc. (NOTE: A marine (boat) battery must be removed and charged on shore. (To charge on board requires special equipment designed for marine use.) WARNING: When reinstalling battery, attach the ground post first.

1.Check polarity of battery posts. Battery case will be marked by each post: POSITIVE (POS, P, +) and NEGATIVE (NEG, N, -). NOTE: The positive battery post usually has a larger diameter than the negative post.

2.Attach a 24-inch long (or longer) 6-gauge (AWG) insu- lated battery cable to NEGATIVE (NEG, N, -) battery post. (The 24" lead is not supplied. You may purchase at most automotive stores.)

The 24" lead provides a safer connection condition. Spark- ing or arcing could occur when connecting the charger clip to the lead.

3.Connect POSITIVE (RED) charger clip to POSITIVE (POS, P, +) post of BATTERY. Rock clip back and forth to make good connection.

4.Position yourself and free end of 24 inch cable as far away from battery as possible. Then connect NEGATIVE (BLACK) charger clip to free end of cable.

WARNING: Do not face battery when making final connec- tion. Rock clip back and forth to make a good connection.

5.Select amperage:

6.Follow steps 1-4 in Battery Charger Section.

7.When battery is fully charged, unplug charger from AC power source.

8.When battery is fully charged and the charger is unplugged:

POSITIVENEGATIVE

BATTERY CHARGER

BATTERY

POWER

24" OF 6 GaugeCORD

Cable

TO GROUNDED

POWER OUTLET

(1) Remove clip from end of the Negative end of cable, then (2) Remove clip from Positive battery post, in that order.

9.Clean and store battery charger.

WARNING: Be sure area around the battery is well venti- lated while battery is being charged. Gas can be force- fully blown away by using a piece of cardboard or other nonmetallic material as a fan.

Sch555 English 10/30/97

3

Page 3
Image 3
Schumacher SF 1250, SF 1052 Operating Instruction Charging Battery in Vehicle, Positivenegative Battery Charger Power

MCF-1, SF 1052, SF 1010-2, SF 1012D, SF 1250 specifications

Schumacher is a renowned brand within the automotive and power solutions industry, particularly known for their advanced battery chargers and jump starters. Among their product lineup, the Schumacher SF series stands out, featuring models such as the SF-60, SF 1250, SF 1012D, SF 1010-2, and SF 1052. Each model is designed to meet diverse charging needs while incorporating innovative technology and user-friendly features.

The Schumacher SF-60 is a versatile battery charger that supports a range of battery types including AGM, gel, and conventional lead-acid batteries. It features automatic voltage detection and a microprocessor-controlled system, which ensures optimal charging based on the battery’s condition. This model also boasts a built-in safety features including reverse polarity protection and overcharge protection, making it a reliable choice for both professional and personal use.

Moving to the SF 1250, this model further enhances the charging experience with a higher amperage output, allowing for faster charging times. It also includes an LCD display that provides real-time information on voltage, amperage, and charging status. The SF 1250's robust construction and advanced cooling system help prevent overheating, ensuring longevity and performance under various conditions.

The SF 1012D is another impressive model with dual charging options, enabling users to charge two batteries simultaneously. Its compact design does not compromise on functionality, coming equipped with smart charging technology that adapts based on battery type and condition. Moreover, the SF 1012D offers a user-friendly interface with LED indicators for easy operation and monitoring.

The SF 1010-2 model is designed for portability and convenience. Weighing less than most of its competitors, it features an ergonomic handle for easy transport. With a simple plug-and-play operation, even novice users can quickly connect and charge their batteries without technical know-how. This model also includes safety features such as thermal protection, making it a worry-free choice.

Lastly, the SF 1052 combines high performance with accessibility. It features a digital display that provides comprehensive feedback regarding the charging process. Its unique design accommodates a variety of battery types and sizes, making it ideal for everything from cars to motorcycles and even power sport vehicles. The integrated maintenance mode ensures that batteries remain in optimal condition, extending their lifespan.

In conclusion, the Schumacher SF series offers diverse models equipped with innovative features and technologies designed to meet various charging needs. From the compact and user-friendly SF 1010-2 to the robust SF 1250, each model provides reliability, safety, and efficiency, making Schumacher a trusted choice for battery solutions.