MEDALIST PRO HARD DRIVE

INSTALLATION GUIDE

Medalist Pro 9140 (ST39140A) Medalist Pro 6530 (ST36530A) Medalist Pro 4520 (ST34520A) for ATA (IDE)-Compatible PCs

P

11. ONE DRIVE OR TWO?

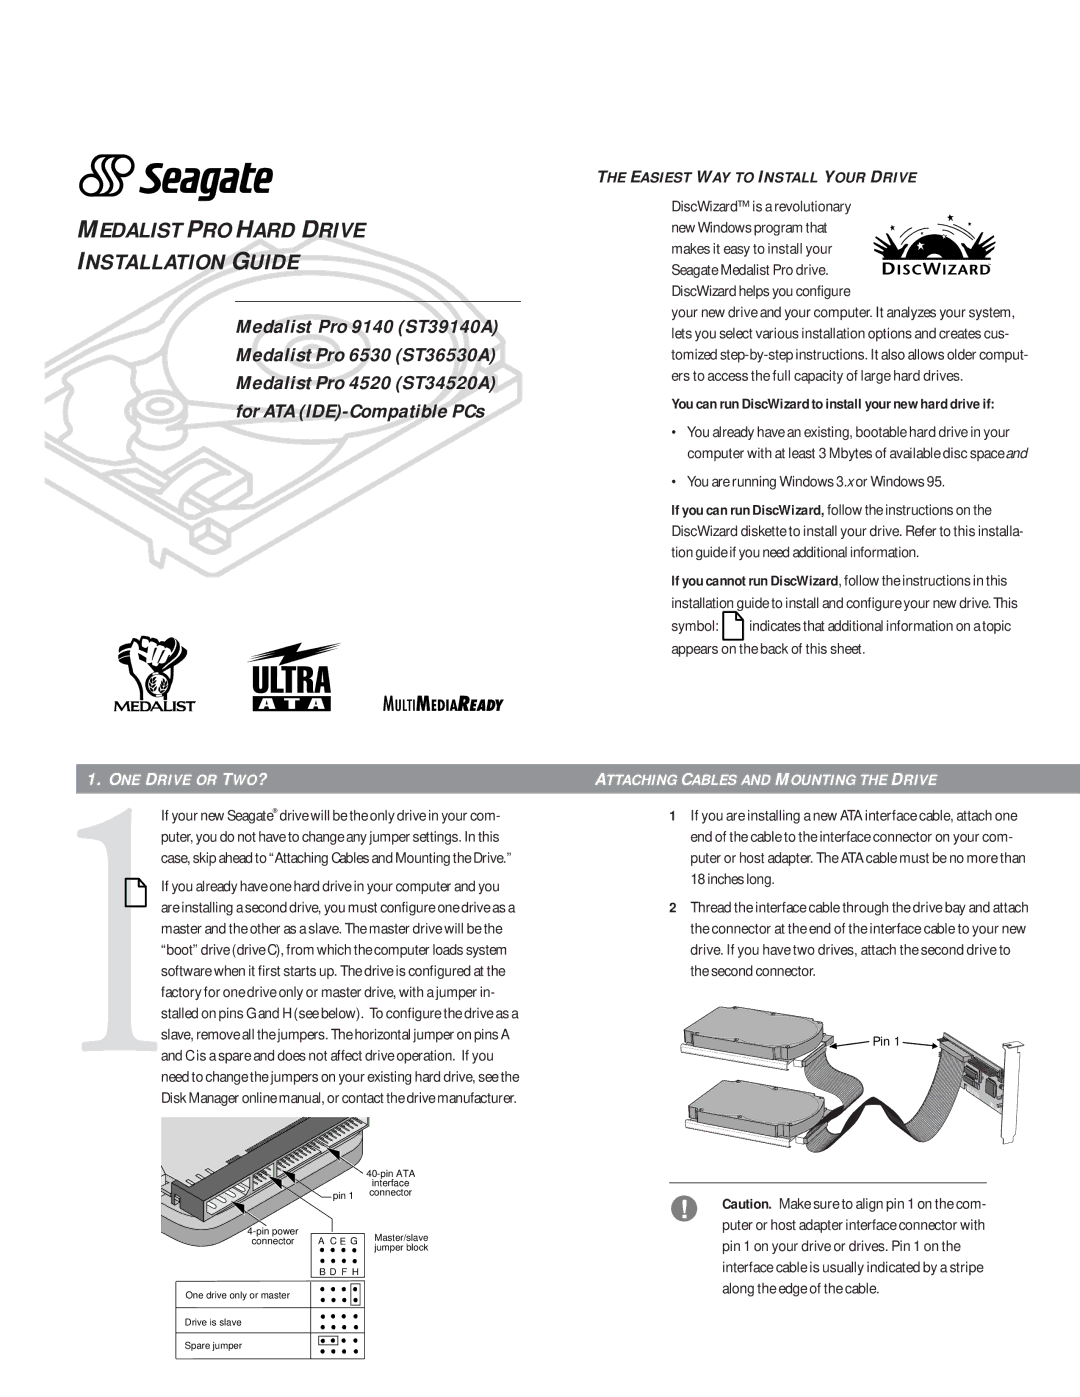
If your new Seagate® drive will be the only drive in your com- puter, you do not have to change any jumper settings. In this case, skip ahead to “Attaching Cables and Mounting the Drive.”

If you already have one hard drive in your computer and you are installing a second drive, you must configure one drive as a master and the other as a slave. The master drive will be the “boot” drive (drive C), from which the computer loads system software when it first starts up. The drive is configured at the factory for one drive only or master drive, with a jumper in- stalled on pins G and H (see below). To configure the drive as a slave, remove all the jumpers. The horizontal jumper on pins A and C is a spare and does not affect drive operation. If you need to change the jumpers on your existing hard drive, see the Disk Manager online manual, or contact the drive manufacturer.


40-pin ATA


interface


pin 1

connector

4-pin power

A C E G

Master/slave

connector

jumper block


B D F H

One drive only or master

Drive is slave

Spare jumper

THE EASIEST WAY TO INSTALL YOUR DRIVE

DiscWizardis a revolutionary

new Windows program that makes it easy to install your Seagate Medalist Pro drive. DiscWizard helps you configure

your new drive and your computer. It analyzes your system, lets you select various installation options and creates cus- tomized step-by-step instructions. It also allows older comput- ers to access the full capacity of large hard drives.

You can run DiscWizard to install your new hard drive if:

You already have an existing, bootable hard drive in your computer with at least 3 Mbytes of available disc spaceand

You are running Windows 3.x or Windows 95.

If you can run DiscWizard,follow the instructions on the DiscWizard diskette to install your drive. Refer to this installa- tion guide if you need additional information.

If you cannot run DiscWizard, follow the instructions in this installation guide to install and configure your new drive.This

symbol: indicates that additional information on a topic appears on the back of this sheet.

ATTACHING CABLES AND MOUNTING THE DRIVE

1If you are installing a new ATA interface cable, attach one end of the cable to the interface connector on your com- puter or host adapter. The ATA cable must be no more than 18 inches long.

2Thread the interface cable through the drive bay and attach the connector at the end of the interface cable to your new drive. If you have two drives, attach the second drive to the second connector.

Pin 1

!Caution. Make sure to align pin 1 on the com- puter or host adapter interface connector with

pin 1 on your drive or drives. Pin 1 on the interface cable is usually indicated by a stripe along the edge of the cable.

Page 1
Image 1
Seagate ST36530A, ST39140A, ST34520A manual ONE Drive or TWO?, Attaching Cables and Mounting the Drive

ST36530A, ST34520A, ST39140A specifications

Seagate has long been a cornerstone in the hard disk drive (HDD) sector, delivering storage solutions that cater to various computing needs. Among its notable offerings are the Seagate ST39140A, ST34520A, and ST36530A models. Each of these drives embodies Seagate's commitment to reliable performance, robust design, and cutting-edge technology.

The Seagate ST39140A, commonly recognized as the Barracuda 9, boasts a storage capacity of 9.1 GB, which was substantial in its time. Operating at a spindle speed of 7200 RPM, it provides rapid data access and improved overall system responsiveness. This drive utilizes an Ultra ATA/33 interface, facilitating a transfer rate of up to 33 MB/s. One of its standout features is the use of Fluid Dynamic Bearing (FDB) technology, allowing for quieter operation and enhanced longevity. This drive also includes a built-in error correction mechanism, ensuring data integrity and reliability, which are critical for both personal and business applications.

Looking toward the ST34520A, this model is also part of the Barracuda family but offers greater storage capacity at 4.5 GB. It operates at the same 7200 RPM speed but implements an Ultra ATA/66 interface, effectively doubling the data transfer potential to up to 66 MB/s. In terms of design, it incorporates advanced technology that enhances shock resistance, an essential feature for drives installed in mobile computing environments. The ST34520A was well-regarded for its efficiency, making it suitable for both desktop systems and servers that required reliable, high-capacity storage.

Meanwhile, the ST36530A serves as an excellent bridge between performance and capacity with 6.5 GB of storage. This model also maintains the 7200 RPM speed and features the Ultra ATA/33 interface, ensuring it delivers a consistent and reliable performance. Its design is tailored to meet the demands of both stationary and portable computing environments, making it an excellent choice for various applications.

In summary, Seagate’s ST39140A, ST34520A, and ST36530A drives excelled in their respective roles within the hard disk drive market, each offering unique features and technologies. Their combination of speed, capacity, and reliability made them popular choices in the late 1990s and early 2000s, showcasing Seagate’s legacy of innovation in data storage technologies. Whether catering to general consumers or technical applications, these models remain remembered for their contributions to the evolution of hard drive technology.