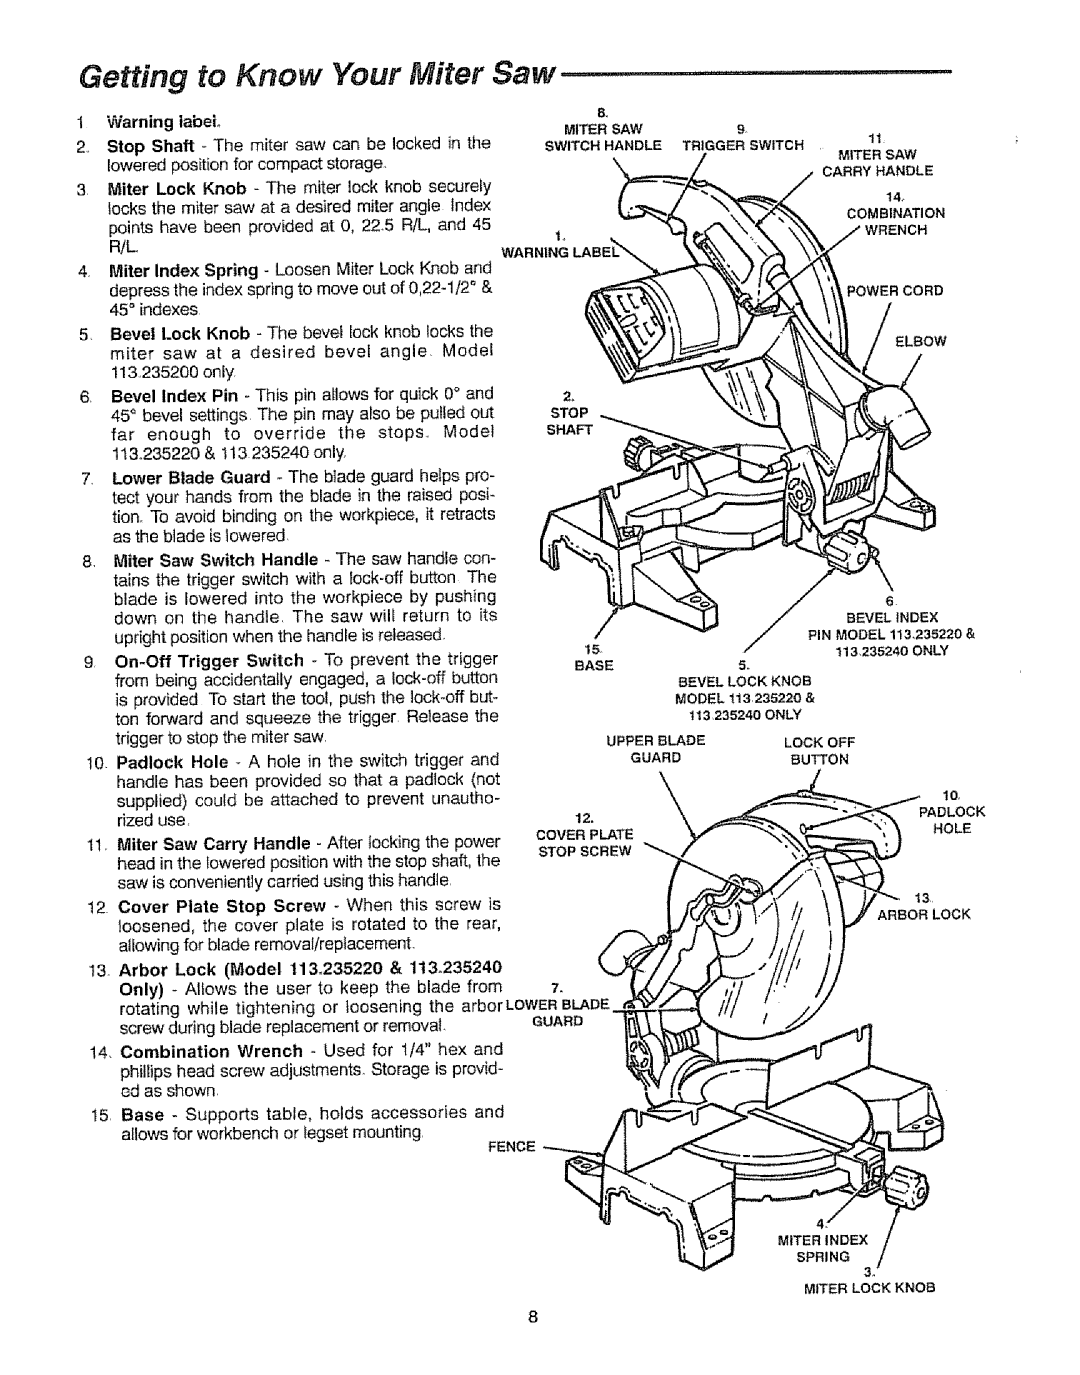
Getting to Know "YourMiter Saw
1 | Warning label |
|
|
| 8,, |
|
| ||
|
|
| MITER | SAW | 9_ |
| |||
2,, | Stop Shaft | - The | miter saw | can be | locked in the |
| |||
SWITCH | HANDLE | TRIGGER SWITCH | 11 | ||||||
| lowered position for compact | storage. |
|
|
| MITER SAW | |||
3 | Miter Lock | Knob | - The miter lock | knob securely |
|
| CARRY | HANDLE | |
|
|
| 14. | ||||||
| locks the miter saw at a desired miter angle Index |
|
|
| |||||
|
|
| COMBINATION | ||||||
| points have been provided at O, 22.5 R/L, and 45 |
|
| ||||||
|
|
|
|
| |||||
| R/L |
|
|
|
| I. |
|
|
|
4Miter Index Spring - Loosen Miter Lock Knob and
depress the index spring to move out of
5, | Bevel | Lock | Knob | - The | bevel lock knob locks the |
|
| ELBOW | |||||||||||
| miter saw at a desired bevel angle. Model |
|
| ||||||||||||||||
|
|
|
| ||||||||||||||||
| 113,,235200 only |
|
|
|
|
|
|
|
|
|
|
|
|
|
| ||||
6 | Bevel | Index | Pin - This pin allows for quick 0° and | 2. |
|
| |||||||||||||
| 45 ° bevel | settings | The | pin may | also be pulled | out | STOP |
| |||||||||||
| far | enough | to | override | the |
| stops., |
| Model | SHAFT |
| ||||||||
| 113.235220 | & 113 235240 | only. |
|
|
|
|
|
|
|
|
| |||||||
7, | Lower Blade Guard - The btade guard helps pro- |
|
|
| |||||||||||||||
| tect your hands from the blade in the raised posi- |
|
|
| |||||||||||||||
| tion. To avoid binding on the workpiece, it retracts |
|
|
| |||||||||||||||
| as the blade is lowered, |
|
|
|
|
|
|
|
|
|
|
|
| ||||||
8, Miter Saw Switch Handle - The saw handle con- |
|
|
| ||||||||||||||||
| tains the trigger switch with a |
|
|
| |||||||||||||||
| blade is lowered into the workpiece by pushing |
|
| 6 | |||||||||||||||
| down on the handle, The saw will return to its |
|
| ||||||||||||||||
|
|
| BEVEL, iNDEX | ||||||||||||||||
| upright position when the handle | is released. |
|
|
|
| |||||||||||||
|
|
|
| 15, | PIN MODEL 113,235220 & | ||||||||||||||
9 |
|
|
|
|
|
| Switch |
|
|
|
|
|
|
|
|
| tl 3,235240 ONLY | ||
Trigger |
| - To prevent | the | trigger | BASE | ||||||||||||||
| 5. | ||||||||||||||||||
| from | being accidentally | engaged, | a | button |
| BEVEL | LOCK KNOB | |||||||||||
| is provided | To start the toot, | push the | but- |
| MODEL | t13,235220 & | ||||||||||||
| ton | forward | and |
| squeeze | the | trigger | Release | the |
| 1t3,235240 ONLY | ||||||||
| trigger to stop the miter saw, |
|
|
|
|
|
|
|
| UPPER BLADE | LOCK OFF | ||||||||
|
|
|
|
|
|
|
|
|
|
|
|
|
|
|
|
|
| ||
10. Padlock | Hole | - A hole | in the switch | trigger | and |
| GUARD | BUTTON | |||||||||||
| handle has been provided so that a padlock (not |
|
|
| |||||||||||||||
| supplied) | could | be attached | to | prevent | unautho- |
|
| 1Q | ||||||||||
| rized use, |
|
|
|
|
|
|
|
|
|
|
|
|
| 12. | PADLOCK | |||
11, Miter Saw Carry Handle - After locking the power | COVER | PLATE | HOLE | ||||||||||||||||
STOP | SCREW _'_ |
| |||||||||||||||||
| head in the !owered position with the stop shaft, the |
| |||||||||||||||||
|
|
|
| ||||||||||||||||
| saw is conveniently carried using this handle, |
|
|
|
| ||||||||||||||
12 Cover Plate Stop Screw - When this screw is |
|
| 13 | ||||||||||||||||
| loosened, the cover plate is rotated to the rear, |
|
| ARBOR LOCK | |||||||||||||||
|
|
|
| ||||||||||||||||
| allowing for blade | removal/replacement. |
|
|
|
|
|
|
| ||||||||||
13. Arbor | Lock | (Model | 113.235220 | & | 1t&235240 |
|
|
| |||||||||||
| Only) | - Allows | the user | to keep the blade from | 7. |
|
| ||||||||||||
| rotating while tightening or loosening the arborLOWER BLADE |
| |||||||||||||||||
| screw during blade replacement or removal, |
|
| GUARD |
| ||||||||||||||
14, Combination | Wrench |
| - Used | for l/4" | hex | and |
|
|
| ||||||||||
phillips head screw adjustments Storage is provid- ed as shown,
15, Base - Supports table, holds accessories and allows for workbench or Iegset mounting,
FENCE
4.'
MITER INDEX
SPRING
3.
MITER LOCK KNOB
