STABILITY DEVICE
|
|
|
| pulled as tlg ht as possible and that there Is no excess | |
|
|
|
| slack In the chain after chain is attached to the | |
|
|
|
| bracket. | |
|
|
|
| Excess slack in the chain could allow the | |
• | ALL | RANGES | range to tip over. | ||
| CAN | TIP | 6) | Slide the range all the way back Into the counter. | |
• | INJURY | TO PERSONS | Once the range is pushed back in place, there will be | ||
a small amount of slack in the chain. This is normal. | |||||
| COULD | RESULT | |||
|
| ||||
• | INSTALL | BACKGUARD | |||
| DEVICES | PACKED | |||
|
| ||||
| WITH | RANGE |
| ||
• | SEE | INSTALLATION |
| ||
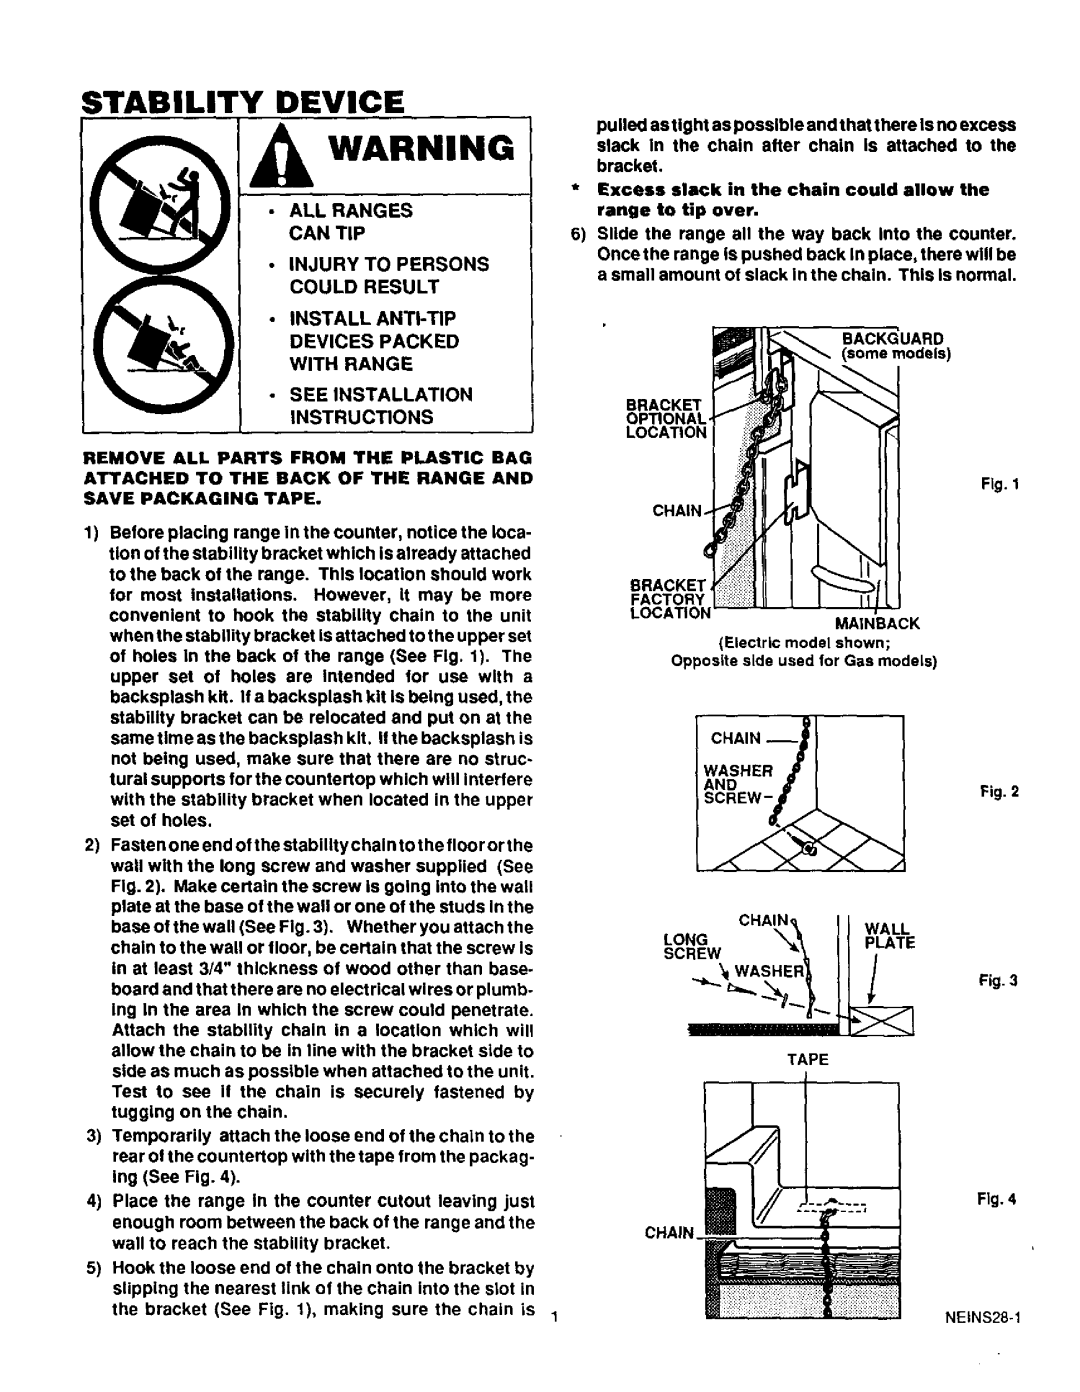
BRACKET
INSTRUCTIONSOP_ONAL
LOCATION
REMOVE ALL PARTS FROM THE PLASTIC BAG |
| |
ATTACHED TO THE BACK OF THE RANGE AND | Fig. 1 | |
SAVE PACKAGING TAPE. | ||
|
1)Before placing range In the counter, notice the loca- tion of the stability bracket which is already attached
to the back ot the range. This location should work |
|
| |||||||
for most installations. | However, | it may | be | more | FACTORY |
| |||
convenient to hook the | stability | chain | to | the | unit | LOCA_ON |
| ||
when the stability bracket is attached to the upper set | MAINBACK | ||||||||
(Ele_ric modelshown; |
| ||||||||
of holes in the back of the range (See Fig. 1). The |
| ||||||||
OpposltesideusedforGas | models) | ||||||||
upper set of holes are Intended for use with a | |||||||||
|
| ||||||||
backsplash kit. If a backsplash kit is being used, the |
|
| |||||||
stability bracket can be relocated and put on at the |
|
| |||||||
same time as the backsplash kit. If the backsplash is |
| ||||||||
not being used, make sure that there are no struc- | WASHER |
| |||||||
tural supports for the countertop | which | will Interlere |
| ||||||
AND | Fig. 2 | ||||||||
with the stability bracket | when | located | in the upper | SCREW- | |||||
| |||||||||
set of holes.
2)Fasten one end of the stability chain to the floor or the wall with the long screw and washer supplied (See
| Fig. 2). Make certain the screw is going into the wall |
|
|
|
| |
| plate at the base of the wall or one of the studs In the | CHAIN_ | I [ | WALL |
| |
| base of the wall (See Fig. 3). Whether you attach the |
| ||||
| chain to the wall or floor, be certain that the screw Is | \\ | IIP ATE | |||
|
|
|
|
| ||
| in at least 3/4" thickness of wood other than base- | _x I WASHER_ | J] | / | Fig. 3 | |
| board and that there are no electrical wires or plumb- | |||||
|
|
|
|
| ||
| ing in the area In which the screw could penetrate. |
|
|
|
| |
| Attach the stability chain in a location which will |
|
|
|
| |
| allow the chain to be in line with the bracket side to | TAPE |
|
|
| |
| side as much as possible when attached to the unit. |
|
|
| ||
|
|
|
|
| ||
| Test to see If the chain is securely fastened by |
|
|
|
| |
| tugging on the chain. |
|
|
|
| |
3) | Temporarily | attach the loose end of the chain to the |
|
|
|
|
| rear ol the countertop with the tape from the packag- |
|
|
|
| |
| ing (See Fig. 4). |
|
|
|
| |
4) | Place the range In the counter cutout leaving just |
|
|
| Fig. 4 | |
| enough room between the back of the range and the | CHAIN |
|
|
| |
| wall to reach the stability bracket. |
|
|
| ||
|
|
|
|
| ||
5) | Hook the loose end of the chain onto the bracket by |
|
|
|
| |
| slipping the | nearest link of the chain into the slot in |
|
|
|
|
| the bracket | (See Fig. 1), making sure the chain is | 1 |
|
| |