Sewing Machine
With
Ventilation
Kenmore Sewing Machine
Model No Serial No Retain these numbers for future reference
Section
10tI02
103104
7276
Page
Locate and Identify the Parts
Sectionknow YOt
Foot Lever
Set Up the Machine
Plug in the Machine and Switch on the Power
Store the power supply cord
SetUp Machine
Operating Instructions
Adjust the Presser Foot Lever
Lever
Iid of the accessory storage box lifts open toward
Sewing accessones are conveniently located
You
Box
Clothes
Foot
Presser Foot Types
Zigzag Foot
Siidng
Snap On the Presser
Silk-like Fabrics
Thicker
Fabric, Needle, Thread and Stitch Length Chart
To Change the Needle
110
To Remove the Bobbin from the Machine
Horizontal Spool Pin Ordinary Spool
Additional spool pin is used to wind
Wind the Bobbin
Insert the Bobbin into the Bobbin Holder
Pull the thread clockwise
Toward you through the tension
Attach the hook cover plateo
Prepare the Top Thread
Thread the Needle
PreparetheTop Thread Pick Up the Bobbin Thread
Button
Left
By pulling
Adjust the Top Thread Tension
PreparetheT0pThrea d
Too Tight Too Loose Just Right
Main Function
Buttons
Display Sharpness Adjusting Knob
Control Button
Mode Button
0OT
Mirror Image Button Clear Button
Stitch Length Control Button
Length will be
Light
Increase
Message Button
Press
Use the Seam Guides
Turn a Square Corner
Sewing on HeavyFabrics
Dropping the Feed Dogs
Basting
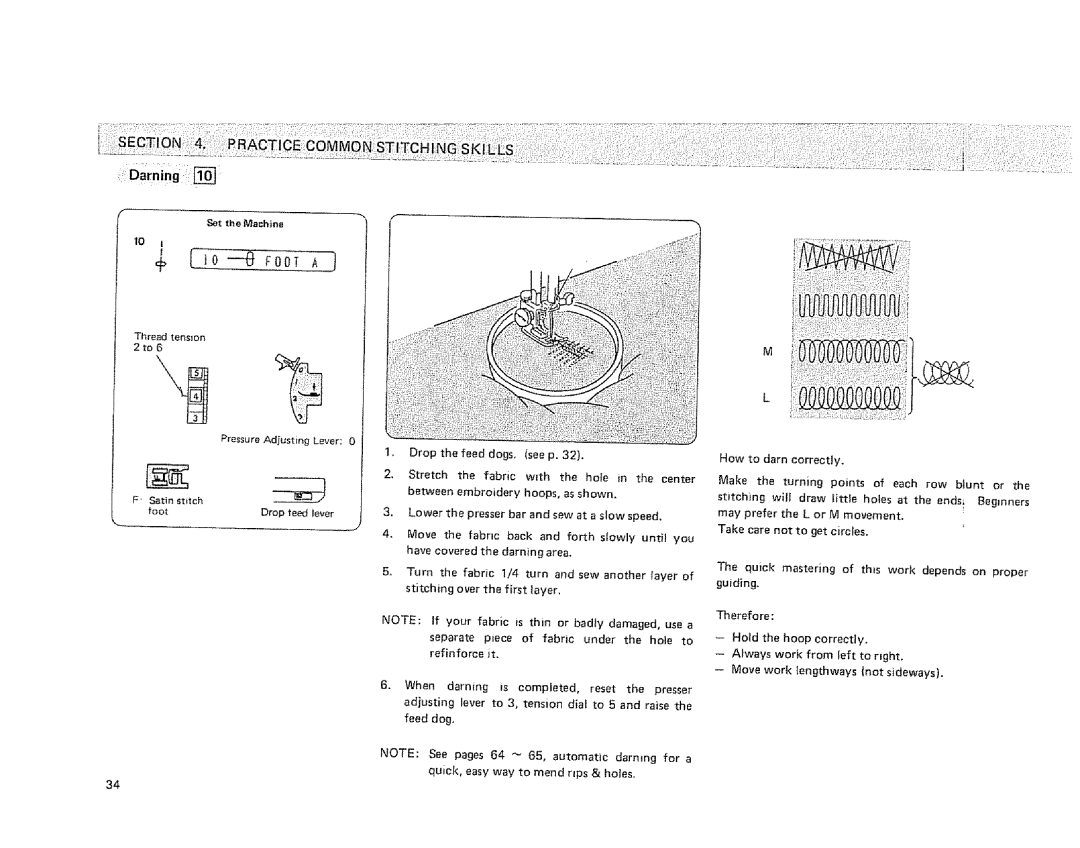
ICTICE Commonstitching SKI LLS
Sat the Machine
Iii
Guiding
Sew a Button
Thread tension
$ lo FootAJ
Itsas easy at a -- B -- C Set the Machine
Put in a Zipper
Closethezipperandturnthefabrictop sideup. Spreadflat
Chart of Sewing F,unctions
30,31 13,14 10,19
16,28
40,52 41~43,61,62,74
Stitch Pattern Chart
On p
Tension Lever
Refer to
Overedge Seam
Stitch Pattern Chart
On p, t7
Stitc H ES
Sat,n if
Satin
Qua
91 ~
Straight Stitches
Straight Stitch
Presser
Its highest
+t --eroot Aj
Topstitchlng Set the Machine
?Cfi!,,,,, .... i!i!iii?ii!¸iiiii!!¸!iii
Effect
+ Io--- ooT a
Pintucking Sat the Machine
+ !0-4 F00 a
Quilting
Adjust your fabric accordingly
Gathering
Straight stretch
Il z- 0oTAj
Locl*Matic Seam
OutlineStretch
Ill 18 root Ill
I3NWr00T a
Satin Stitch Set the Machine
Heres How
HeresHow
Overcasting Stitch Set the Machine
Mending Set the Machine
FO0
Overedge Seam Sat the Machine
00,A
Knit Stitch Set the Machine
FootA
Rick-Rack Stretch Set the Machine
FOOTj
114
= Adjusting Evenness of Darning
Darning Small Rips
=L=0B,3Foot
Cm 31/321
LSTEP2 !- ca sTEP
Adjust the Stitch Width and Density
Stitch Density in Entire Buttonhole
Is EPi
Manual BuOnhoiing
Stitch Density on One Side
For
Setthe Machine
Himinglad Eging Stitches
WS,0 L2.0
Foota
Is to
28 w5.0 L2.0 j
Shell Stitch
EAR N T H E Sl
Scallop Stitch Set the Machine
Cut-Out Work Edging and Applique Set the Machine
Each
Reinforcing stitches
TESI
Sew this pattern On a seam that s
Already joined and pressed fiat
33 Fo0T
Fagoting Stitch Sat the Machine
Elastic Casing Stitch Set the Machine
Elastic Stretch Stitch Set the Machine
T40
FO01 F
FootF
Decorate with Geometric Patterns
Page
F34 Foot l
Cross Stitch
Iscki !i!iii¸!iii¸!iiiii
Thread tension 2to
Or2
Thread tensio n 2to8
Pro,sMomo.o
Pressthe next stitch pattern 6 I w- flash
Two Cycle Stitching
Same combination
= Test Sewing Pattern Combinations
Cycle Stitching by Pressing Mirror image Button
Step
Press Auto-Lock
Pattern Single Umts Aid to Programming
Memory Lock Alphabet and Numbers
Memory lock patterns
Combining Letters in Block Style Step
Combining Large and Small Letters Step
QF- flash Flash I Ill
Flash
Flash +-flash
Flash @ 3E --- P, S . H flash
LqT
Combining Letters in Script Style Step
Press the Edit button again when editing is completed
Checking and Editing You r Program
Cursor
To Delete and Add Patterns Add pattern Z between D and E
+-flash
To Adjust Distorted Patterns
To Adjust Distorted Letters or Numbers
Accessory
Letters
What to do When
Needle thread
Breaks
Skipped stitches
Seam puckering
Cloth is not feeding
Smoothly
Machine doesntwork
Cleaningthe Machine
Oiling the Machine
No other oiling is required
Parts List
LOl
Ret. No
647814031 No Single Needles
647814042 No Single Needles
647814053 No, 18 Single Needles
Cross stTtching Cut-out Work
Gathering Hook cover pate 18, 9g
Knit Stitching Large screw driver 101102
7273
Quilter 12, 13, 51,101102 Quilting
Foot 1213 3638, t0t102
Supply
From
WiII, tree
Except
SEARS, Roebuck and CO., D/817 WA, Hoffman Estates, IL
Sewing Machine