ASSEMBLY

,,,,

,,,,

-

,, ,,,,,

,,,,

rO INSTALL THE UPPER HANDLE

AND CRANK ASSEMBLY

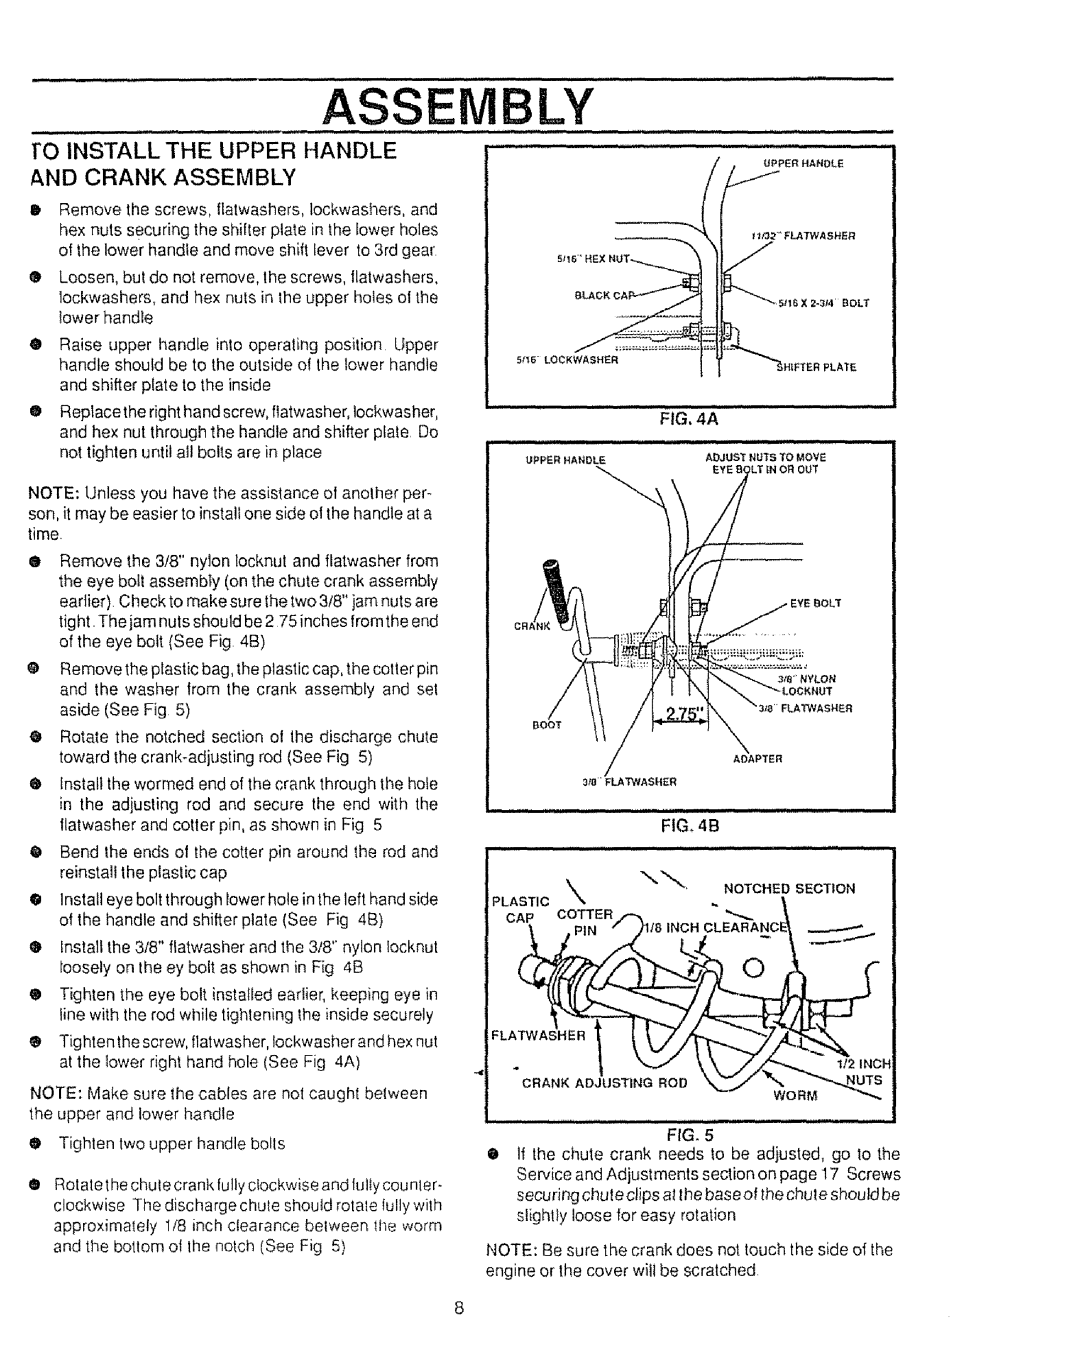
Remove the screws, flatwashers, lockwashers, and hex nuts securing the shitter plate in the lower holes of the lower handle and move shift lever to 3rd gear

®Loosen, but do not remove, the screws, flatwashers, lockwashers, and hex nuts in _heupper holes ol the lower handle

®Raise upper handle into operating position Upper handle should be to the outside of the lower handle and shifter prate to the inside

OReplacethe right hand screw, flatwasher, lockwasher, and hex nut through the handle and shifter plate Do not tighten t_ntilall bolts are in place

NOTE: Unless you have the assistance of another per-

son, it may be easier to install one side ot the handle at a time.

@Remove the 3/8" nylon locknut and flatwasher from the eye bolt assembly (on the chute crank assembly earlier) Check to make sure the two 3/8" jam nuts are tight The jam nuts should be 2 75 inches from the end of the eye bolt (See Fig 4B)

@Remove the plastic bag, the plastic cap, the cotter pin and the washer from the crank assembly and set aside (See Fig 5)

@Rotate the notched section of the discharge chute toward the crank-adjusting rod (See Fig 5)

®Install the wormed end of the crank through the hofe in the adjusting rod and secure the end with the llatwasher and cotter pin, as shown in Fig 5

Bend the ends of the cotter pin around the rod and reinstall the plastic cap

FTER PLATE

FLATWASHER

BOOT

ADAPTER

3_FLATWASHER

i i i,,,,,

n,

,nil

n,,i,ii

nnl

FIG, 4B

@ Instal] eye bolt through lower hole in the left hand side

PLASTIC

NOTCHED SECTION

ot the handle and shifter plate (See Fig 4B)

®tnstall the 3/8" flatwasher and the 3/8" nylon locknut loosely on the ey bolt as shown in Fig 4B

®Tighten the eye bolt installed earlier, keeping eye in line with the rod while tightening the inside securely

®Tightenthe screw, flalwasher, Iockwasherand hex nut at the lower right hand hole (See Fig 4A)

CAP COTTER/-

FLA_.

)118 INCH

;LEARANC_

NOTE: Make sure the cables are not caught between the upper and lower handle

O Tighten two upper handle bolts

ORotate the chute crank fully clockwise and lulty counler- clockwise The discharge chule should rotale tully with approximately 1/8 inch ctearance belween ihe worm and the bottom ot the notch (See Fig 5)

CRANK ADJUSTING ROD

....................

@If the chute crank needs to be adjusted, go to the Service and Adjustments section on page 17 Screws securing chute clips at the base of the chule should be slight}y loose for easy rotation

NOTE: Be sure the crank does not touch the side of the engine or the cover wilt be scratched,

Page 8
Image 8
Sears 536.886531 owner manual Crank Assembly, FIG, 4B

536.886531 specifications

The Sears 536.886531 is a noteworthy addition to the realm of household appliances, particularly in the category of tabletop kitchen appliances. Designed to simplify cooking processes, it stands out due to its innovative features and user-friendly interface. This appliance is particularly known for its versatility, serving multiple functions that cater to modern cooking needs.

At its core, the Sears 536.886531 incorporates advanced technologies that enhance its performance and efficiency. One of its main features is the adjustable temperature control, allowing users to customize settings based on the specific dish being prepared. This range of control is critical for achieving optimal results, whether it’s grilling, baking, or steaming.

The cooking surface is designed for even heat distribution, which is essential for preventing hotspots that can lead to uneven cooking. With a non-stick coating, cleaning the surface becomes effortless, reducing the hassle typically associated with kitchen cleanup. Additionally, this appliance is built with safety features such as cool-touch handles and an automatic shut-off function, ensuring peace of mind during use.

Another characteristic that sets the Sears 536.886531 apart is its compact size. Designed for ease of storage and portability, it fits seamlessly into various kitchen spaces without taking up too much real estate. This size makes it an ideal choice for those in smaller living environments, such as apartments or dorms.

Moreover, the ease of operation is a significant selling point. With simple controls and an intuitive layout, users can quickly familiarize themselves with the appliance, making it accessible even for those who may not be experienced in the kitchen.

Compatibility with a variety of cooking recipes further enhances its allure. From breakfast favorites like pancakes to dinner options such as grilled vegetables, the Sears 536.886531 is versatile enough to accommodate an array of culinary endeavors.

In conclusion, the Sears 536.886531 combines innovative technology, safety features, and user-friendly design to create a standout kitchen appliance. Its adaptability for different cooking methods and ease of use make it an excellent addition for both novice and experienced cooks. This appliance not only aims to meet the demands of modern cooking but also enhances the overall culinary experience.