ASSEMBLY

Read these iv,sttuctions and Operator's Manual in its en- tirety before you attempt to assemble or operate your new high pressure washer° Your high pressure washer has, for the most part, been asserr_ed at the factory, except those parts left unassembted. Before you can operate your new high pressure washer, you must assemble the wheel kitand property connect the high pressure hose.

IF YOU HAVE ANY PROBLEMS WITH THE ASSEMBLY

OF YOUR PRESSURE WASHER, PLEASE CALL THE PRESSURE WASHER HELPLINE AT 1-800-_-3136.

HOW TO SET UP YOUR PRESSURE WASHER

TO INSTALL THE WHEEL KIT

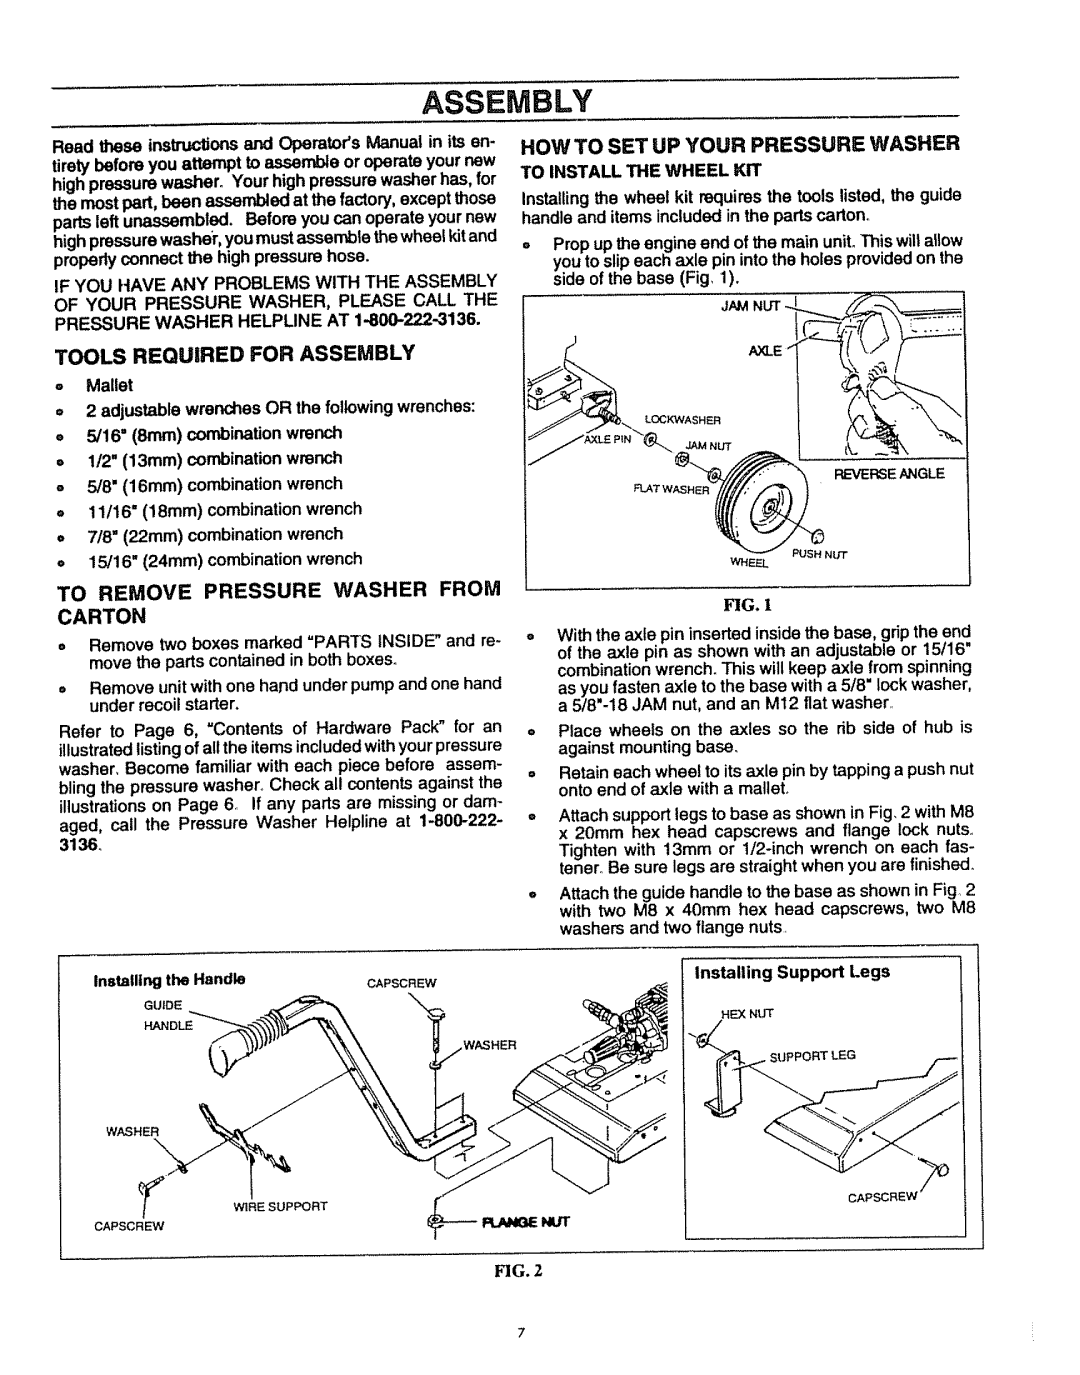
Installing the wheel kit requires the tools listed, the guide handle and items included in the parts carton°

°Prop up the engine end of the main unit. This will allow you to slip each axle pin into the holes provided on the side of the base (Fig 1).

JAM

TOOLS REQUIRED FOR ASSEMBLY

oMallet

=2 adjustable wrenches OR the following wrenches:

=, 5/16" (8mm) combination wrench

=1/2" (13mm) combination wrench

-5/8'(16mm) combination wrench

=11/16" (18mm) combination wrench

=7/8" (22ram) combination wrench

=15/16" (24mm) combination wrench

LOGK1NASHER

JAM NUT

_L


REVERSE ANGLE

FLAT v

TO REMOVE PRESSURE WASHER FROM CARTON

=, Remove two boxes marked "PARTS INSIDE" and re- move the parts contained in both boxes.

=Remove unit with one hand under pump and one hand under recoil starter.

Refer to Page 6, "Contents of Hardware Pack" for an illustrated listingof all the items included with your pressure washer, Become familiar with each piece before assem- bling the pressure washer,, Check all contents against the illustrations on Page & If any parts are missing or dam-

aged, call the Pressure Washer Helpline at 1-800-222- 3136,

FIG. 1

With the axle pin inserted inside the base, grip the end of the axle pin as shown with an adjustable or 15/16"

combination wrench. This will keep axle from spinning as you fasten axle to the base with a 5/8 lock washer,

a 5/8"-18 JAM nut, and an M12 flat washer..

oPlace wheels on the axles so the rib side of hub is against mounting base.

=Retain each wheel to its axle pin by tapping a push nut onto end of axle with a mallet.

°Attach support legs to base as shown in Fig, 2 with M8 x 20mm hex head capscrews and flange lock nuts,. Tighten with 13mm or 1/2-inch wrench on each fas- tener.. Be sure legs are straight when you are tinished_

Attach the guide handle to the base as shown in Fig, 2 with two M8 x 40mm hex head capscrews, two M8 washers and two flange nuts.

Installing the Handle

CAPSCREW

GUIDE


Installing Support Legs

HANDLE

WASHER

\

WIRE SUPPORT

CAPSC

CAPSCREW

_NUT

FIG. 2

Page 7
Image 7
Sears 580.7515 HOW to SET UP Your Pressure Washer, Tools Required for Assembly, To Remove Pressure Washer from Carton

580.7515 specifications

The Sears 580.7515 is a distinctive piece of technology that emerged in the realm of consumer electronics. Primarily recognized as a high-performance rotary tool, the 580.7515 quickly garnered attention for its versatility and efficiency in various applications, which include crafting, repair, and maintenance tasks.

One of the most notable features of the Sears 580.7515 is its powerful motor, which delivers a robust performance that can handle a variety of materials, including wood, metal, and plastic. The tool operates at multiple speeds, enabling users to adjust the RPM according to the specific requirement of their tasks. This flexibility is particularly beneficial for intricate detail work or when more aggressive grinding is necessary.

The design of the Sears 580.7515 emphasizes user comfort and control. It typically features an ergonomic handle that reduces fatigue during prolonged use, providing a secure grip. The tool's lightweight nature further enhances its usability, making it an ideal choice for both professionals and amateur DIY enthusiasts.

In terms of technology, the Sears 580.7515 is equipped with a universal collet system, allowing users to easily interchange a variety of attachments and accessories. This compatibility significantly expands the range of potential applications for the tool. From sanding and polishing to cutting and engraving, the Sears 580.7515 does it all with relative ease.

Safety is also a priority with the Sears 580.7515. The rotary tool often includes safety features such as a protective guard to shield users from debris and a reliable safety switch to prevent accidental activation. These elements work in tandem to create a safer working environment.

Another noteworthy characteristic of the Sears 580.7515 is its robust construction. Built to withstand the rigors of frequent use, this tool is designed for longevity. Many users appreciate its durability, often citing it as a valuable addition to their toolkits.

Overall, the Sears 580.7515 combines power, versatility, and safety in a compact design, making it a reliable choice for anyone looking to tackle a range of tasks with precision and ease. Its adaptability continues to make it relevant in an ever-evolving market, showcasing the enduring appeal of well-crafted tools.