BROILING

Broiling is cooking by direct heat from the broil burner° Tender cuts of meat or marinated meat

should be selected for broiling. For best results steaks and chops should be at least 3/4" thick.

After placing food on the broiler pan, put the pan on

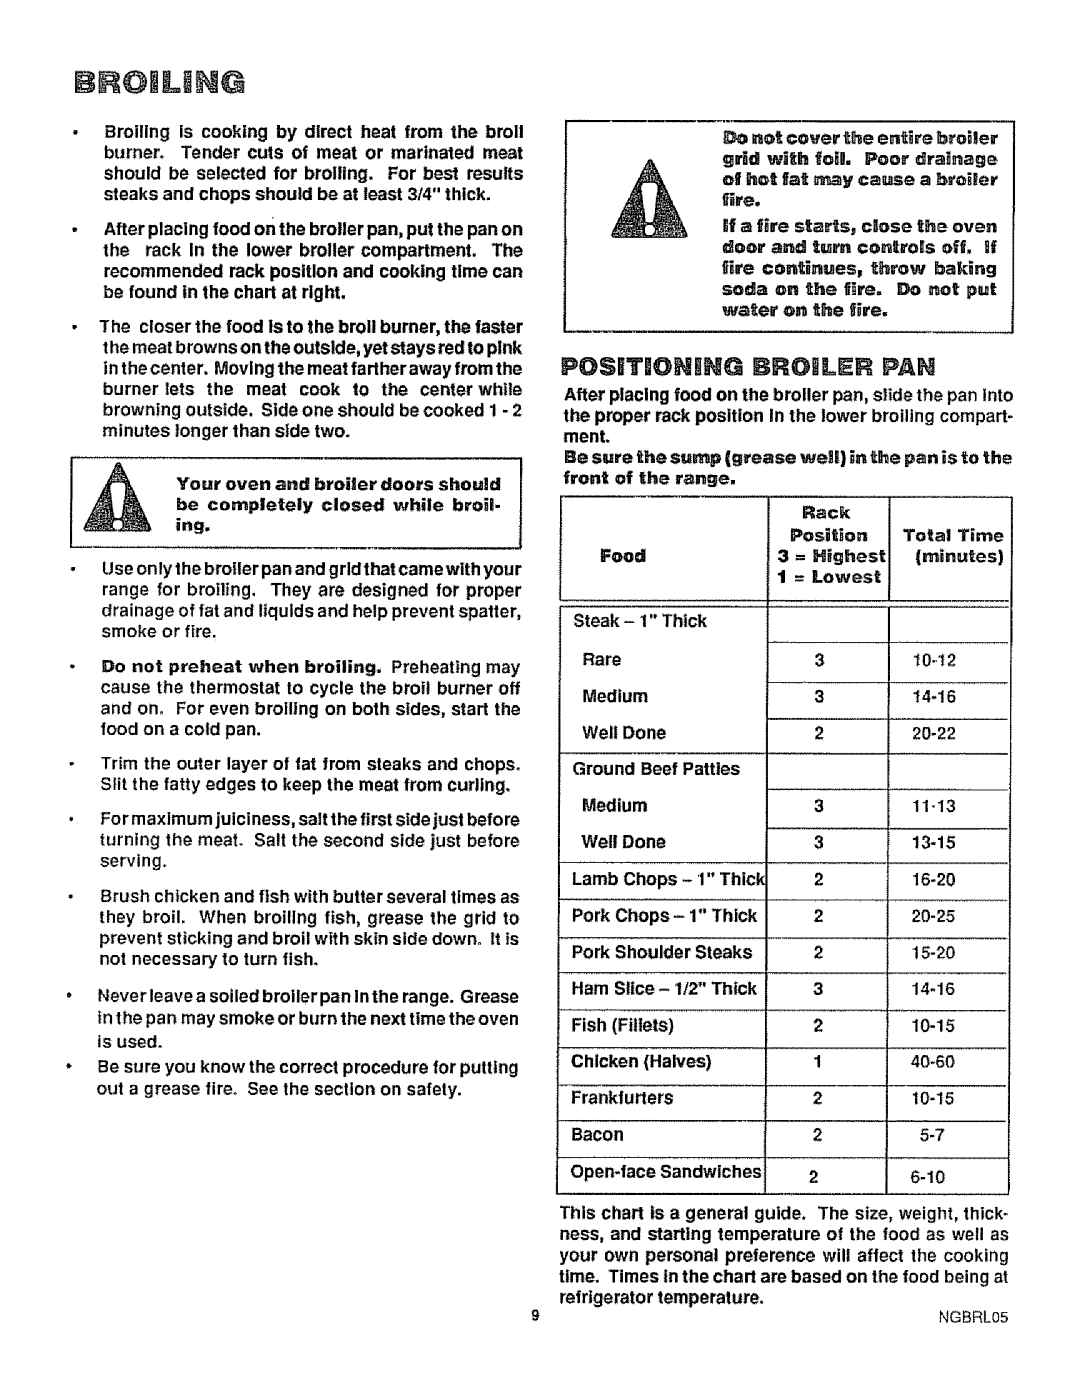
the rack In the lower broiler compartment. The recommended rack position and cooking time can be found in the chart at right.

The closer the food Is to the broil burner, the faster t he meat browns on the outslde, yet stays red to plnk in the center. Movlng the meat fartheraway from the burner lets the meat cook to the center while browning outside. Side one should be cooked 1 - 2 minutes longer than side two.

be completely closed while broil.

AYour oven and broiler doors should ing.

Use only the broiler pan and grid that came with your range for broiling. They are designed for proper

drainage of fat and liquids and help prevent spatter, smoke or fire.

Do not preheat when broiling. Preheating may cause the thermostat to cycle the broil burner off and on. For even broiling on both sides, start the food on a cold pan.

Trim the outer layer of fat from steaks and chops. Slit the fatty edges to keep the meat from curling.

For maximum juiciness, salt the first side just before turning the meat. Salt the second side just before serving.

Brush chicken and fish with butter several times as they broil, When broiling fish, grease the grid to prevent sticking and broil with skin side down. it is not necessary to turn fish.

Neverleaveasoiledbroilerpanlntherange. Grease in the pan may smoke or burn the next time the oven is used.

Be sure you know the correct procedure for putting out a grease fire_ See the section on safety.

not cover the entire broiler grid with tfoiU, Poor drainage of hot fat _y cause a broiler

fire,

if a fire starts_ close the even door and turn controis off. if

fire continues, _;hrow baking

soda on the fire= Do not put

water on the fire.

POSiTiONiNG BROILER PAN

After placing food on the broiler pan, slide the pan into the proper rack position In the lower broiling compart- ment.

Be sure the sump (grease well) in the pan is to the front of the range.

Rack

Position Total Time

Food3 = Highest (minu_es} 1 = Lowest

Steak - 1" Thick


Rare


3

t04 2

Medium


3

14-16

Well Done


2

20-22

Ground Beef Patties


Medium


3

11-13

Well Done


3

13-15

Lamb Chops - 1" Thick

2

16-20

Pork Chops -

1" Thick

2

20-25

Pork Shoulder

Steaks

2

16-20

Ham Slice - 112" Thick

3

14-16

Fish (Fillets)


2

10-15

Chicken (Halves)

1

40-60

- Frankfurters


2

10-15

Bacon


2

5-7

Open-face Sandwiches

2

6-10

This chart is a general guide. The size, weight, thick- hess, and starting temperature of the food as well as your own personal preference will affect the cooking time. Times in the chart are based on the food being at refrigerator temperature.

NGBRLo5

Page 10
Image 10
Sears 911.363209 warranty Broiling

911.363209 specifications

Sears 911.363209 is a compact, versatile, and reliable tool designed primarily for home improvement and DIY enthusiasts. This multi-functional device integrates innovative technologies and features that make it a practical addition to any toolkit. At its core, the Sears 911.363209 combines the utility of several tools into one compact design, which promotes ease of use and portability.

One of the standout features of the Sears 911.363209 is its ergonomic design. Designed for comfortable handling, this tool minimizes user fatigue during extended use. The textured grip ensures a secure hold, allowing for precise operation even in challenging working conditions. This focus on ergonomics reflects Sears’ commitment to making tools that cater to the needs of the user, enhancing overall efficiency.

The tool is equipped with a powerful motor that delivers superior performance. This motor provides the necessary torque for various tasks, from drilling and driving screws to cutting through a range of materials. The Sears 911.363209 is engineered to handle both light and heavy-duty applications, making it suitable for numerous projects around the home or on the job site.

Moreover, the Sears 911.363209 features an adjustable speed setting, giving users the flexibility to choose the appropriate speed for their specific tasks. This functionality is vital for achieving clean and accurate results, especially when working with delicate materials. Whether you are assembling furniture, installing fixtures, or completing craft projects, the adjustable speed adds a layer of versatility that enhances usability.

In addition to its power and adaptability, the Sears 911.363209 is built with durability in mind. The materials used in its construction resist wear and tear, ensuring that the tool remains functional over time. This durability is essential for those who rely on their tools for regular use, as it translates to a longer lifespan and better value for money.

Finally, the Sears 911.363209 incorporates safety features such as a built-in safety lock to prevent accidental starts and a protective casing that minimizes the risk of injury. These characteristics demonstrate Sears’ dedication to producing tools that not only perform well but also prioritize user safety.

In summary, the Sears 911.363209 is a multifunctional tool that combines power, versatility, and safety in a compact design. With its ergonomic grip, adjustable speed settings, and durable construction, it serves as an essential tool for anyone looking to tackle various tasks efficiently and safely. Whether you’re a seasoned professional or a casual DIYer, the Sears 911.363209 is designed to meet your needs with performance and reliability.