_jl,/llljllll

ii iii i,,

,ll,

ii illll

1,1,1,11 ,i

ii iiilllllll

i

ASSEMBLY

i iill ii

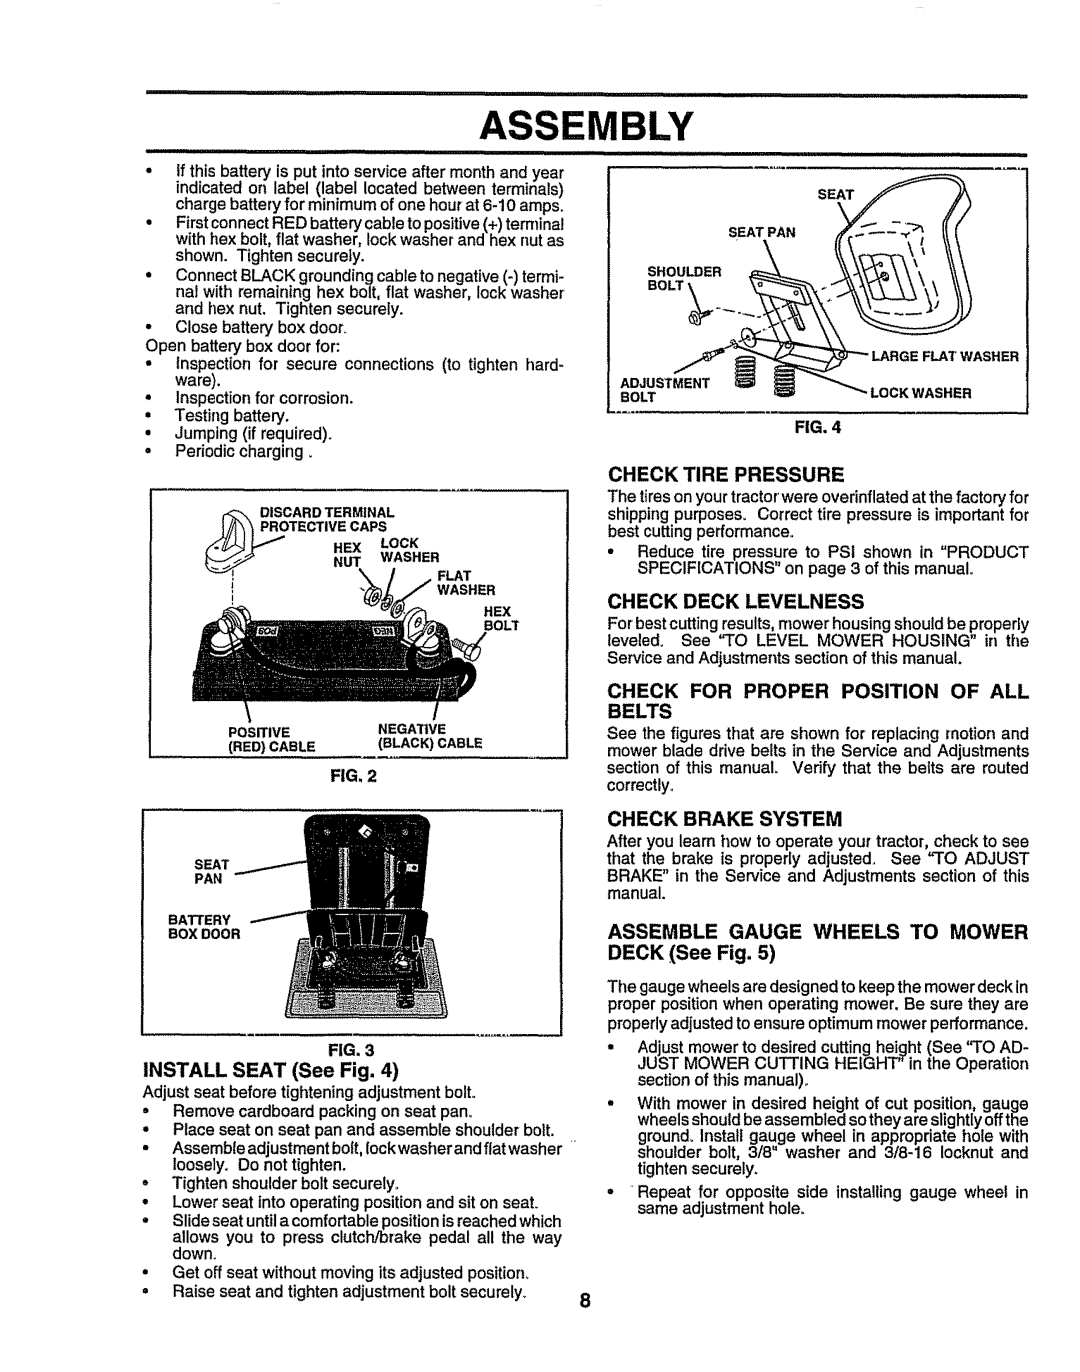
If this battery is put into service after month and year indicated on label (label located between terminals) charge battery for minimum of one hour at 6-10 amps.

Firstconnect RED battery cable to positive(+) temfinal with hex bolt, flat washer, lock washer and hex nut as shown. Tighten securely.

Connect BLACK grounding cable to negative (-) termi- nal with remaining hex bolt, flat washer, lock washer and hex nut. Tighten securely.

Close battery box door.

Open battery box door for:

Inspection for secure connections (to tighten hard- ware).

Inspection for corrosion,

Testing battery.

Jumping (if required)_

°Periodic charging

,_oTDISCARD

TERMINAL


ECTIVE CAPS


NEX

LOCK

!

NUT

WASHER


FLAT

!


WASHER

!


HEX

BOL_r

i i i i Ill I I ,I, lllllL lull,H,I

SEAT PAN _ _- Y'_, tl {

ME,T='_ LOCKWAS.E.

FIG. 4

CHECK TIRE PRESSURE

The tires on your tractor'wereoverinflated at the factory for shipping purposes. Correct tire pressure is important for

best cutting performance.

Reduce tire pressure to PSI shown in "PRODUCT SPECIFICATIONS on page 3 of this manual,

CHECK DECK LEVELNESS

For best cutting results, mower housing should be properly leveled. See "TO LEVEL MOWER HOUSING in the

Service and Adjustments section of this manual.

POSITIVE

NEGATIVE

(RED) CABLE

(BLACK) CABLE

FIG,

2

CHECK FOR PROPER POSITION OF ALL

See the figures that are shown for replacing motion and mower blade drive belts in the Service and Adjustments section of this manual Verify that the belts are routed correctly.

SEAT

PAN

BATTERY

BOX DOOR

FIG. 3

INSTALL SEAT (See Fig. 4)

Adjust seat before tightening adjustment bolto

Remove cardboard packing on seat pan_

Place seat on seat pan and assemble shoulder bolt.

Assemble adjustment bolt,{ockwasherandfiatwasher loosely. Do not tighten.

°Tighten shoulder bolt securely,,

°Lower seat into operating position and sit on seat.

°Slide seat until a comfortable position is reached which

allows you to press clutch/brake pedal all the way down.

Get off seat without moving its adjusted position_

° Raise seat and tighten adjustment bolt securely_

8


CHECK BRAKE SYSTEM

After you learn how to operate your tractor, check to see that the brake is properly adjusted. See "TO ADJUST BRAKE" in the Service and Adjustments section of this manual.

ASSEMBLE GAUGE WHEELS TO MOWER DECK (See Fig. 5)

The gauge wheels are designed to keep the mower deck in proper position when operating mower, Be sure they are properly adjusted to ensure optimum mower performance,

Adjust mower to desired cutting height (See "TO AD- JUST MOWER CUTTING HEIGHT' in the Operation section of this manual)°

°With mower in desired height of cut position, gauge wheels should be assembled so they are slightly off the

ground. Instatt gauge wheel in appropriate hole with shoulder bolt, 3/8' washer and 3/8-16 Iocknut and tighten securely.

°_Repeat for opposite side installing gauge wheel in same adjustment hole.

Page 8
Image 8
Sears 917.258524 Assembly, Check Tire Pressure, Check Deck Levelness, Check for Proper Position of ALL, Check Brake System

917.258524 specifications

The Sears 917.258524 is a notable addition to the landscape of outdoor power equipment, specifically in the realm of lawn maintenance. This model, known for its durability and efficiency, represents a standard of excellence in residential lawn care machinery.

One of the main features of the Sears 917.258524 is its powerful engine. Equipped with a reliable gasoline engine, this model offers robust performance that allows users to tackle a wide variety of lawn conditions, from smooth suburban lawns to rugged terrains. Its engine is designed to provide high torque, enabling the mower to cut through thick grass and even overgrown areas with ease.

The cutting deck of the 917.258524 is another standout feature. With a generous width, typically around 21 inches, it allows for efficient mowing over larger areas in a shorter amount of time. The adjustable cutting height is a practical attribute, offering multiple settings for different grass types and seasonal conditions. This versatility ensures that users can maintain their lawns at the desired height across various weather patterns.

In terms of technology, the Sears 917.258524 incorporates a self-propelling mechanism, making it easier for users to maneuver across slopes and uneven ground without excessive physical effort. This feature is particularly beneficial for those who may find traditional push mowers cumbersome.

The mower also boasts a user-friendly interface, often equipped with easy-to-reach controls for starting and stopping the engine, as well as for adjusting the speed and cutting height. This intuitive design enhances the overall user experience, making it accessible even for beginners.

Durability is a key characteristic of the Sears 917.258524. Constructed with high-quality materials, both the chassis and the cutting deck are designed to withstand the elements and resist corrosion. This ensures that the mower maintains its performance and appearance over time, providing long-lasting value to consumers.

Finally, the Sears 917.258524 takes maintenance into consideration. With features that simplify cleaning and oil changes, users can easily care for their mower, ensuring it remains in peak condition year after year. Overall, the Sears 917.258524 stands out as a reliable, efficient, and user-friendly option for homeowners seeking to keep their lawns well-manicured.