PARA CAMBIAR LA CORREA DE IMPULSIÓN
1. | Colocar la nueva correa de polea del motor. |
2. | Colocar la otra extremidad de la nueva correa |
| de mando a través del orifi cio en el bastidor. |
3. | Volver a colocar el cortacésped en posición |
| vertical. |
4. | Instalar la nueva correa de mando en el |
| conjunto de la palanca de transmisión, |
| luego alrededor de la polea de mando. Ase- |
| gurarse de que la correa se halle al interior |
| de los dispositivos de fijación de la correa. |
5. | Volver a colocar la conjunto de la palanca |
| de transmisión con el tuerca hexagonal |
| precedentemente quitados. |
6. | Haga descansar la segadora en su lado. |
| Asegúrese que el filtro de aire y que el |
| carburador queden mirando hacia arriba. |
2.Al mismo tiempo que sujeta el conjunto del mango, remueva la manilla y el perno porta- dor del lado opuesto, alinee el agujero en el mango con el agujero deseado en el puntal del mango y vuelva a montar el perno y la manilla y apriételos en forma segura.
3.Alinee el lado opuesto del mango con el agujero de la misma posición y asegúrelos con el perno y la manilla.
CLEANING
IMPORTANT: For best performance, keep mower housing free of built-up grass and trash. Clean the underside of your mower after each use.
 CAUTION: Disconnect spark plug wire from spark plug and place wire where it cannot come in contact with plug.
•Clean underside of mower by scraping to remove build-up of grass and trash.
•Clean engine often to keep trash from accumulating. A clogged engine runs hotter and shortens engine life.
•Keep finished surfaces and wheels free of all gasoline, oil, etc.
•We do not recommend using a garden hose to clean lawn mower unless the electrical system, muffler, air filter and carburetor are covered to keep water out. Water in engine can result in short- ened engine life.
CLEAN UNDER DRIVE COVER
Clean under drive cover at least twice a sea- son. Scrape underside of cover with putty knife or similar tool to remove any build-up of trash or grass on underside of drive cover.
| de los escombros se halle en el orificio del |
| bastidor. |
8. | Ponga la cuchilla en el adaptador de ésta |
| alineando los dos (2) agujeros en la cuchilla |
| con las salientes elevadas en el adaptador. |
9. | Asegúrese de que el borde de salida de |
| la cuchilla (opuesto al borde afilado) esté |
| hacia arriba hacia el motor. |
10. | Instale el perno de la cuchilla con la aran- |
| dela de seguridad y la arandela endurecida |
| en el adaptador de la cuchilla y el cigueñal. |
11. | Use un bloque de madera entre la cuchilla |
| y la caja de la segadora y apriete el perno |
| de la cuchilla girándolo en el sentido en que |
| giran las manillas del reloj. |
•La torsión para apretar recomendada es de 35 – 40 pies libras.
MOTOR
VELOCIDAD DEL MOTOR
La velocidad del motor ha sido ajustada en la fábrica. No trate de aumentar la velocidad del motor pues se pueden producir lesiones
 WARNING: To avoid serious injury, before performing any service or adjust- ments:
1.Release control bar and stop engine.
2.Make sure the blade and all moving parts have completely stopped.
3.Disconnect spark plug wire from spark plug and place wire where it cannot come in contact with plug.
LAWN MOWER
TO ADJUST CUTTING HEIGHT
See “TO ADJUST CUTTING HEIGHT” in the Operation section of this manual.
REAR DEFLECTOR
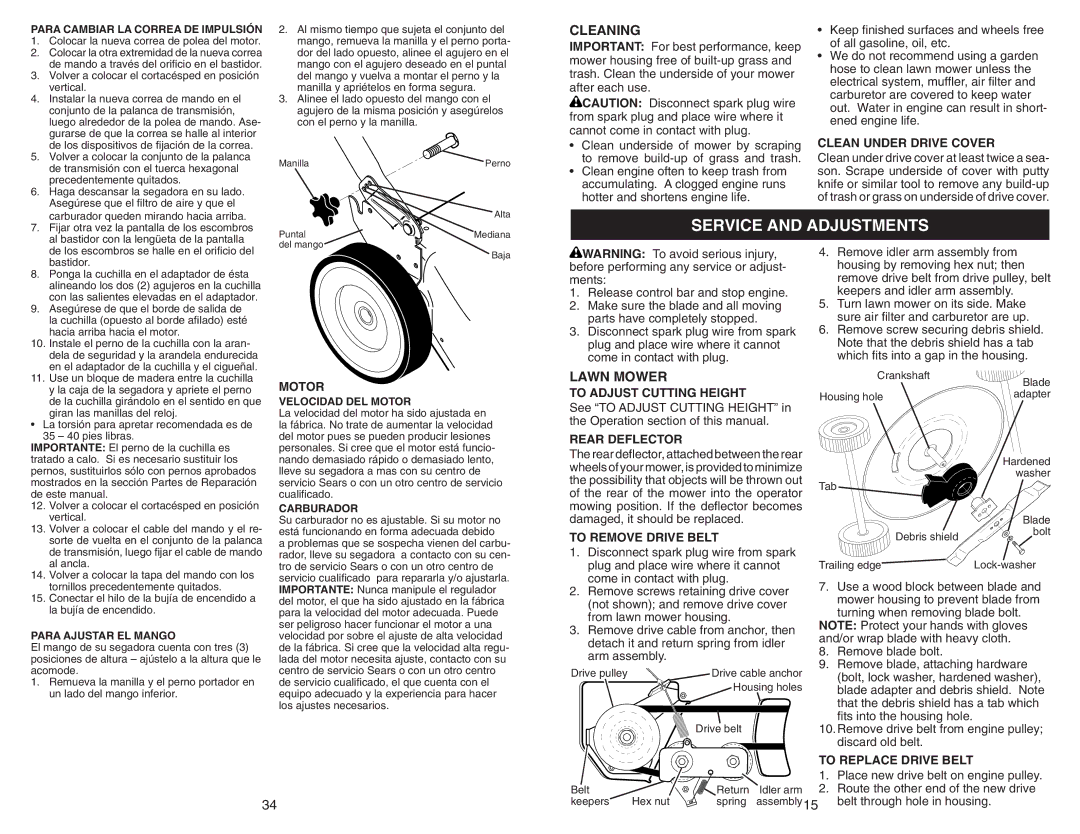
4.Remove idler arm assembly from housing by removing hex nut; then remove drive belt from drive pulley, belt keepers and idler arm assembly.
5.Turn lawn mower on its side. Make sure air filter and carburetor are up.
6.Remove screw securing debris shield. Note that the debris shield has a tab which fits into a gap in the housing.
Crankshaft | Blade |
|
Housing hole | adapter |
IMPORTANTE: El perno de la cuchilla es tratado a calo. Si es necesario sustituir los pernos, sustituirlos sólo con pernos aprobados mostrados en la sección Partes de Reparación de este manual.
12.Volver a colocar el cortacésped en posición vertical.
13.Volver a colocar el cable del mando y el re- sorte de vuelta en el conjunto de la palanca de transmisión, luego fi jar el cable de mando al ancla.
14.Volver a colocar la tapa del mando con los tornillos precedentemente quitados.
15.Conectar el hilo de la bujía de encendido a la bujía de encendido.
PARA AJUSTAR EL MANGO
El mango de su segadora cuenta con tres (3) posiciones de altura – ajústelo a la altura que le acomode.
1.Remueva la manilla y el perno portador en un lado del mango inferior.
personales. Si cree que el motor está funcio- nando demasiado rápido o demasiado lento, lleve su segadora a mas con su centro de servicio Sears o con un otro centro de servicio cualificado.
CARBURADOR
Su carburador no es ajustable. Si su motor no está funcionando en forma adecuada debido
a problemas que se sospecha vienen del carbu- rador, lleve su segadora a contacto con su cen- tro de servicio Sears o con un otro centro de servicio cualificado para repararla y/o ajustarla. IMPORTANTE: Nunca manipule el regulador del motor, el que ha sido ajustado en la fábrica para la velocidad del motor adecuada. Puede ser peligroso hacer funcionar el motor a una velocidad por sobre el ajuste de alta velocidad de la fábrica. Si cree que la velocidad alta regu- lada del motor necesita ajuste, contacto con su centro de servicio Sears o con un otro centro de servicio cualificado, el que cuenta con el equipo adecuado y la experiencia para hacer los ajustes necesarios.
The rear deflector, attached between the rear wheels of your mower, is provided to minimize the possibility that objects will be thrown out of the rear of the mower into the operator mowing position. If the defl ector becomes damaged, it should be replaced.
TO REMOVE DRIVE BELT
1.Disconnect spark plug wire from spark plug and place wire where it cannot come in contact with plug.
2.Remove screws retaining drive cover (not shown); and remove drive cover from lawn mower housing.
3.Remove drive cable from anchor, then detach it and return spring from idler arm assembly.
Drive pulley | Drive cable anchor |
| Housing holes |
Drive belt
| | Hardened |
| | washer |
Tab | | |
| | Blade |
| Debris shield | bolt |
| |
Trailing edge | | Lock-washer |
7.Use a wood block between blade and mower housing to prevent blade from turning when removing blade bolt.
NOTE: Protect your hands with gloves and/or wrap blade with heavy cloth.
8.Remove blade bolt.
9.Remove blade, attaching hardware (bolt, lock washer, hardened washer), blade adapter and debris shield. Note that the debris shield has a tab which fits into the housing hole.
10.Remove drive belt from engine pulley; discard old belt.
TO REPLACE DRIVE BELT