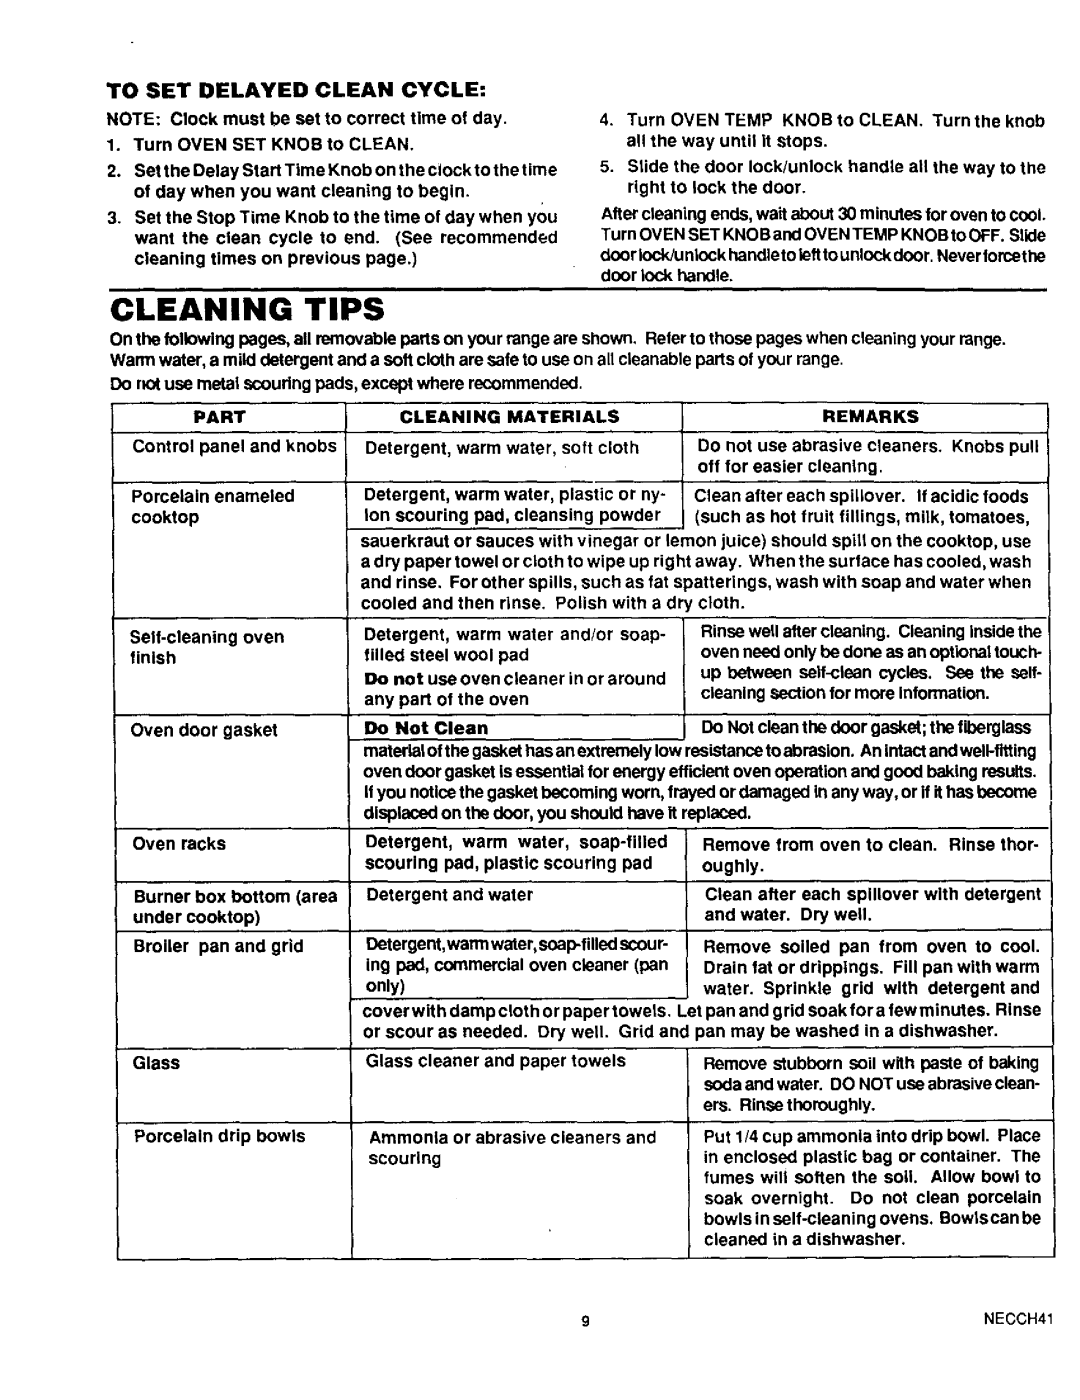
TO SET DELAYED CLEAN CYCLE:
NOTE: Clock must be set to correct time of day.
1.Turn OVEN SET KNOB to CLEAN.
2.Set the Delay Start Time Knob on the clock to the time of day when you want cleaning to begin.
3.Set the Stop Time Knob to the time of day when you want the clean cycle to end. (See recommended cleaning times on previous page.)
4.Turn OVEN TEMP KNOB to CLEAN. Turn the knob all the way until it stops.
5.Slide the door lock/unlock handle all the way to the right to lock the door.
After cleaning ends, wait about 30 minutes for oven to cool. Turn OVEN SET KNOB and OVEN TEMP KNOB to OFF. Slide doorlockiunlock handleto left to unlock door. Nevertorcethe door lock handle.
CLEANING TIPS
On the following pages, all removable parts on your range are shown. Reler to those pages when cleaning your range. Warm water, a mild detergent and a soft cloth are safe to use on all cleanable parts of your range.
Do not use metal scoudng pads, except where recommended. |
|
|
|
|
|
|
| ||||||
| PART |
| CLEANING | MATERIALS |
|
| REMARKS |
|
| ||||
Control panel | and knobs | Detergent, warm water, soft cloth | Do not use abrasive cleaners. | Knobs pull | |||||||||
|
|
|
|
|
| off for easier | cleaning. |
|
|
| |||
Porcelain enameled | Detergent, | warm water, plastic or ny- | Clean after each spillover. | If acidic foods | |||||||||
cooktop |
| ion scouring pad, cleansing powder | (such as hot fruit fillings, milk, tomatoes, | ||||||||||
|
|
| sauerkraut or sauces with vinegar or lemon juice) should spill on the cooktop, use | ||||||||||
|
|
| a dry paper towel or cloth to wipe up right away. When the surlace has cooled, wash | ||||||||||
|
|
| and rinse. For other spills, such as fat spatterings, wash with soap and water when | ||||||||||
|
|
| cooled and then rinse. Polish with a dr t cloth. |
|
|
|
|
|
| ||||
oven | Detergent, warm water and/or soap- | Rinse well after cleaning. Cleaning inside the ! | |||||||||||
oven need only be done as an optional touch- | |||||||||||||
finish |
|
| filled steel wool pad | ||||||||||
|
|
| Do not use oven cleaner in or around | up between | |||||||||
|
|
| cleaning section for more information. | ||||||||||
|
|
| any part of the oven | ||||||||||
|
|
|
|
|
|
|
|
|
| ||||
Oven door gasket | Do Not Clean |
| Do Not clean the door gasket; the fiberglass | ||||||||||
|
|
| material ofthe gasket has an extremely low resistance to abrasion. An intact and | ||||||||||
|
|
| oven door gasket is essential for energy efficient oven operation and good baking results. | ||||||||||
|
|
| It you notice the gasket becoming worn, fm red or damaged in any way, or if ithas become | ||||||||||
|
|
| displaced on the door, you should have it replaced. |
|
|
|
|
|
| ||||
Oven racks |
| Detergent, warm water, | Remove | from oven to | clean. | Rinse thor- | |||||||
|
|
| scouring | pad, plastic scouring pad | oughly. |
|
|
|
|
|
| ||
Burner | box bottom (area | Detergent | and water | Clean after | each | splllover | with detergent | ||||||
under | cooktop) |
|
|
| and water. | Dry well. |
|
|
| ||||
Broiler | pan and grid | Dotergent,warm water, | Remove soiled pan from oven to cool. | ||||||||||
|
|
| ing pad, commercial oven cleaner (pan | Drain fat or drippings. | Fill pan with warm | ||||||||
|
|
| only) |
|
| water. | Sprinkle | grid | with | detergent and | |||
|
|
| cover with damp cloth or paper towels. Let pan and grid soak fora few minutes. Rinse | ||||||||||
|
|
| or scour as needed. Dry well. Grid and pan may be washed in a dishwasher. | ||||||||||
Glass |
|
| Glass cleaner | and paper towels | Remove stubborn soil with paste of baking | ||||||||
|
|
|
|
|
| sodaand water. DO NOT uss abrasiveclean- | |||||||
|
|
|
|
|
| ers. Rinsa thoroughiy. |
|
|
| ||||
Porcelain drip bowls | Ammonia or abrasive cleaners and | Put 1/4 cup ammonia into drip bowl. Place | |||||||||||
|
|
| scouring |
|
| in enclosed | plastic bag or container. The | ||||||
|
|
|
|
|
| fumes will soften the soil. Allow bowl to | |||||||
|
|
|
|
|
| soak overnight. Do not clean porcelain | |||||||
|
|
|
|
|
| bowls in | |||||||
|
|
|
|
|
| cleaned | in a dishwasher. |
|
| ||||
9 | NECCH41 |
