SECO-LARM USA SK-1131-SQ warranty Digital Access Keypad Manual, SECO-LARMU.S.A., Inc, Wiring, Door

Models: SK-1131-SQ

1 8
Download 8 pages 11.72 Kb
Page 7
Image 7
DOOR 1

Digital Access Keypad Manual

WIRING:

Example Wiring, Mantrap Using Two Keypads

DOOR 1

1

2

3

4

5

6

7

8

9

10

11

12

13

14

15

16


OUTPUT 1

EG

(+)

(--)

Door


N.C. C. N.O. IN

12~24V AC/DC

Sens


(+)


GREEN LED (--)

)

O/P 1 Disable

Mantrap control

Common GND


+


N.C.

N.O.


N.C

GREEN LED (


OR


Door 1


Electric


sensor

) GND

1 N.O.


+ Lock

--


+

--


12VDC


To (--

To O/P


power


Diode

(for DC


supply

REMARKS:


1N4004

use only)


Output relay #1


Cathode


N.O. output for fail-secure lock.


N.C. output for fail-safe lock.


control


Egress button (open door 1 from inside).


N.O.

LEDs:


Disable

GND

Additional egress buttons can be


Each LED requires a 1.5K-Ohm

connected in parallel as needed.


series resistor for 24V operation.


1


Digital Access Keypad Manual

WIRING:

Example Wiring, with Connection to Lock Device and Alarm Arm/Disarm


OUTPUT 1

EG


(+) (--)

Door

N.C. C. N.O

IN


12~24V AC/DC

Sens


(+)


N.C.

N.O.


OR


+


--


REMARKS:


Electric


12VDC


Output relay #1


+ Lock


N.O. output for fail-secure lock.


--


power


N.C. output for fail-safe lock.


supply


Diode


(for DC


use only)


1N4004


Cathode


Additional egress buttons


Egress button (inside the


N.O.


N.O.

can be connected in


protected premises)


parallel as needed


1

2

3

4

5

6

7

8

9

10

11

12

13

14

15

16

O/P Mantrap Common

DOOR 2


1

2

3

4

5

6

7

8

9

10

11

12

13

14

15

16


OUTPUT 1 EG

(+)

(--)

Door


N.C. C. N.O. IN

12~24V AC/DC

Sens


(+)


)

)


--

+


N.C. N.O.


N.C


LED (

LED (


GREEN

GREEN


OR


Door 2


Electric


sensor


) GND

1 N.O.


+

Lock --

+

--


12VDC


To (--

To O/P


power


Diode


(for DC

supply

REMARKS:


1N4004


use only)


Output relay #1


Cathode


N.O. output for fail-secure lock.


Egress button (open door


N.C. output for fail-safe lock.


AUX LED

OUTPUT 3 O/P 1 DISABLE


ALARM CONTROL PANEL

WHITE/ORANGE

N.O.


Duress --To 24-hour N.O. zone

LIGHT GREEN

(--)


Com gnd (--) of keypad & alarm system

PURPLE

N.C.


Relay output #2

BLUE

N.O.


Alarm arm/disarm control --


Consult alarm system manual for how

WHITE/BROWN

COM }

to connect for N.C. or N.O. operation

YELLOW

(+)

}

Red LED

}

LEDs:

LIGHT BLUE

(--)

For alarm status


indication. Each LED

GREEN

(+)

}

Green LED

requires a 1.5K-Ohm

GREY

(--)

series resistor for


24V operation.

BLACK

N.C. }

Tamper --


RED

To a 24-hour N.C. zone

2 from inside)

N.O.

LEDs:


Each LED requires a 1.5K-Ohm


series resistor for 24V operation.

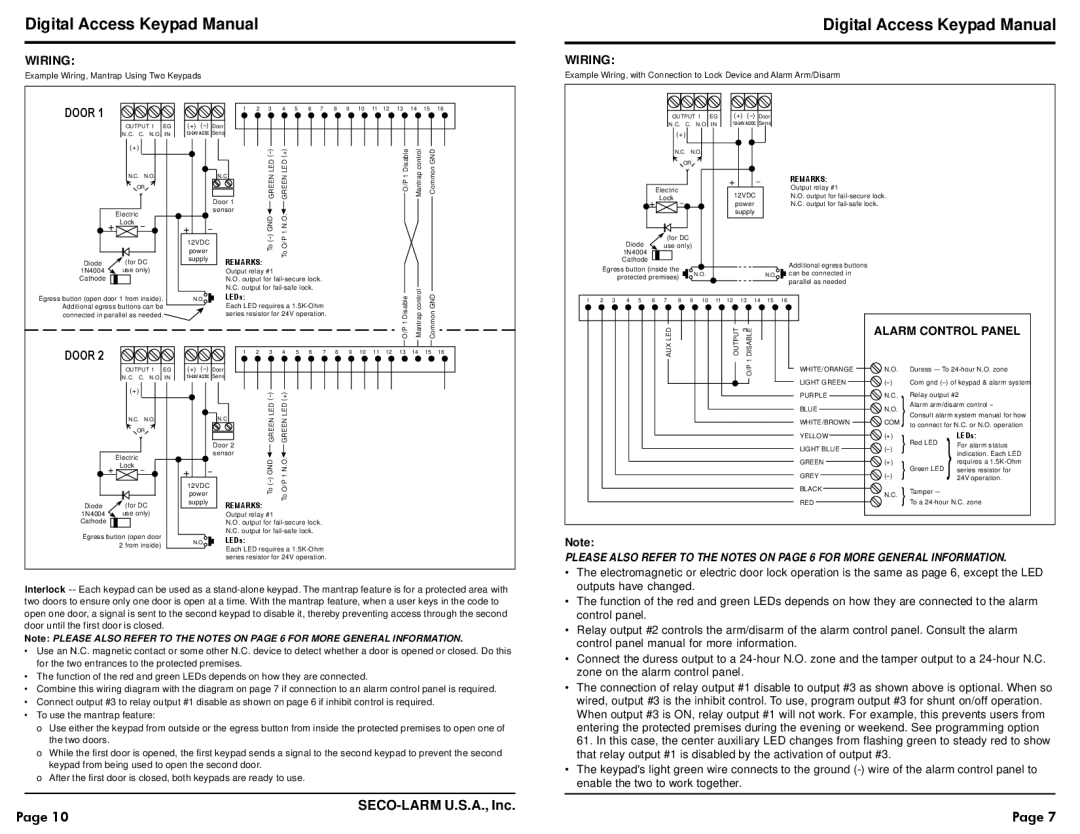
Interlock --Each keypad can be used as a stand-alone keypad. The mantrap feature is for a protected area with two doors to ensure only one door is open at a time. With the mantrap feature, when a user keys in the code to open one door, a signal is sent to the second keypad to disable it, thereby preventing access through the second door until the first door is closed.

Note: PLEASE ALSO REFER TO THE NOTES ON PAGE 6 FOR MORE GENERAL INFORMATION.

Use an N.C. magnetic contact or some other N.C. device to detect whether a door is opened or closed. Do this for the two entrances to the protected premises.

The function of the red and green LEDs depends on how they are connected.

Combine this wiring diagram with the diagram on page 7 if connection to an alarm control panel is required.

Connect output #3 to relay output #1 disable as shown on page 6 if inhibit control is required.

To use the mantrap feature:

o Use either the keypad from outside or the egress button from inside the protected premises to open one of the two doors.

o While the first door is opened, the first keypad sends a signal to the second keypad to prevent the second keypad from being used to open the second door.

o After the first door is closed, both keypads are ready to use.

Note:

PLEASE ALSO REFER TO THE NOTES ON PAGE 6 FOR MORE GENERAL INFORMATION.

The electromagnetic or electric door lock operation is the same as page 6, except the LED outputs have changed.

The function of the red and green LEDs depends on how they are connected to the alarm control panel.

Relay output #2 controls the arm/disarm of the alarm control panel. Consult the alarm control panel manual for more information.

Connect the duress output to a 24-hour N.O. zone and the tamper output to a 24-hour N.C. zone on the alarm control panel.

The connection of relay output #1 disable to output #3 as shown above is optional. When so wired, output #3 is the inhibit control. To use, program output #3 for shunt on/off operation. When output #3 is ON, relay output #1 will not work. For example, this prevents users from entering the protected premises during the evening or weekend. See programming option 61. In this case, the center auxiliary LED changes from flashing green to steady red to show that relay output #1 is disabled by the activation of output #3.

The keypad's light green wire connects to the ground (-) wire of the alarm control panel to enable the two to work together.

Page 10

SECO-LARM U.S.A., Inc.

Page 7

Page 7
Image 7
SECO-LARM USA SK-1131-SQ warranty Digital Access Keypad Manual, SECO-LARMU.S.A., Inc, Wiring, Door, Alarm Control Panel