DV-HR350H DV-HR300H
For this recorder is
Blue Neutral Brown Live
If YOU have ANY DOUBT, Consult a Qualified Electrician
Power Cord Protection
Laser Diode Properties Material DVD AlGaInP
Wave length DVD 658nm
Emission Duration Pulse Laser output Max. DVD 100mW
Contents
Contents
Features
Variety of hard disc tDVD dubbing functions
Comprehensive editing functions
DVD-RW/R recording/playback with outstanding compatibility
Accessories
Features
MP3 file playback
Video Plus+*3 system
Do not use at locations at high temperature
Set up the Recorder so it is hori- zontal
When moving or shipping the Recorder
Do not remove the cabinets
Precautions about Using This Product
About Hard Disc HDD
About DVD
Types of Discs that Can Be Used with This Recorder
Discs that Cannot Be Used with This Recorder
Discs For Recording and Playback
About DVD
Types of Discs for Recording
DVD-RW Discs
DVD-R Discs
VR Video Recording Mode
Video Mode
Recording Formats
Recording Time
Using the Proper Disc
When you want to play Recordable Video mode
Compatible When you want to play Recordable Video mode
Objective Disc Used
About the Contents of the Disc
Initialization and Finalization
About the Contents of the Disc
Copyright
Disc Precautions
Important Information
Major Components
Main Unit Front
Front Panel Display
Main Unit Rear
Remote Control Unit
Major Components
Loading the Batteries
Remote sensor
Setting the Remote Control Code
Setting the Manufacturer’s Code
Setting the Remote Con- trol Code of the Remote
Setting the Remote Con- trol Code of the Recorder
Connection Using Antenna Cables and Scart
Basic Connection
To Line 1TV
Scart
Using Other Types of Video Output
Basic Connection
Output jack
To component
Auto Installation
Turning the Power On
Using the Auto Installation for initial setting
To Turn the Power Off
Auto Installation
When connecting with Aerial
When connecting with Scart cable
Press Return Next to display the Clock setting screen
Basic Start Menu Operation
About Start Menu
About Start Menu
Enter
Clock Setting
Clock Setting
Channel Setting
Channel Setting
Channel Sort
SET/ENTER
Channel Setting
Press SET/ENTER twice to cancel the channel
Deleting Channels
Re-naming Channels
Post Code
Post Code Security
Changing PIN Number
This must be a 4 digit number in the range 0000
Content of TV Screen Display
Display Information
Checking the Channel Remaining Time of HDD Number of Titles
Press on Screen under the cover or HDD again
Checking the Channel Remaining Time of DVD Number of Titles
Switching Front Panel Display
Display Information
Buttons on Remote Control
Buttons on Recorder Turn on the power of TV
Switch TV input to the AV
Press
Time Shift Viewing Pause
Chasing Playback PausePlay
Fast Reverse/Forward Playback
Time shift recording
Chasing Playback
Time Shift Viewing/Chasing Playback
Time Shift Viewing
Recording to HDD
Inserting Chapter Marks Manually during Recording
Recording to HDD
Direct Recording to HDD
Direct Recording to DVD
Recording to DVD
Loading Disc
Setting Record End Time during Direct Recording
About Recording to DVD in Video Mode
Recording to DVD
Set a DVD-RW or DVD-R disc
HDD Recording Mode DVD-RW/R Recording Mode Recording Time
DV-HR350H DV-HR300H
Function
Setting the Manual Recording Mode MN
Direct Recording the TV programme you are watching
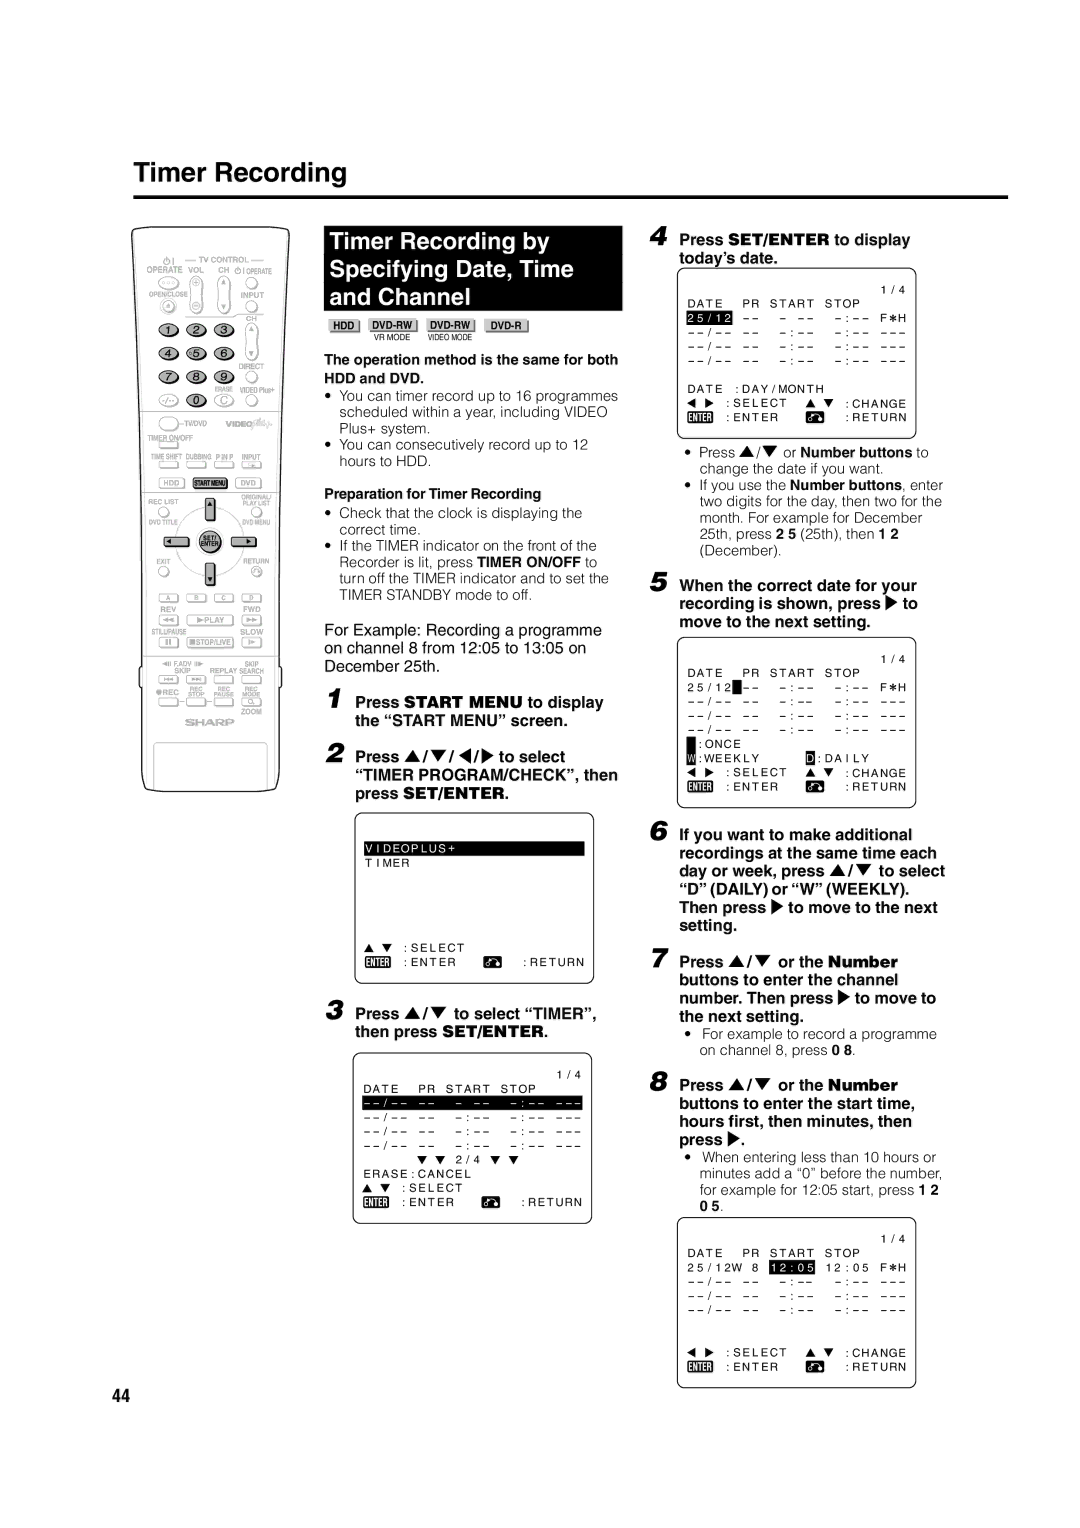
Timer Recording
Timer Recording with Video Plus+ system
When Mmanual 1~32 is selected
Press Number buttons to enter the PlusCode number
To stop recording while timer recording is in progress
Timer Recording
To check, change or cancel timer settings
Press SET/ENTER to display today’s date
Timer Recording by Specifying Date, Time and Channel
Press / to select TIMER, then press SET/ENTER
If any more timer recordings are to be set, repeat to
For example for 1305 stop, press 1
Confirm, Change Cancel a Timer Programme
Cancelling
Confirming
Changing
Dubbing HDD/DVD
Dubbing Method and Dubbing Types
Limitation during Dubbing
Dubbing Direction and Dubbing Speed
Dubbing HDD/DVD
When dubbing from HDD to
When dubbing from DVD to
Dubbing HDD↔DVD High Speed Dubbing
HDD→DVD
To Stop Dubbing
Front Panel Display during Dubbing
Press Dubbing
You can also stop dubbing by pressing STOP/LIVE or REC Stop
When You Cannot High Speed Dub
When You Cannot Record
When You Cannot Dub
Eliminating problems Recording, Timer Recording, Dubbing
When You Cannot Timer Record
HDD Playback
Playback
Resume playback function
Inserting Chapter Marks during Playback
HDD Playback
Playback from REC List
To Stop Playback
About REC List
Playback by Selecting Title Number Direct Playback
You can start playback from the title you want to see
Other Types of Playback
Switching Audio
Zoom
Repeat Playback of a Title or Chapter Repeat Play- back
Repeat Playback Repeat Playback of a Specified Part
DVD/CD Playback
DVD-RW/R Playback
To Record a Chapter Mark during Playback
Playback by Selecting Title
Audio CD/Video CD Playback
DVD/CD Playback
DVD Video Playback
When playing back a DVD
When playing back a video CD or audio
Skipping to the Beginning of a Chapter Track
Playback by Selecting a Title Track Number Direct Playback
Function Control
Switching Subtitles
Switching Angle
Using the Disc Menu
Playback by Selecting With the Menu in the DVD
Playback by Selecting a Title from the Title Menu
Language
MP3 File Playback
To Play Another File music title during Playback
To Skip the File during Playback
Menu
Settings During Playback
Procedure
Function Control
Function Control Operation
Settings During Playback
Viewing Another
Programme Recorded on HDD while Recording to
HDD
Simultaneous Recording Playback
How to Use
Function Menu
Function Menu
Press REC List or select REC List in Start Menu screen
Editing Procedure
Recordings on HDD, or on DVD-RW in VR mode
Recordings on DVD-RW/R in Video mode
Editing HDD/DVD
Original and Play List
Switching between
Editing HDD/DVD
Before Starting Editing
Edit Menu
Editing an Original Title HDD/DVD
Searching for the Start Point and End Point Scenes
Change Title Name
Inputting/Changing Title Name Change Title
Name
Changing Thumbnail
Change Thumbnail
Change Thumbnail
If this is the screen you want, select YES by pressing \
Making Sections in a Title
Divide Chapter
To Cancel Title Protect
Combining Chapters Together
Combine Chapters
Disabling Title Edit Erase Title Protect
Erasing All Titles
Erasing by Selecting a Title or Chapter
Editing a Play List HDD/DVD
Creating a Play List
TITLE/CHAPTER
Specified Scene
Editing a Play List HDD/DVD
Adding a Scene from an
Original to a Play List
ADD Scene
Adding a Title or Chap- ter
Specifying and Adding a
Scene
Press SET/ENTER at the end of the scene you want to add
Changing the Title Sequence Move Title
Freely changes the sequence of titles
Erasing Unnecessary Scenes Erase Scene
Inputting/Changing Title Name
Change Title Name
Select Edit at the Edit
Enjoying High Quality Sounds
DTS or Mpeg Audio with a Digital Connection
Enjoying High Quality Sounds
Playing 2 Channel Audio with a Digital Connection
Audio CD or Video CD
DVD Video Disc
Audio Mode
Recording from a Digital Camcorder Using i.LINK
Input of Video, Audio and Data Signals
Recording from External Equipment
Recording with This Recorder DV Capture
Recording from a Camcorder VCR Using an Analogue Connection
Example
To record to HDD
To record to DVD
Function Setting
Functions under Other Settings
Function Setting
Basic Operation for REC. Function Setting
Country Code List
Language Code List
VIEW/PLAY Setting
Password Setting
Disc Language Setting
Basic Operation for
Normal
Letter BOX
PAN Scan
BIT Stream
OFF
To perform high speed dubbing from the HDD to a DVD in Video
DV Link
DV Audio Input
OFF Stereo
+ Stereo
Adjustment Setting
Press \/ to select Adjust
Ment
Press \/ to select the de- sired option, then press SET
Comp
Auto
RGB
Mode Setting
About NICAM/A2
Chxx
Number buttons
Adjust
TIMEXXXX24H
Yearxx
∗AUTO/-OFF
With a DVD-RW in VR mode, initialize in VR mode
When recording
You can initialize in either VR mode or Video mode
Finalization
INITIALIZE/FINALIZE
100
Troubleshooting
Problem
102
Troubleshooting
Problem Suggested Solution
103
On-screen Error Messages
Error message Possible Error Suggested Solution
On-screen Error Messages
105
106
Glossary
Glossary
109
Specifications
General
Terms of Guarantee
0201
Sharp Corporation
Printed on 100% post-consumer recycled paper