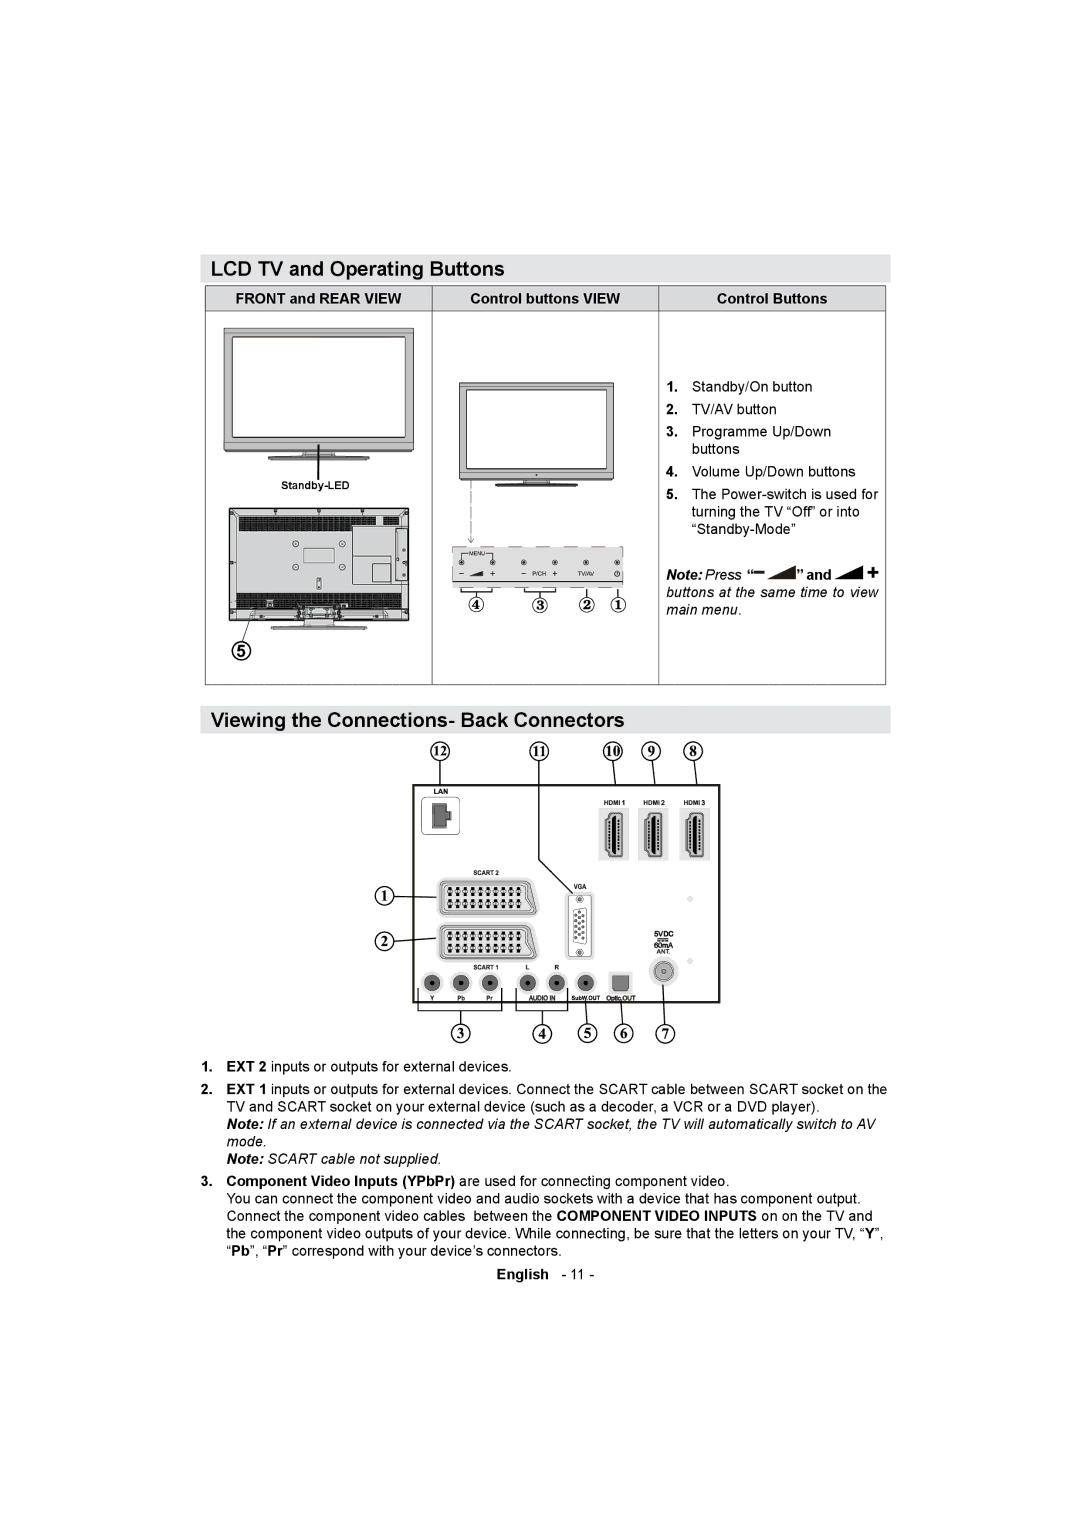
LCD TV and Operating Buttons
FRONT and REAR VIEW | Control buttons VIEW | Control Buttons |
|
|
|
|
|
|
|
|
|
|
|
|
| 1. | Standby/On button | |
|
|
|
|
|
|
|
|
|
|
|
|
| |||
|
|
|
|
|
|
|
|
|
|
|
|
| 2. | TV/AV button |
|
|
|
|
|
|
|
|
|
|
|
|
|
| 3. | Programme Up/Down | |
|
|
|
|
|
|
|
|
|
|
|
|
|
| buttons |
|
|
|
|
|
|
|
|
|
|
|
|
|
|
|
| |
|
|
|
|
| 4. | Volume Up/Down buttons | |||||||||
|
|
|
|
| 5. | The | |||||||||
|
|
|
|
|
|
|
|
|
|
|
|
| |||
|
|
|
|
|
|
|
|
|
|
|
|
|
| turning the TV “Off” or into | |
|
|
|
|
|
|
|
|
|
|
|
|
|
| ||
|
|
|
|
|
|
|
|
|
|
|
|
|
|
| |
|
|
|
|
|
|
|
|
|
|
|
|
|
|
| |
|
|
|
|
|
|
|
|
|
|
|
|
| Note: Press “ | ” and | |
|
|
|
|
|
|
|
|
|
|
|
|
| |||
|
|
|
|
|
|
|
|
|
|
|
|
| |||
|
|
|
|
|
|
|
|
|
|
|
|
| |||
|
|
|
|
|
|
|
|
|
|
|
|
| buttons at the same time to view | ||
|
|
|
|
|
|
|
|
|
|
|
|
| |||
|
|
|
|
|
|
|
|
|
|
|
|
| main menu. |
| |
|
|
|
|
|
|
|
|
|
|
|
|
|
|
|
|
|
|
|
|
|
|
|
|
|
|
|
|
|
|
|
|
|
|
|
|
|
|
|
|
|
|
|
|
|
|
|
|
Viewing the Connections- Back Connectors
1.EXT 2 inputs or outputs for external devices.
2.EXT 1 inputs or outputs for external devices. Connect the SCART cable between SCART socket on the TV and SCART socket on your external device (such as a decoder, a VCR or a DVD player).
Note: If an external device is connected via the SCART socket, the TV will automatically switch to AV mode.
Note: SCART cable not supplied.
3.Component Video Inputs (YPbPr) are used for connecting component video.
You can connect the component video and audio sockets with a device that has component output. Connect the component video cables between the COMPONENT VIDEO INPUTS on on the TV and the component video outputs of your device. While connecting, be sure that the letters on your TV, “Y”, “Pb”, “Pr” correspond with your device’s connectors.
English - 11 -
