Preparation
Attaching the stand unit (for 80 inch models)
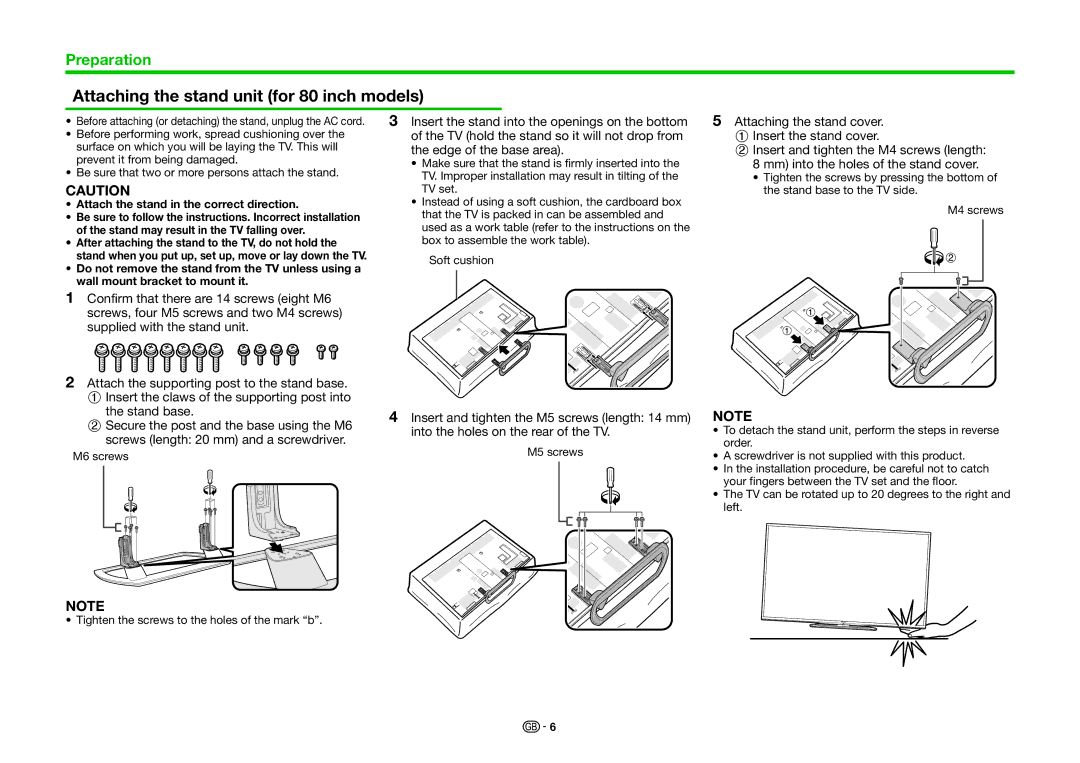
• Before attaching (or detaching) the stand, unplug the AC cord. | 3 Insert the stand into the openings on the bottom | 5 Attaching the stand cover. | |
• Before performing work, spread cushioning over the | of the TV (hold the stand so it will not drop from | 1Insert the stand cover. | |
surface on which you will be laying the TV. This will | the edge of the base area). | 2Insert and tighten the M4 screws (length: | |
prevent it from being damaged. | • Make sure that the stand is firmly inserted into the | 8 mm) into the holes of the stand cover. | |
• Be sure that two or more persons attach the stand. | |||
TV. Improper installation may result in tilting of the | • Tighten the screws by pressing the bottom of | ||
CAUTION | |||
TV set. | the stand base to the TV side. | ||
• Attach the stand in the correct direction. | • Instead of using a soft cushion, the cardboard box | M4 screws | |
• Be sure to follow the instructions. Incorrect installation | that the TV is packed in can be assembled and | ||
| |||
of the stand may result in the TV falling over. | used as a work table (refer to the instructions on the |
| |
• After attaching the stand to the TV, do not hold the | box to assemble the work table). |
| |
stand when you put up, set up, move or lay down the TV. | Soft cushion |
| |
• Do not remove the stand from the TV unless using a |
| ||
|
| ||
wall mount bracket to mount it. |
|
|
1 Confirm that there are 14 screws (eight M6 screws, four M5 screws and two M4 screws) supplied with the stand unit.
2 Attach the supporting post to the stand base. |
| |
1Insert the claws of the supporting post into |
| |
the stand base. | 4 Insert and tighten the M5 screws (length: 14 mm) | |
2Secure the post and the base using the M6 | into the holes on the rear of the TV. | |
screws (length: 20 mm) and a screwdriver. | ||
M5 screws | ||
M6 screws | ||
|
NOTE
•To detach the stand unit, perform the steps in reverse order.
•A screwdriver is not supplied with this product.
•In the installation procedure, be careful not to catch your fingers between the TV set and the floor.
•The TV can be rotated up to 20 degrees to the right and left.
NOTE
•Tighten the screws to the holes of the mark “b”.
![]()
![]() 6
6