R-1500

R-1501

R-1505

R-1506

TEST PROCEDURES

PROCEDURE


COMPONENT TEST


LETTER


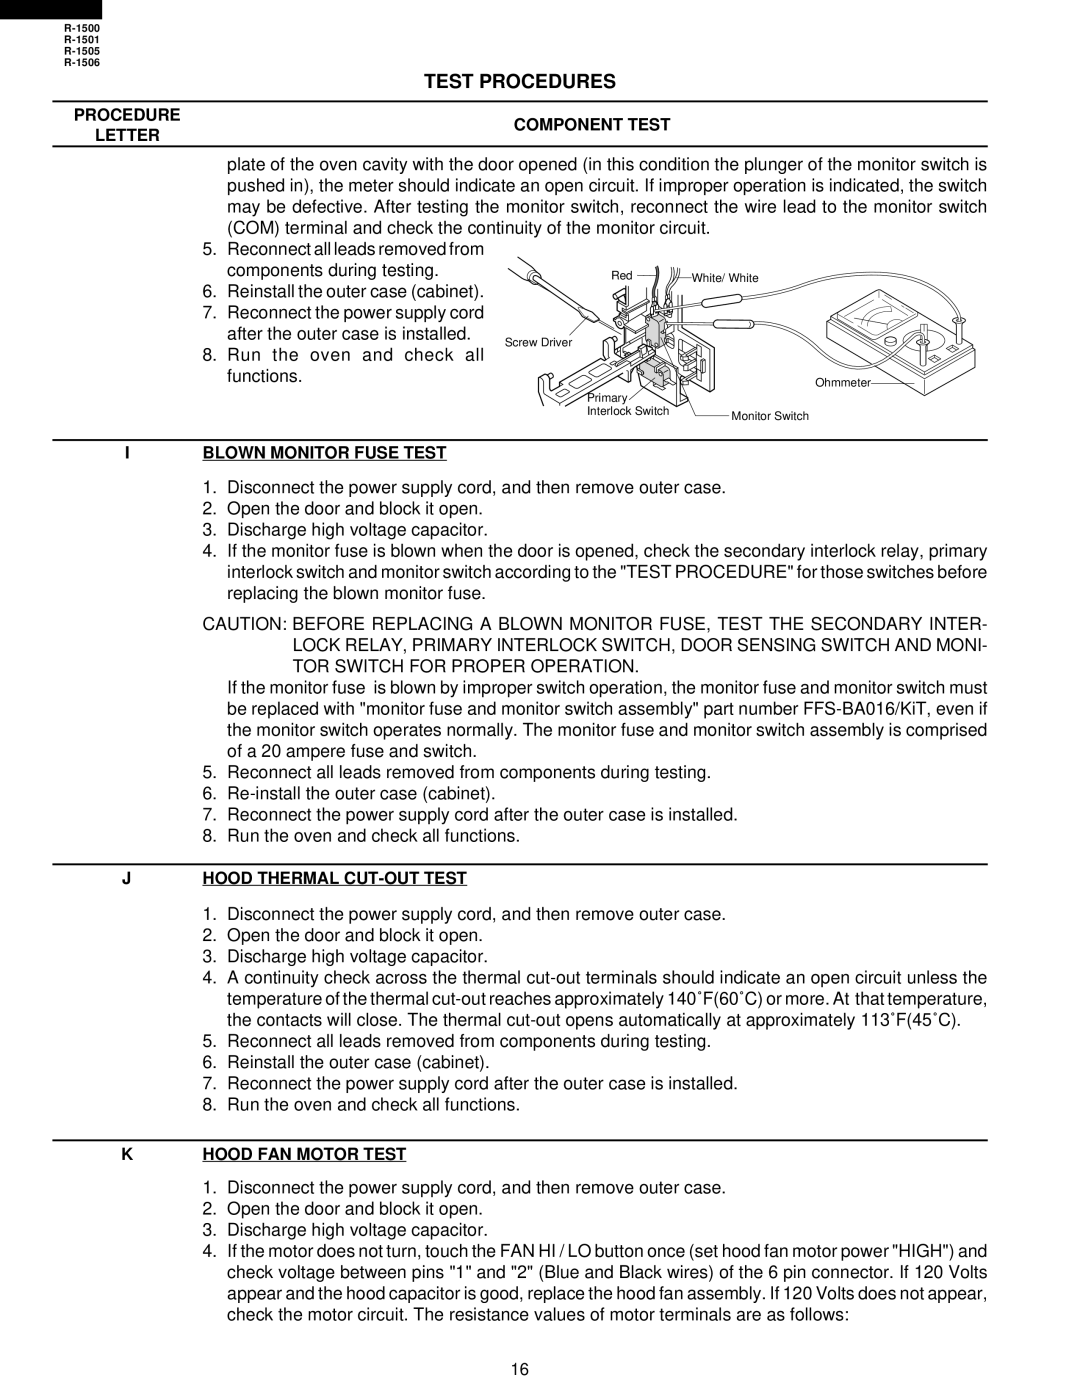
plate of the oven cavity with the door opened (in this condition the plunger of the monitor switch is


pushed in), the meter should indicate an open circuit. If improper operation is indicated, the switch


may be defective. After testing the monitor switch, reconnect the wire lead to the monitor switch


(COM) terminal and check the continuity of the monitor circuit.


5. Reconnect all leads removed from


components during testing.

Red

White/ White


6. Reinstall the outer case (cabinet).


7. Reconnect the power supply cord


after the outer case is installed.

Screw Driver


8. Run the oven and check all


functions.


Ohmmeter


Primary


Interlock Switch

Monitor Switch


IBLOWN MONITOR FUSE TEST

1.Disconnect the power supply cord, and then remove outer case.

2.Open the door and block it open.

3.Discharge high voltage capacitor.

4.If the monitor fuse is blown when the door is opened, check the secondary interlock relay, primary interlock switch and monitor switch according to the "TEST PROCEDURE" for those switches before replacing the blown monitor fuse.

CAUTION: BEFORE REPLACING A BLOWN MONITOR FUSE, TEST THE SECONDARY INTER- LOCK RELAY, PRIMARY INTERLOCK SWITCH, DOOR SENSING SWITCH AND MONI- TOR SWITCH FOR PROPER OPERATION.

If the monitor fuse is blown by improper switch operation, the monitor fuse and monitor switch must be replaced with "monitor fuse and monitor switch assembly" part number FFS-BA016/KiT, even if the monitor switch operates normally. The monitor fuse and monitor switch assembly is comprised of a 20 ampere fuse and switch.

5.Reconnect all leads removed from components during testing.

6.Re-install the outer case (cabinet).

7.Reconnect the power supply cord after the outer case is installed.

8.Run the oven and check all functions.

JHOOD THERMAL CUT-OUT TEST

1.Disconnect the power supply cord, and then remove outer case.

2.Open the door and block it open.

3.Discharge high voltage capacitor.

4.A continuity check across the thermal cut-out terminals should indicate an open circuit unless the temperature of the thermal cut-out reaches approximately 140˚F(60˚C) or more. At that temperature, the contacts will close. The thermal cut-out opens automatically at approximately 113˚F(45˚C).

5.Reconnect all leads removed from components during testing.

6.Reinstall the outer case (cabinet).

7.Reconnect the power supply cord after the outer case is installed.

8.Run the oven and check all functions.

KHOOD FAN MOTOR TEST

1.Disconnect the power supply cord, and then remove outer case.

2.Open the door and block it open.

3.Discharge high voltage capacitor.

4.If the motor does not turn, touch the FAN HI / LO button once (set hood fan motor power "HIGH") and check voltage between pins "1" and "2" (Blue and Black wires) of the 6 pin connector. If 120 Volts appear and the hood capacitor is good, replace the hood fan assembly. If 120 Volts does not appear, check the motor circuit. The resistance values of motor terminals are as follows:

16

Page 18
Image 18
Sharp R-1501 Procedure Component Test Letter, Blown Monitor Fuse Test, Hood Thermal CUT-OUT Test, Hood FAN Motor Test

R-1506, R-1501, R-1505, R-1500 specifications

The Sharp R-1500, R-1505, R-1501, and R-1506 are part of Sharp's extensive line of microwave ovens, showcasing advanced cooking technologies and user-friendly features that cater to the modern kitchen. These models are designed to provide convenience and efficiency while delivering consistent cooking results.

One of the standout features across these models is the use of Sharp's innovative microwave technology, which ensures even heating and cooking. This is achieved through a combination of advanced microwave distribution systems that help to minimize cold spots common in traditional microwaves. As a result, users can enjoy perfectly cooked meals, whether it's reheating leftovers or preparing a fresh dish.

Each model comes equipped with a variety of cooking presets that simplify meal preparation. These presets are tailored for a range of foods, including popcorn, pizza, vegetables, and baked goods. With just the press of a button, users can automatically adjust the cooking time and power level, making the cooking process intuitive and hassle-free.

The R-1500 and R-1505 models, in particular, offer a sleek and modern design that can seamlessly blend into any kitchen décor. The front-facing control panel is easy to read and navigate, while the spacious interior can accommodate larger dishes, making these models ideal for family meals or entertaining guests.

In addition to their cooking capabilities, these microwaves prioritize energy efficiency and safety. With features like a child lock function and an eco-mode, users can have peace of mind knowing that their appliance is safe for the entire family and environmentally conscious.

The R-1501 model adds additional versatility by including a grill function, allowing users to achieve that perfect crispiness on meats and vegetables. This feature enhances the range of cooking options available, making it suitable for those who enjoy grilling but may not have the outdoor space or equipment.

Lastly, the R-1506 combines the benefits of microwave cooking with user-friendly features such as a digital display and programmable timers. This model is particularly well-suited for busy households, as it allows for quick meal prep without sacrificing quality.

In summary, the Sharp R-1500, R-1505, R-1501, and R-1506 microwave ovens represent a blend of advanced technology, safety features, and user-convenience. They cater to a broad spectrum of cooking needs, from basic reheating to more complex meal preparations, all while maintaining a focus on efficiency and style.