P r i n t e l l i g e n c e ( M ) S d n . B h d
Part names
The ![]() mark indicates the page numbers with more detailed information.
mark indicates the page numbers with more detailed information.
 Remote control
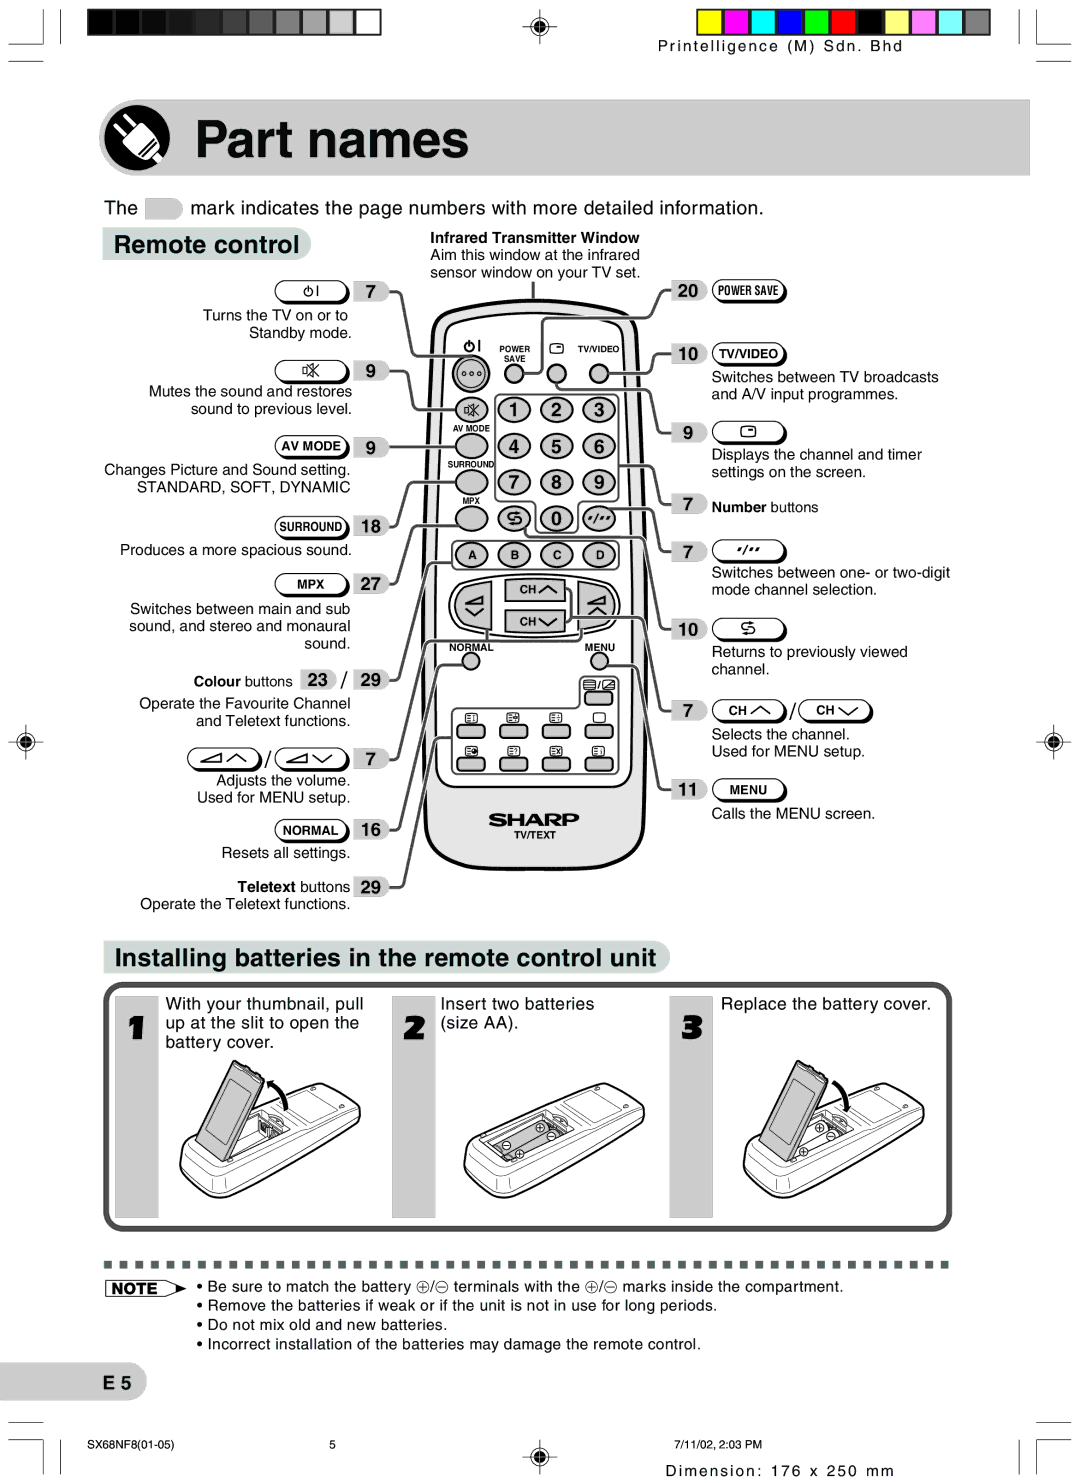
7
Turns the TV on or to
Standby mode.
9
Mutes the sound and restores sound to previous level.
AV MODE 9
Changes Picture and Sound setting.
STANDARD, SOFT, DYNAMIC
SURROUND 18
Produces a more spacious sound.
MPX 27
Switches between main and sub sound, and stereo and monaural sound.
Colour buttons 23 / 29
Operate the Favourite Channel and Teletext functions.
![]() /
/ ![]() 7
7
Adjusts the volume.
Used for MENU setup.
NORMAL 16
Resets all settings.
Teletext buttons 29
Operate the Teletext functions.
Infrared Transmitter Window Aim this window at the infrared sensor window on your TV set.
POWER ![]() TV/VIDEO
TV/VIDEO
SAVE
1 2 3
AV MODE
4 5 6
SURROUND
7 8 9
MPX
0
A B C D
CH![]()
CH![]()
NORMALMENU
TV/TEXT
20POWER SAVE
10TV/VIDEO
Switches between TV broadcasts and A/V input programmes.
9
Displays the channel and timer settings on the screen.
7Number buttons
7
Switches between one- or
10
Returns to previously viewed channel.
7 CH ![]() / CH
/ CH ![]()
Selects the channel.
Used for MENU setup.
11MENU
Calls the MENU screen.
 Installing batteries in the remote control unit
With your thumbnail, pull |
|
|
|
|
| Insert two batteries |
|
|
|
|
| Replace the battery cover. | ||||||||||||||||||||||||||||||||||||||||||||||||||||||||||||||||||||||||||||||||||||
up at the slit to open the |
|
|
|
|
| (size AA). |
|
|
|
|
|
|
|
|
|
|
|
|
|
|
|
|
|
|
|
|
|
|
|
|
|
|
|
|
|
|
| |||||||||||||||||||||||||||||||||||||||||||||||||||||||||||
battery cover. |
|
|
|
|
|
|
|
|
|
|
|
|
|
|
|
|
|
|
|
|
|
|
|
|
|
|
|
|
|
|
|
|
|
|
|
|
|
|
|
|
|
|
|
|
|
|
|
|
|
|
|
|
|
|
|
|
|
|
|
|
|
|
|
|
|
|
|
| ||||||||||||||||||||||||||||
|
|
|
|
|
|
|
|
|
|
|
|
|
|
|
|
|
|
|
|
|
|
|
|
|
|
|
|
|
|
|
|
|
|
|
|
|
|
|
|
|
|
|
|
|
|
|
|
|
|
|
|
|
|
|
|
|
|
|
|
|
|
|
|
|
|
|
|
|
|
|
|
|
|
|
|
|
|
|
|
|
|
|
|
|
|
|
|
|
|
|
|
|
|
|
|
|
|
|
|
|
|
|
|
|
|
|
|
|
|
|
|
|
|
|
|
|
|
|
|
|
|
|
|
|
|
|
|
|
|
|
|
|
|
|
|
|
|
|
|
|
|
|
|
|
|
|
|
|
|
|
|
|
|
|
|
|
|
|
|
|
|
|
|
|
|
|
|
|
|
|
|
|
|
|
|
|
|
|
|
|
|
|
|
|
|
|
|
|
|
|
|
|
|
|
|
|
|
|
|
|
|
|
|
|
|
|
|
|
|
|
|
|
|
|
|
|
|
|
|
|
|
|
|
|
|
|
|
|
|
|
|
|
|
|
|
|
|
|
|
|
|
|
|
|
|
|
|
|
|
|
|
|
|
|
|
|
|
|
|
|
|
|
|
|
|
|
|
|
|
|
|
|
|
|
|
|
|
|
|
|
|
|
|
|
|
|
|
|
|
|
|
|
|
|
|
|
|
|
|
|
|
|
|
|
|
|
|
|
|
|
|
|
|
|
|
|
|
|
|
|
|
|
|
|
|
|
|
|
|
|
|
|
|
|
|
|
|
|
|
|
|
|
|
|
|
|
|
|
|
|
|
|
|
|
|
|
|
|
|
|
|
|
|
|
|
|
|
|
|
|
|
|
|
|
|
|
|
|
|
|
|
|
|
|
|
|
|
|
|
|
|
|
|
|
|
|
|
|
|
|
|
|
|
|
|
|
|
|
|
|
|
|
|
|
|
|
|
|
|
|
|
|
|
|
|
|
|
|
|
|
|
|
|
|
|
|
|
|
|
|
|
|
|
|
|
|
|
|
|
|
|
|
|
|
|
|
|
|
|
|
|
|
|
|
|
|
|
|
|
|
|
|
|
|
|
|
|
|
|
|
|
|
|
|
|
|
|
|
|
|
|
|
|
|
|
|
|
|
|
|
|
|
|
|
|
|
|
|
|
|
|
|
|
|
|
|
|
|
|
|
|
|
|
|
|
|
|
|
|
|
|
|
|
|
|
|
|
|
|
|
|
|
|
|
|
|
|
|
|
|
|
|
|
|
|
|
|
|
|
|
|
|
|
|
|
|
|
|
|
|
|
|
|
|
|
|
|
|
|
|
|
|
|
|
|
|
|
|
|
|
|
|
|
|
|
|
|
|
|
|
|
|
|
|
|
|
|
|
|
|
|
|
|
|
|
|
|
|
|
|
|
|
|
|
|
|
|
|
|
|
|
|
|
|
|
|
|
|
|
|
|
|
|
|
|
|
|
|
|
|
|
|
|
|
|
|
|
|
|
|
|
|
|
|
|
|
|
|
|
|
|
|
|
|
|
|
|
|
• Be sure to match the battery j/k terminals with the j/k marks inside the compartment.
•Remove the batteries if weak or if the unit is not in use for long periods.
•Do not mix old and new batteries.
•Incorrect installation of the batteries may damage the remote control.
E 5
5 | 7/11/02, 2:03 PM |
D i m e n s i o n : 1 7 6 x 2 5 0 m m