10/15 Hour Maintenance | 40/50 Hour Maintenance |
Installing and Adjusting the Guide Bar and Saw Chain
MAINTENANCE
35719
■Remove and clean the spark plug. Adjust the spark plug gap to 0.024" (0.6 mm), and reinstall. If a torque wrench is available, torque the plug to 148Ð165
CAUTION!
Incorrect spark plug installation can result in serious engine damage!
Never allow chips or other debris to enter the cylinder bore! Before removing the spark plug, thoroughly clean the spark plug and cylinder head area!
■Remove the guide bar and chain. Carefully inspect the drive sprocket for wear or damage, and replace if needed. Inspect the guide bar grooves and tip for wear or dam- age, and repair or replace compo- nents as required.
IMPORTANT!
Always replace the drive sprocket and cutting chain loop as a set! For economy, rotate the same 2 or 3 chains daily. When these chains are worn out, replace both the chains and the sprocket at the same time.
■Replace the spark plug with a Champion CJ6Y (or equivalent), gapped to 0.024" (0.6 mm). For EMC compliance use NGK BPMR 7A.
■Extract the fuel filter from inside the fuel tank. Remove and wash both filter elements in clean fuel. If you discover damage or deterioration to the fuel lines or other fuel system components, remove the saw from service until it can be inspected by a
35720 |
CAUTION!
The fuel line can be punctured or torn by careless handling! Never use sharp or
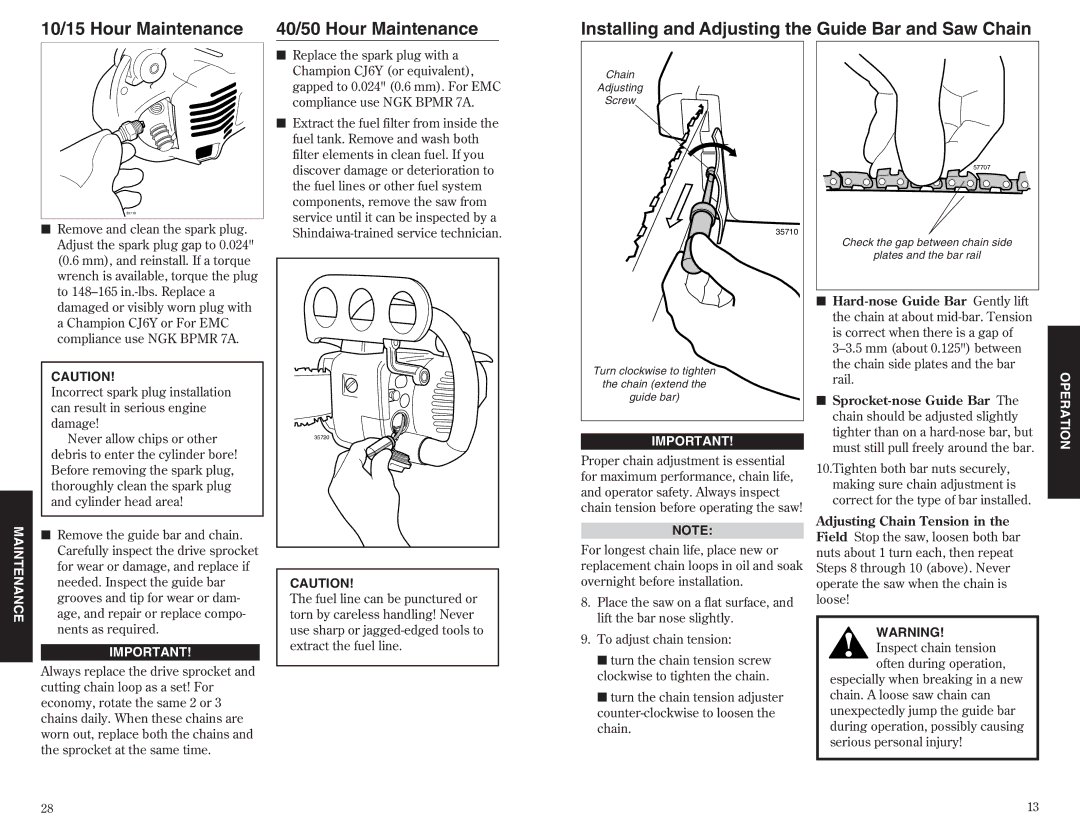
Chain
Adjusting
Screw
35710
Turn clockwise to tighten
the chain (extend the
guide bar)
IMPORTANT!
Proper chain adjustment is essential for maximum performance, chain life, and operator safety. Always inspect chain tension before operating the saw!
NOTE:
For longest chain life, place new or replacement chain loops in oil and soak overnight before installation.
8.Place the saw on a flat surface, and lift the bar nose slightly.
9.To adjust chain tension:
■turn the chain tension screw clockwise to tighten the chain.
■turn the chain tension adjuster
57707 |
Check the gap between chain side |
plates and the bar rail |
■
■
10.Tighten both bar nuts securely, making sure chain adjustment is correct for the type of bar installed.
Adjusting Chain Tension in the
Field Stop the saw, loosen both bar nuts about 1 turn each, then repeat Steps 8 through 10 (above). Never operate the saw when the chain is loose!
WARNING!
Inspect chain tension often during operation,
especially when breaking in a new chain. A loose saw chain can unexpectedly jump the guide bar during operation, possibly causing serious personal injury!
OPERATION
28 | 13 |