Assembly

Prior to assembly

Before assembling, make sure you have all the components required for a complete unit:

Engine assembly Outer tube assembly Drum kit with gearcase

Kit containing operator’s handle, hardware, owner/operator's manual, tool kit for routine maintenance. Tool kits vary by model and may inclue a hex wrench, spanner, and a combina- tion spark plug wrench/screwdriver.

Carefully inspect all components for damage before assembling.

WARNING!

Do not make unauthorized modifications or alterations to your pruner or its components.

Connect the Outer Tube to the Powerhead

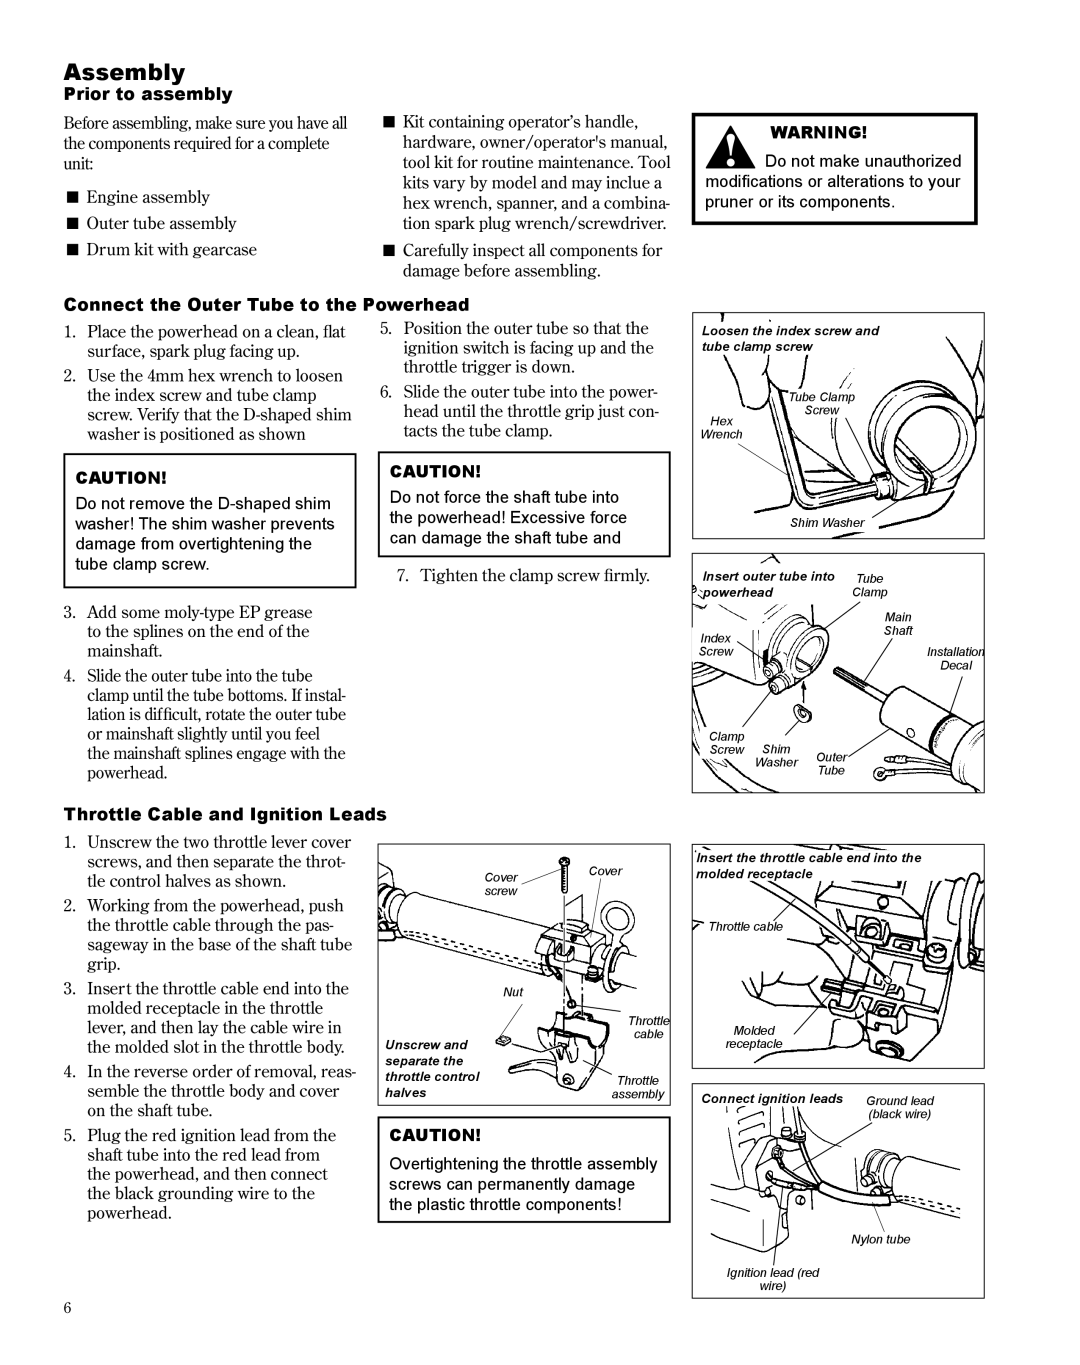
1.

Place the powerhead on a clean, flat


surface, spark plug facing up.

2.

Use the 4mm hex wrench to loosen


the index screw and tube clamp

5.

Position the outer tube so that the


ignition switch is facing up and the


throttle trigger is down.

6.

Slide the outer tube into the power-

Loosen the index screw and tube clamp screw

Tube Clamp

screw. Verify that the D-shaped shim

head until the throttle grip just con-

Hex

Screw

washer is positioned as shown

CAUTION!

Do not remove the D-shaped shim washer! The shim washer prevents damage from overtightening the tube clamp screw.

3.Add some moly-type EP grease to the splines on the end of the mainshaft.

4.Slide the outer tube into the tube clamp until the tube bottoms. If instal- lation is difficult, rotate the outer tube or mainshaft slightly until you feel the mainshaft splines engage with the powerhead.

tacts the tube clamp.

CAUTION!

Do not force the shaft tube into the powerhead! Excessive force can damage the shaft tube and

7. Tighten the clamp screw firmly.

Wrench

Shim Washer


Insert outer tube into


Tube


powerhead


Clamp


Main


Index


Shaft


Screw


Installation


Decal


Clamp

Shim


Screw

Outer


Washer


Tube


Throttle Cable and Ignition Leads

1.Unscrew the two throttle lever cover screws, and then separate the throt- tle control halves as shown.

2.Working from the powerhead, push the throttle cable through the pas- sageway in the base of the shaft tube grip.

3.Insert the throttle cable end into the molded receptacle in the throttle lever, and then lay the cable wire in the molded slot in the throttle body.

4.In the reverse order of removal, reas- semble the throttle body and cover on the shaft tube.

Cover

Cover


screw


Nut


Throttle

Unscrew and

cable


separate the


throttle control

Throttle

halves

assembly

Insert the throttle cable end into the molded receptacle

Throttle cable

Molded

receptacle

Connect ignition leads Ground lead (black wire)

5. Plug the red ignition lead from the

CAUTION!

shaft tube into the red lead from

Overtightening the throttle assembly

the powerhead, and then connect

screws can permanently damage

the black grounding wire to the

the plastic throttle components!

powerhead.


6

Nylon tube

Ignition lead (red

wire)

Page 6
Image 6
Shindaiwa X7502235300, PB270 manual Assembly, Prior to assembly, Connect the Outer Tube to the Powerhead

PB270, X7502235300 specifications

The Shindaiwa X7502235300, also known as the PB270, is a robust and versatile backpack blower tailored for both professional landscapers and homeowners seeking efficiency in outdoor maintenance. This model is engineered to handle a wide range of tasks, from clearing leaves and debris to maintaining garden aesthetics.

One of the standout features of the PB270 is its powerful engine, which boasts a displacement of 25.4cc. This 2-stroke engine is designed to deliver high performance with low emissions, making it both environmentally friendly and compliant with stringent regulations. The blower's exceptional fuel efficiency ensures longer operational times, allowing users to tackle larger areas without frequent refueling.

In addition to its impressive power, the PB270 is equipped with a lightweight design that significantly enhances user comfort during extended use. Weighing in at just over 10 pounds, it incorporates adjustable padded shoulder straps and a cushioned back panel, reducing fatigue and improving user experience. The ergonomic layout ensures that the weight is evenly distributed, enabling users to maneuver easily while navigating tight spaces.

The X7502235300 features a unique jet fan technology that generates a high-speed airflow of up to 150 miles per hour. This innovative design maximizes air volume and velocity, allowing users to effortlessly clear leaves, grass clippings, and debris from driveways, sidewalks, and gardens. The variable speed control further enhances versatility, letting users adjust the airflow to suit the specific task at hand.

Additionally, Shindaiwa emphasizes ease of use in the PB270 with its simplified starting system. The easy-start technology minimizes rope resistance, ensuring quick and reliable starts even in cold conditions. Maintenance is user-friendly as well, featuring a tool-less air filter access and a removable spark plug for quick servicing.

Durability is another significant characteristic of the PB270. It is constructed with high-quality materials designed to withstand harsh outdoor conditions, ensuring longevity and dependable performance. The product is backed by Shindaiwa's reputation for excellence, making it a trusted choice for those seeking a reliable backpack blower.

In summary, the Shindaiwa X7502235300, PB270 brings together power, efficiency, and user-friendly features in a compact design. With its potent engine, innovative technology, and ergonomic considerations, it stands as an excellent option for both professional landscapers and homeowners looking to maintain their outdoor spaces effectively.