Display/Setting ( continued )

Switch setting

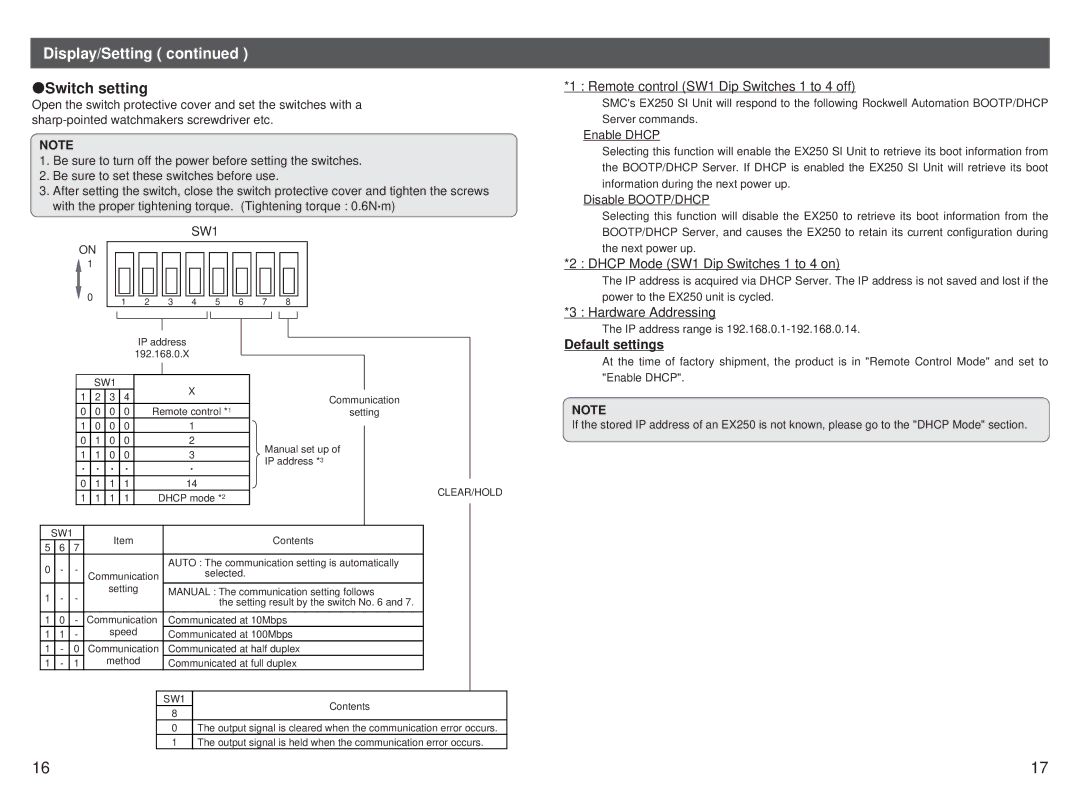
Open the switch protective cover and set the switches with a sharp-pointed watchmakers screwdriver etc.

NOTE

1.Be sure to turn off the power before setting the switches.

2.Be sure to set these switches before use.

3.After setting the switch, close the switch protective cover and tighten the screws with the proper tightening torque. (Tightening torque : 0.6Nm)

SW1


ON


1


0


1


2


3


4


5


6

7

8


IP address


192.168.0.X


SW1


X


1


2

3

4


Communication


0


0

0

0


Remote control *1


setting


1


0

0

0


1


0


1

0

0


2


Manual set up of


1


1

0

0


3


IP address *3


0


1

1

1


14


CLEAR/HOLD


1


1

1

1


DHCP mode *2


SW1


Item


Contents


5


6


7


0


-


-


AUTO : The communication setting is automatically


Communication


selected.


1


-


-


setting


MANUAL : The communication setting follows


the setting result by the switch No. 6 and 7.


1


0


-


Communication


Communicated at 10Mbps


1


1


-


speed


Communicated at 100Mbps


1


-


0


Communication


Communicated at half duplex


1


-


1


method


Communicated at full duplex


SW1


Contents


8


0The output signal is cleared when the communication error occurs.

1The output signal is held when the communication error occurs.

*1 : Remote control (SW1 Dip Switches 1 to 4 off)

SMC's EX250 SI Unit will respond to the following Rockwell Automation BOOTP/DHCP Server commands.

Enable DHCP

Selecting this function will enable the EX250 SI Unit to retrieve its boot information from the BOOTP/DHCP Server. If DHCP is enabled the EX250 SI Unit will retrieve its boot information during the next power up.

Disable BOOTP/DHCP

Selecting this function will disable the EX250 to retrieve its boot information from the BOOTP/DHCP Server, and causes the EX250 to retain its current configuration during the next power up.

*2 : DHCP Mode (SW1 Dip Switches 1 to 4 on)

The IP address is acquired via DHCP Server. The IP address is not saved and lost if the power to the EX250 unit is cycled.

*3 : Hardware Addressing

The IP address range is 192.168.0.1-192.168.0.14.

Default settings

At the time of factory shipment, the product is in "Remote Control Mode" and set to "Enable DHCP".

NOTE

If the stored IP address of an EX250 is not known, please go to the "DHCP Mode" section.

16

17

Page 10
Image 10
Sierra Monitor Corporation EX250-SEN1 instruction manual Display/Setting, Switch setting, Default settings

EX250-SEN1 specifications

Sierra Monitor Corporation's EX250-SEN1 is a next-generation environmental monitoring solution designed to enhance the safety and efficiency of industrial operations. This advanced device excels in its core functionality, providing real-time monitoring and management of gas emissions and other environmental factors.

One of the main features of the EX250-SEN1 is its ability to detect a wide range of hazardous gases, including combustible gases, toxic gases, and oxygen levels. This capability is crucial in industries such as oil and gas, manufacturing, and wastewater treatment, where gas leaks can pose serious safety risks. The device ensures compliance with safety regulations by providing operators with timely alerts and notifications of any hazardous conditions.

The EX250-SEN1 utilizes advanced sensor technology that offers high precision and reliability. Its sensors are capable of rapid response times, allowing for quick detection and intervention in case of gas leaks. Moreover, the sensors have a long lifespan and minimal drift, which reduces the need for frequent recalibration, thereby lowering maintenance costs and downtime.

Another significant technology feature of the EX250-SEN1 is its integrated communication capabilities. It can seamlessly connect with existing industrial control systems and networks, including Modbus, Ethernet, and wireless communication protocols. This connectivity allows for real-time data sharing and integration into broader monitoring systems, enabling operators to analyze trends and make informed decisions.

The EX250-SEN1's user-friendly interface further enhances its usability. It includes a clear display that provides immediate access to key performance indicators and gas concentration levels. Operators can easily navigate through various settings and configurations, making adjustments as needed without extensive training.

Additionally, the device is designed with ruggedness and durability in mind. Built to withstand harsh industrial environments, the EX250-SEN1 is resistant to dust, moisture, and extreme temperatures. This resilience ensures reliable performance in the field, reducing the risk of false readings due to environmental factors.

In summary, the Sierra Monitor Corporation EX250-SEN1 is a cutting-edge environmental monitoring device that combines advanced sensor technology, robust communication capabilities, and user-friendly design. Its comprehensive features make it an ideal solution for industries that require vigilant monitoring of environmental safety, promoting a culture of safety and compliance.