HT3000E
Table 6
|
|
|
|
| )NPUTS |
|
|
| !DJUSTMENTS | Video | RGBS15kHz YCrCb15kHz | RGBS | YCrCb | RGBGrafico | |
|
|
|
|
|
|
| |
| Position |
|
|
|
|
| - |
| Aspect |
|
|
|
|
|
|
| Frequency | - | - |
|
|
| - |
| Phase | - | - |
|
|
| - |
| Colour Temperature |
|
|
|
|
|
|
| Gamma Correction |
|
|
|
|
|
|
| Overscan |
|
|
|
|
|
|
| Y/C Delay |
|
| - | - | - | - |
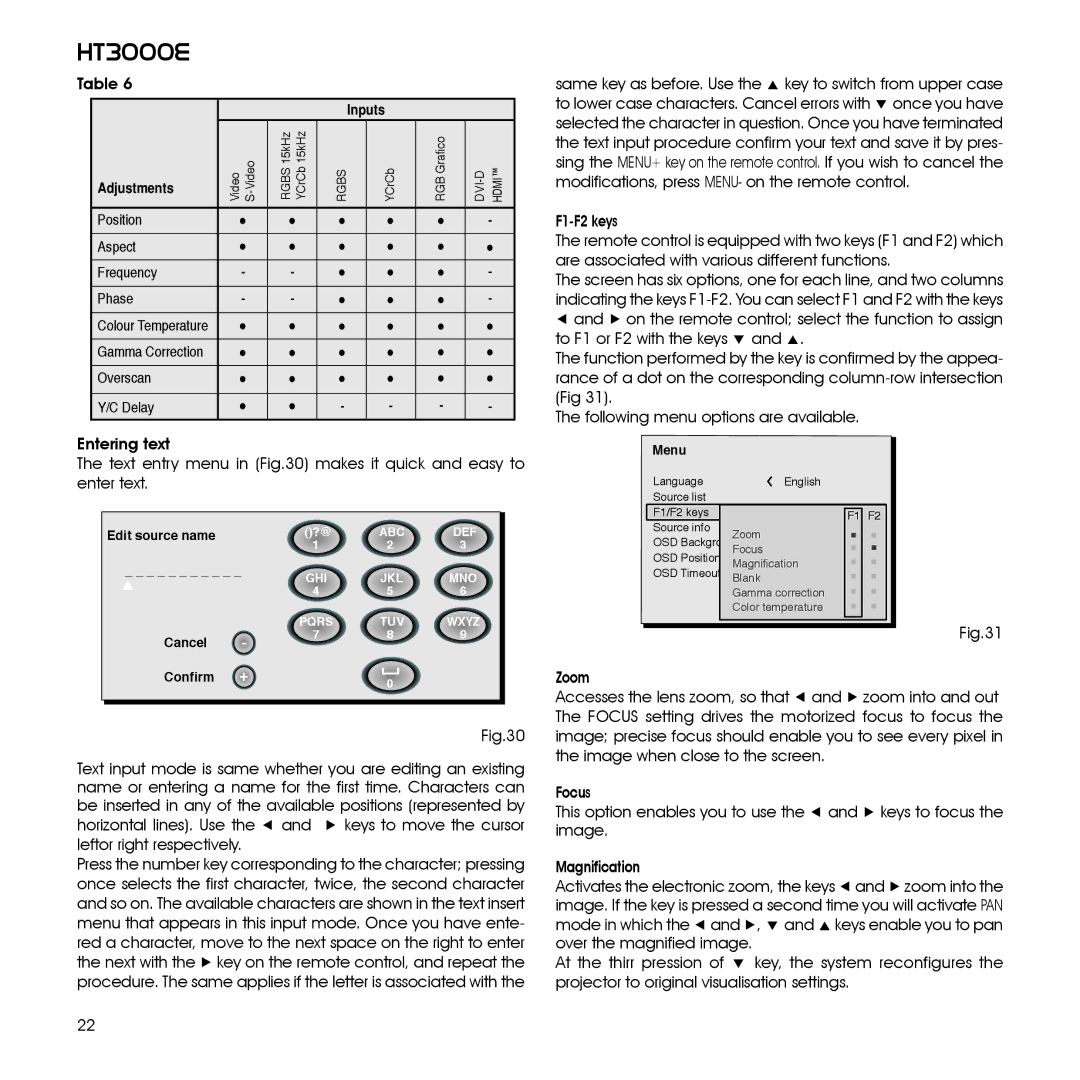
Entering text
The text entry menu in (Fig.30) makes it quick and easy to enter text.
Edit source name |
| ()?@ | ABC | DEF |
|
| 1 | 2 | 3 |
_ _ _ _ _ _ _ _ _ _ _ | GHI | JKL | MNO | |
|
| 4 | 5 | 6 |
|
| PQRS | TUV | WXYZ |
Cancel | - | 7 | 8 | 9 |
|
|
| ||
Confirm | + |
| 0 |
|
|
|
|
|
|
Fig.30
Text input mode is same whether you are editing an existing name or entering a name for the first time. Characters can be inserted in any of the available positions (represented by
horizontal lines). Use the ◀ and ▶ keys to move the cursor leftor right respectively.
Press the number key corresponding to the character; pressing once selects the first character, twice, the second character and so on. The available characters are shown in the text insert menu that appears in this input mode. Once you have ente- red a character, move to the next space on the right to enter the next with the ▶ key on the remote control, and repeat the procedure. The same applies if the letter is associated with the
same key as before. Use the ▲ key to switch from upper case to lower case characters. Cancel errors with ▼ once you have selected the character in question. Once you have terminated the text input procedure confirm your text and save it by pres- sing the MENU+ key on the remote control. If you wish to cancel the modifications, press MENU- on the remote control.
The remote control is equipped with two keys (F1 and F2) which are associated with various different functions.
The screen has six options, one for each line, and two columns indicating the keys
◀and ▶ on the remote control; select the function to assign to F1 or F2 with the keys ▼ and ▲.
The function performed by the key is confirmed by the appea- rance of a dot on the corresponding
The following menu options are available.
Menu
Language | English | ||||
Source list |
|
|
| ||
F1/F2 keys |
|
|
| F1 | F2 |
Source info |
|
| Zoom |
|
|
OSD Backgroung |
|
| |||
OSD Position | Focus |
|
| ||
Magnification |
|
| |||
OSD Timeout | Blank |
|
| ||
|
|
| Gamma correction |
|
|
|
|
| Color temperature |
|
|
|
|
|
|
|
|
Fig.31
Zoom
Accesses the lens zoom, so that ◀ and ▶ zoom into and out The FOCUS setting drives the motorized focus to focus the image; precise focus should enable you to see every pixel in the image when close to the screen.
Focus
This option enables you to use the ◀ and ▶ keys to focus the image.
Magnification
Activates the electronic zoom, the keys ◀ and ▶ zoom into the image. If the key is pressed a second time you will activate PAN mode in which the ◀ and ▶, ▼ and ▲ keys enable you to pan over the magnified image.
At the thirr pression of ▼ key, the system reconfigures the projector to original visualisation settings.
22
