Manuals
/
Sim2 Multimedia
/
Home Audio
/
Home Theater System
Sim2 Multimedia
HT300 XTRA-H
installation manual
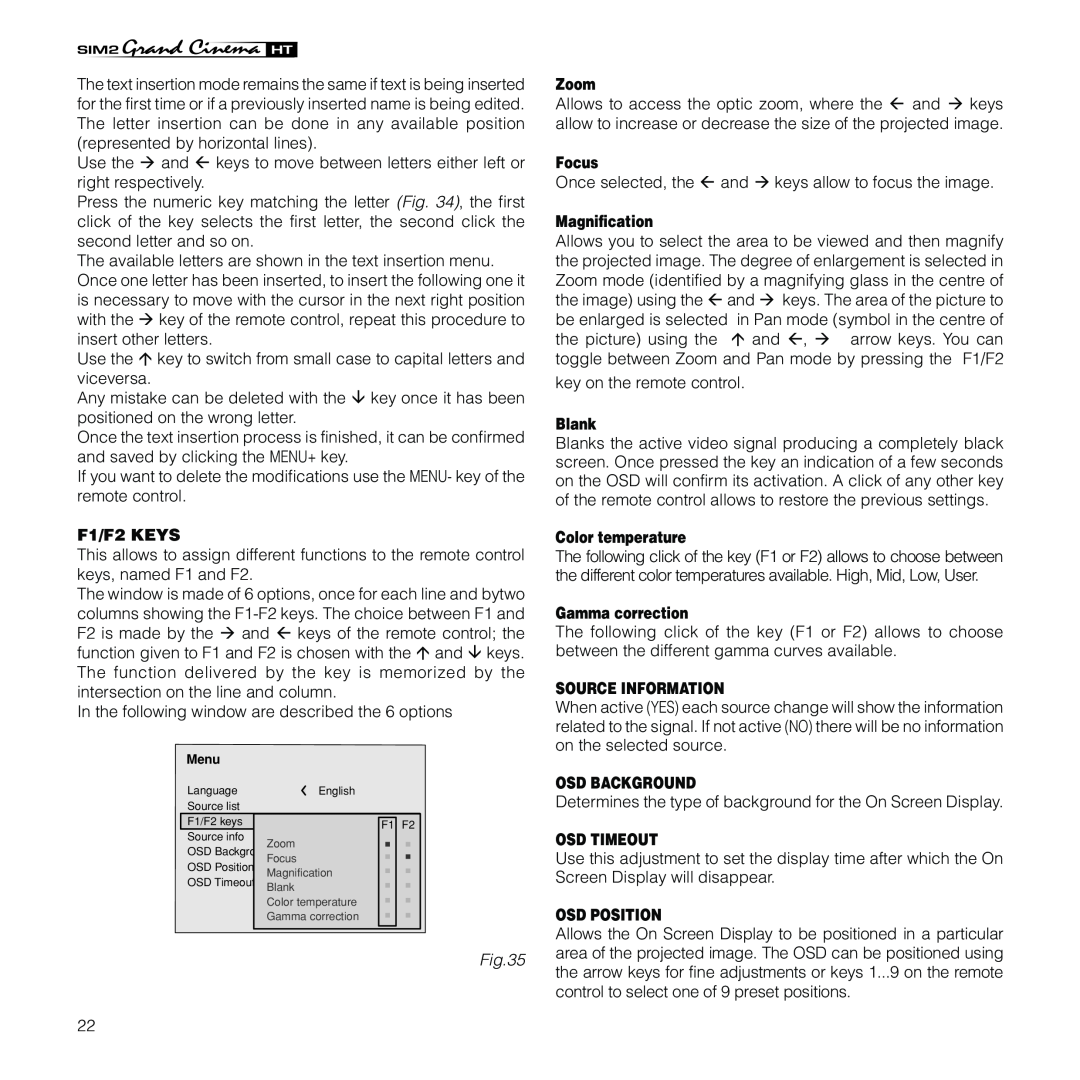
F1/F2 KEYS
Models:
HT300 XTRA-H
1
24
40
40
Download
40 pages
24.23 Kb
21
22
23
24
25
26
27
28
Troubleshooting
Specification
Install
No Signal
Led Indicators
Dimension
Optional Accessories
Setup
RS232 INTERFACE CONNECTOR
Frequency/Phase
Page 24
Image 24
Page 23
Page 25
Page 24
Image 24
Page 23
Page 25
Contents
User and Installation Manual The home theater projector
HT 300XTRA-H HT
BACK LIGHT
1 INTRODUCTION
SIM2 carries out comprehensive functional testing in order to guarantee the maximum product quality. For this reason, when you start using the product lamp operating hours may already be at between 30 and
1 Projection lens 2 Lens shift knob 3 Cooling air inlet vents
2 IMPORTANT SAFETY INSTRUCTIONS
Refer to trained, authorised personnel for technical assistance
Do not use the projector when the room temperature is above 35C 95F
3 PACKAGING AND CONTENTS
4 INSTALLATION
ZOOM FOCUS
For rear projection the screen must be translucent
5 SWITCHING ON AND OFF THE PROJECTOR
SWITCH ON FROM STAND-BY
6 CONNECTIONS
SWITCHING OFF AND RETURNING TO STAND-BY
LED INDICATORS
COMPOSITE VIDEO INPUT
S-VIDEO INPUT
VGA INPUT
RGB/YCRCB INPUT
Fig. 21b
HDMI
MOTORISED PROJECTION SCREEN OUTPUT
7 KEYBOARD PAD
RS232 INTERFACE CONNECTOR
Up/Down/Left/Right arrow keys
Menu
8 REMOTE CONTROL
four
batteries
9 ON SCREEN MENU
SOURCE SELECTION
Fig. 26a
MAIN MENU
PICTURE
Fig. 28a
Fig. 28b
BRIGHTNESS
TABLE 1INPUT SIGNALS AND ADJUSTABLE/SETTING ITEMS
CINEMA MODE
VIDEO TYPE
NOISE REDUCTION
IMAGE
ASPECT
COLOR TEMPERATURE
GAMMA CORRECTION
FREQUENCY/PHASE
TABLE 2 INPUT SIGNALS AND ADJUSTABLE/SETTING ITEMS
Y / C DELAY
SETUP
ORIENTATION
HORIZONTAL/VERTICAL KEYSTONE
LENS
POWER ON
FACTORY DEFAULTS
TEST PATTERNS
MENU LANGUAGE
F1/F2 KEYS
Fig.36
MEMORIES
Image
Picture
10 CLEANING AND MAINTENANCE
No Signal
Cleaning the projector’s cover
Cleaning the lens
11 TROUBLESHOOTING GUIDE
No power Green and red LED are OFF
the Image Adjustments menu
The lamp is not coming on
12 OPTIONAL ACCESSORIES
A TECHNICAL SPECIFICATIONS
OPTICAL HT
OPTICAL HT 300 XTRA-H
ELECTRICAL
GENERAL
ENVIROMENTAL
CVBS on RCA/Phono type connector
B DIMENSIONS
C PROJECTION DISTANCES
Fig.37a
unit mm inches
16/9
16/9
D ON SCREEN MENU LAYOUT Picture
Image
YCrCb
Video S-Video
Setup
Menu
VIDEO
S-VIDEO
Memories
Save current settings Save initial settings Rename
0 Auto
1 S MEMORY 2 S MEMORY 3 S MEMORY
INDEX
Phone +39.434.383.253-256 Fax +39.434.383260-261
Top
Page
Image
Contents