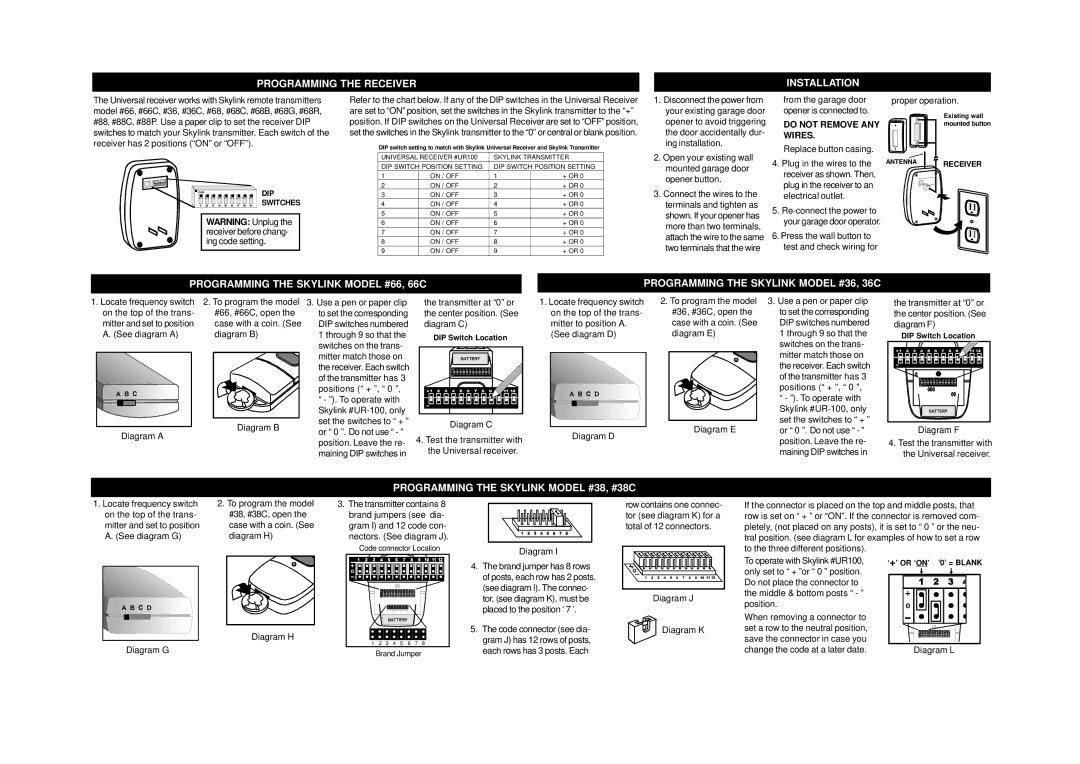
PROGRAMMING THE RECEIVER

INSTALLATION

The Universal receiver works with Skylink remote transmitters

Refer to the chart below. If any of the DIP switches in the Universal Receiver

model #66, #66C, #36, #36C, #68, #68C, #68B, #68G, #68R,

are set to “ON” position, set the switches in the Skylink transmitter to the “+”

#88, #88C, #88P. Use a paper clip to set the receiver DIP

position. If DIP switches on the Universal Receiver are set to “OFF” position,

switches to match your Skylink transmitter. Each switch of the

set the switches in the Skylink transmitter to the “0” or central or blank position.

receiver has 2 positions (“ON” or “OFF”).

DIP switch setting to match with Skylink Universal Receiver and Skylink Transmitter


1. Disconnect the power from

your existing garage door

opener to avoid triggering

the door accidentally dur-

ing installation.

from the garage door opener is connected to.

DO NOT REMOVE ANY WIRES.

Replace button casing.

proper operation.

Existing wall mounted button

DIP

SWITCHES

WARNING: Unplug the receiver before chang- ing code setting.

UNIVERSAL RECEIVER #UR100

SKYLINK TRANSMITTER

DIP SWITCH POSITION SETTING

DIP SWITCH POSITION SETTING

1

ON / OFF

1

+ OR 0

2

ON / OFF

2

+ OR 0

3

ON / OFF

3

+ OR 0

4

ON / OFF

4

+ OR 0

5

ON / OFF

5

+ OR 0

6

ON / OFF

6

+ OR 0

7

ON / OFF

7

+ OR 0

8

ON / OFF

8

+ OR 0

9

ON / OFF

9

+ OR 0

2. Open your existing wall

mounted garage door

opener button.

3. Connect the wires to the

terminals and tighten as

shown. If your opener has

more than two terminals,

attach the wire to the same

two terminals that the wire

4.Plug in the wires to the receiver as shown. Then, plug in the receiver to an electrical outlet.

5.Re-connect the power to your garage door operator.

6.Press the wall button to test and check wiring for

ANTENNA RECEIVER

PROGRAMMING THE SKYLINK MODEL #66, 66C

PROGRAMMING THE SKYLINK MODEL #36, 36C

1.Locate frequency switch on the top of the trans- mitter and set to position A. (See diagram A)

Diagram A

2.To program the model #66, #66C, open the case with a coin. (See diagram B)

Diagram B

3.Use a pen or paper clip to set the corresponding DIP switches numbered 1 through 9 so that the switches on the trans- mitter match those on the receiver. Each switch of the transmitter has 3 positions (“ + ”, “ 0 ”, “ - ”). To operate with Skylink #UR-100, only set the switches to “ + ” or “ 0 ”. Do not use “ - ” position. Leave the re- maining DIP switches in

the transmitter at “0” or the center position. (See diagram C)

DIP Switch Location

Diagram C

4.Test the transmitter with the Universal receiver.

1.Locate frequency switch on the top of the trans- mitter to position A.

(See diagram D)

Diagram D

2.To program the model #36, #36C, open the case with a coin. (See diagram E)

Diagram E

3.Use a pen or paper clip to set the corresponding DIP switches numbered 1 through 9 so that the switches on the trans- mitter match those on the receiver. Each switch of the transmitter has 3 positions (“ + ”, “ 0 ”, “ - ”). To operate with Skylink #UR-100, only set the switches to “ + ” or “ 0 ”. Do not use “ - ” position. Leave the re- maining DIP switches in

the transmitter at “0” or the center position. (See diagram F)

DIP Switch Location

Diagram F

4.Test the transmitter with the Universal receiver.

PROGRAMMING THE SKYLINK MODEL #38, #38C

1. Locate frequency switch

2. To program the model

on the top of the trans-

#38, #38C, open the

mitter and set to position

case with a coin. (See

A. (See diagram G)

diagram H)

3.The transmitter contains 8 brand jumpers (see dia- gram I) and 12 code con- nectors. (See diagram J).

Code connector Location

Diagram I

row contains one connec- tor (see diagram K) for a total of 12 connectors.

If the connector is placed on the top and middle posts, that row is set on “ + ” or “ON”. If the connector is removed com- pletely, (not placed on any posts), it is set to “ 0 ” or the neu- tral position. (see diagram L for examples of how to set a row to the three different positions).

Diagram H

Diagram G

1 2 3 4 5 6 7 8

Brand Jumper

4.The brand jumper has 8 rows of posts, each row has 2 posts. (see diagram I). The connec- tor, (see diagram K), must be placed to the position ‘ 7 ’.

5.The code connector (see dia- gram J) has 12 rows of posts, each rows has 3 posts. Each

Diagram J

Diagram K

To operate with Skylink #UR100, only set to “ + ”or “ 0 ” position. Do not place the connector to the middle & bottom posts “ - ” position.

When removing a connector to set a row to the neutral position, save the connector in case you change the code at a later date.

+’ OR ‘ON’ ‘0’ = BLANK

Diagram L

Page 1
Image 1
SkyLink Model UR-100 manual Programming the Receiver Installation, Programming the Skylink Model #38, #38C

Model UR-100 specifications

The SkyLink Model UR-100 is an advanced aerial drone designed for both commercial and recreational use. Blending cutting-edge technology with user-friendly features, the UR-100 is crafted to enhance aerial imaging, surveillance, and logistical support across a variety of industries.

One of the standout features of the UR-100 is its impressive flight range. With a maximum operational distance of up to 10 kilometers, users can explore expansive areas with ease. This feature is particularly beneficial for agricultural assessment, infrastructure inspection, and even search-and-rescue missions, where long-range capabilities can make a significant difference.

The drone is equipped with a high-definition 4K camera that enables users to capture stunning aerial imagery and 1080p video. Its gimbal stabilization system ensures smooth footage, even in windy conditions. Photographers and videographers can take advantage of various shooting modes, including time-lapse and burst photography, enhancing creativity and versatility in capturing visual content.

For enhanced battery life, the UR-100 integrates a powerful lithium-polymer battery, providing up to 30 minutes of flight time per charge. This allows for extended aerial sessions without the constant need for recharging. The drone’s intelligent battery management system optimizes power consumption, ensuring safety and longevity.

The UR-100 also comes with advanced GPS and an automated flight path functionality. Users can pre-program routes and manage waypoints using an intuitive mobile app. This feature not only streamlines the flight operation but also enables autonomous flights, allowing operators to multitask or focus on capturing content.

Safety is paramount with the UR-100, featuring obstacle avoidance sensors to detect and prevent collisions during flight. Additionally, the drone is designed with a return-to-home feature, ensuring it safely returns to its launch point in case of low battery or signal loss.

In terms of construction, the UR-100 is lightweight yet robust, utilizing high-quality materials that withstand environmental challenges. Its compact design makes it portable, appealing to users who travel frequently or require on-the-go operations.

Overall, the SkyLink Model UR-100 stands out as a versatile drone that meets the needs of both professionals and hobbyists. With its blend of advanced technology, impressive features, and user-friendly operation, it’s a reliable choice for anyone looking to enhance their aerial capabilities.